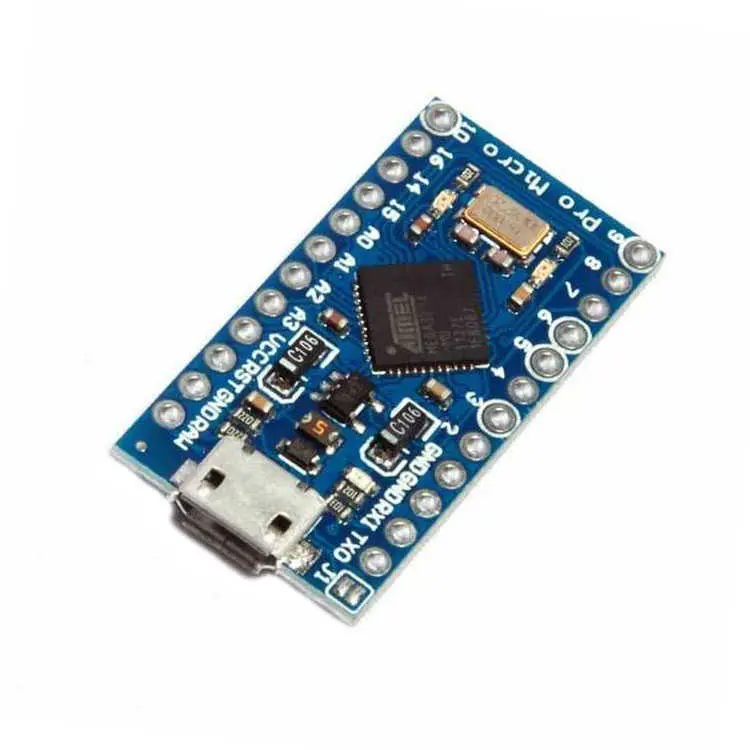
Features
| Specification | Details |
|---|---|
| Microcontroller | ATmega32U4 |
| Operating Voltage | 5V |
| Input Voltage | 5–12V (5V to VCC, >5V to RAW) |
| Clock Speed | 16 MHz |
| Analog Input Pins | 9 (10-bit resolution) |
| Digital I/O Pins | 18 |
| PWM Pins | 5 |
| UART (Serial) | RX/TX |
| Flash Memory | 32 KB |
| SRAM | 2.5 KB |
| USB | Micro USB (native USB support) |
| LED on Pin 13 | Not available |
| Onboard Voltage Regulator | Yes (5V) |
Description
The Pro Micro is a miniaturized version of the Leonardo, powered by the ATmega32U4 MCU with native USB support. It’s ideal for USB HID applications like custom keyboards, mice, or game controllers. With 9 analog inputs, 18 digital I/O pins, and built-in USB support, it eliminates the need for external programmers.
Principle of Work
Arduino boards were introduced to simplify electronics prototyping for non-engineers. The Pro Micro follows Arduino’s open-source model, supporting both free hardware and free software principles.
With native USB, the Pro Micro communicates directly with a computer. Using the Arduino IDE, users can write and upload sketches over USB without external programmers. The IDE also provides serial monitoring and debugging capabilities.
Pinout of the Module
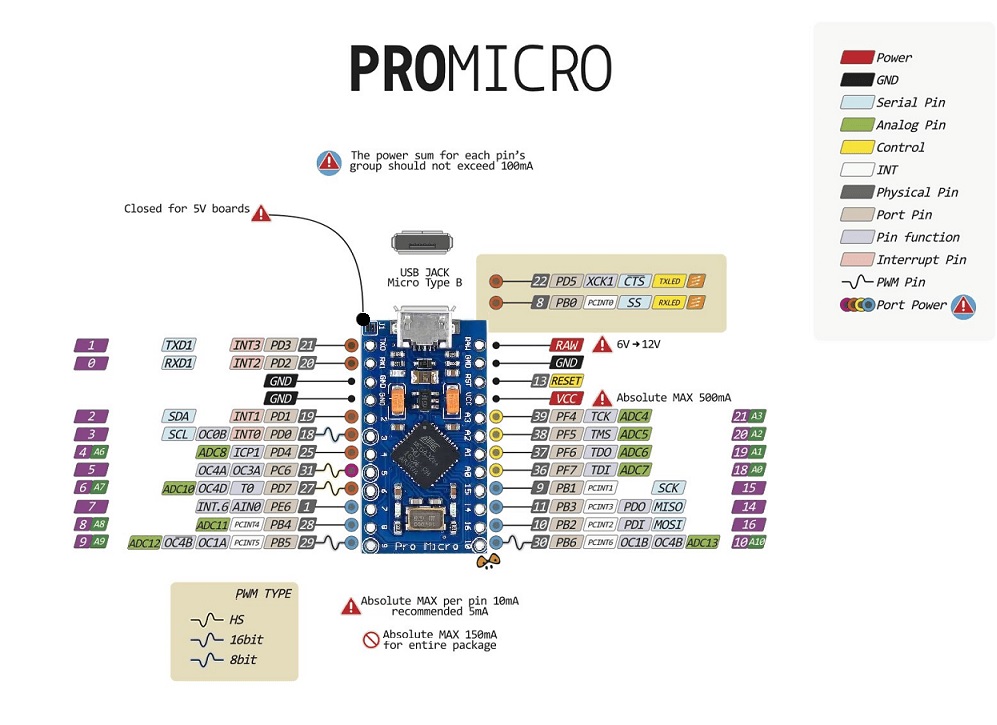
Pin Details
Digital I/O Pins:
-
18 pins for input/output.
-
States: HIGH (5V), LOW (0V).
Analog Input Pins:
-
9 channels of 10-bit ADC.
-
Accepts variable voltage input.
PWM Pins:
-
5 PWM channels.
-
Simulates analog output using digital modulation.
UART (Serial):
-
RX and TX pins for serial communication.
SPI:
-
MOSI, MISO, SCK for interfacing with peripherals.
I2C:
-
SDA (data) and SCL (clock) for two-wire communication.
Power Pins
| Pin | Description |
|---|---|
| RAW | Unregulated voltage input (up to 12V) |
| VCC | Regulated 5V output/input |
| RST | Active-low reset pin |
| GND | Ground |
Applications
-
USB HID (Keyboard/Mouse)
-
IoT Systems
-
Embedded Devices
-
Serial Communication Interfaces
-
USB Game Controllers
-
PC Lock/Unlock Tools
-
Water Level Meters
-
Custom USB Interfaces
Circuit
No external circuit is needed for basic testing. Use the built-in serial interface to test communication.
Getting Started
1. Open Arduino IDE:
-
Download from the official Arduino website.
2. Connect the Board:
-
Use a micro USB data cable.
3. Select Board:
-
Go to Tools > Board, choose Arduino Leonardo or Arduino Micro.
4. Select Port:
-
Go to Tools > Port, select the correct COM port.
5. Upload Sketch:
-
Use the Upload button in Arduino IDE.
-
Monitor output via the Serial Monitor.
Example Code
void setup() {
  Serial.begin(9600);
  while (!Serial) {
    ; // wait for serial port to connect
  }
  Serial.println("ASCII Table ~ Character Map");
}

int thisByte = 33;

void loop() {
  Serial.write(thisByte);
  Serial.print(", dec: ");
  Serial.print(thisByte);
  Serial.print(", hex: ");
  Serial.print(thisByte, HEX);
  Serial.print(", oct: ");
  Serial.print(thisByte, OCT);
  Serial.print(", bin: ");
  Serial.println(thisByte, BIN);

  if (thisByte == 126) {
    while (true) { continue; }
  }
  thisByte++;
}
Technical Details
| Parameter | Value |
|---|---|
| CPU | 8-bit |
| Microcontroller | ATmega32U4 |
| Operating Voltage | 5V |
| Max Input Voltage | 12V |
| Weight | ~6g |
| Dimensions | 3.4cm × 1.8cm |
Resources
Comparisons
| Feature | Arduino Pro Micro | Arduino Micro | Leonardo | UNO |
|---|---|---|---|---|
| USB Interface | Native | Native | Native | Via external chip |
| Reset Button | No | Yes | Yes | Yes |
| ICSP Header | No | Yes | Yes | Yes |
| Size | Smaller | Medium | Medium | Large |
| Pin 13 LED | No | Yes | Yes | Yes |
| Startup Serial Delay | Yes | Yes | Yes | No |
The Pro Micro’s compact design and built-in USB make it ideal for portable and embedded USB applications, though it lacks some features like a reset button or ICSP header.
Features
| Specification | Details |
|---|---|
| Microcontroller | ATmega32U4 |
| Operating Voltage | 5V |
| Input Voltage | 5–12V (5V to VCC, >5V to RAW) |
| Clock Speed | 16 MHz |
| Analog Input Pins | 9 (10-bit resolution) |
| Digital I/O Pins | 18 |
| PWM Pins | 5 |
| UART (Serial) | RX/TX |
| Flash Memory | 32 KB |
| SRAM | 2.5 KB |
| USB | Micro USB (native USB support) |
| LED on Pin 13 | Not available |
| Onboard Voltage Regulator | Yes (5V) |
Description
The Pro Micro is a miniaturized version of the Leonardo, powered by the ATmega32U4 MCU with native USB support. It’s ideal for USB HID applications like custom keyboards, mice, or game controllers. With 9 analog inputs, 18 digital I/O pins, and built-in USB support, it eliminates the need for external programmers.
Principle of Work
Arduino boards were introduced to simplify electronics prototyping for non-engineers. The Pro Micro follows Arduino’s open-source model, supporting both free hardware and free software principles.
With native USB, the Pro Micro communicates directly with a computer. Using the Arduino IDE, users can write and upload sketches over USB without external programmers. The IDE also provides serial monitoring and debugging capabilities.
Pinout of the Module
Pin Details
Digital I/O Pins:
-
18 pins for input/output.
-
States: HIGH (5V), LOW (0V).
Analog Input Pins:
-
9 channels of 10-bit ADC.
-
Accepts variable voltage input.
PWM Pins:
-
5 PWM channels.
-
Simulates analog output using digital modulation.
UART (Serial):
-
RX and TX pins for serial communication.
SPI:
-
MOSI, MISO, SCK for interfacing with peripherals.
I2C:
-
SDA (data) and SCL (clock) for two-wire communication.
Power Pins
| Pin | Description |
|---|---|
| RAW | Unregulated voltage input (up to 12V) |
| VCC | Regulated 5V output/input |
| RST | Active-low reset pin |
| GND | Ground |
Applications
-
USB HID (Keyboard/Mouse)
-
IoT Systems
-
Embedded Devices
-
Serial Communication Interfaces
-
USB Game Controllers
-
PC Lock/Unlock Tools
-
Water Level Meters
-
Custom USB Interfaces
Circuit
No external circuit is needed for basic testing. Use the built-in serial interface to test communication.
Getting Started
1. Open Arduino IDE:
-
Download from the official Arduino website.
2. Connect the Board:
-
Use a micro USB data cable.
3. Select Board:
-
Go to Tools > Board, choose Arduino Leonardo or Arduino Micro.
4. Select Port:
-
Go to Tools > Port, select the correct COM port.
5. Upload Sketch:
-
Use the Upload button in Arduino IDE.
-
Monitor output via the Serial Monitor.
Example Code
void setup() {
  Serial.begin(9600);
  while (!Serial) {
    ; // wait for serial port to connect
  }
  Serial.println("ASCII Table ~ Character Map");
}

int thisByte = 33;

void loop() {
  Serial.write(thisByte);
  Serial.print(", dec: ");
  Serial.print(thisByte);
  Serial.print(", hex: ");
  Serial.print(thisByte, HEX);
  Serial.print(", oct: ");
  Serial.print(thisByte, OCT);
  Serial.print(", bin: ");
  Serial.println(thisByte, BIN);

  if (thisByte == 126) {
    while (true) { continue; }
  }
  thisByte++;
}
Technical Details
| Parameter | Value |
|---|---|
| CPU | 8-bit |
| Microcontroller | ATmega32U4 |
| Operating Voltage | 5V |
| Max Input Voltage | 12V |
| Weight | ~6g |
| Dimensions | 3.4cm × 1.8cm |
Resources
Comparisons
| Feature | Arduino Pro Micro | Arduino Micro | Leonardo | UNO |
|---|---|---|---|---|
| USB Interface | Native | Native | Native | Via external chip |
| Reset Button | No | Yes | Yes | Yes |
| ICSP Header | No | Yes | Yes | Yes |
| Size | Smaller | Medium | Medium | Large |
| Pin 13 LED | No | Yes | Yes | Yes |
| Startup Serial Delay | Yes | Yes | Yes | No |
The Pro Micro’s compact design and built-in USB make it ideal for portable and embedded USB applications, though it lacks some features like a reset button or ICSP header.