Features:
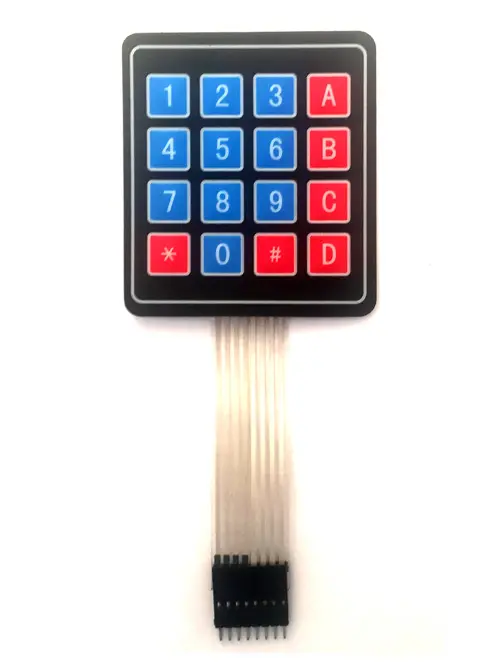
- Extended Key Count: 4x5 matrix design with a total of 20 keys for enhanced functionality.
- Compatibility: Works with Arduino, AVR, PIC, STM, and Raspberry Pi.
- Nine Outputs: Allows multiple key combinations and flexible interfacing.
- Arduino Integration: Easy to connect with existing Arduino libraries and setup procedures.
- Custom Key Mapping: Keys can be assigned specific functions in your Arduino code.
- Compact Design: Panel size is 75 x 85mm, and the total cable length is 18cm.
- Durable Build: Reliable for use in long-term or repeated projects.
Specifications:
- Panel Size: 75 x 85mm
- Length: 18cm
- Insulation Resistance: 100MΩ at 100V
- Withstand Voltage: 250V RMS (50–60Hz)
- Storage Temperature: +15°C to +35°C
- Storage Humidity: 70% – 90%
Connecting with Arduino:
- Install the required libraries: Keypad and I2C LCD.
- In Arduino IDE, go to Sketch > Include Library > Add .ZIP Library to add them.
- Use the sample code below to get started.
Example Arduino Code:
#include "Wire.h"
#include "LiquidCrystal_I2C.h"
#include "Keypad.h"

LiquidCrystal_I2C lcd(0x27, 20, 4);

const byte numRows = 5;
const byte numCols = 4;

char keymap[numRows][numCols] = {
  {'A','B','#','*'},
  {'1','2','3','U'},
  {'4','5','6','D'},
  {'7','8','9','C'},
  {'L','0','R','E'}
};

byte rowPins[numRows] = {10, 9, 8, 7, 6};
byte colPins[numCols] = {2, 3, 4, 5};

Keypad myKeypad = Keypad(makeKeymap(keymap), rowPins, colPins, numRows, numCols);
String numstr = "";

void setup() {
  lcd.init();
  lcd.backlight();
  lcd.print("start LCD2004");
  delay(1000);
  lcd.clear();
}

void loop() {
  lcd.setCursor(0, 0);
  lcd.print("S187:4x5 20 Keypad");
  char keypressed = myKeypad.getKey();

  if (keypressed != NO_KEY) {
    lcd.setCursor(0, 1);
    lcd.print("keypressed=" + (String)keypressed + " ");

    // Handle key logic here

    if (numstr != "") {
      lcd.setCursor(0, 2);
      lcd.print("numstr=" + numstr + " ");
    }
  }
}
Features:
- Extended Key Count: 4x5 matrix design with a total of 20 keys for enhanced functionality.
- Compatibility: Works with Arduino, AVR, PIC, STM, and Raspberry Pi.
- Nine Outputs: Allows multiple key combinations and flexible interfacing.
- Arduino Integration: Easy to connect with existing Arduino libraries and setup procedures.
- Custom Key Mapping: Keys can be assigned specific functions in your Arduino code.
- Compact Design: Panel size is 75 x 85mm, and the total cable length is 18cm.
- Durable Build: Reliable for use in long-term or repeated projects.
Specifications:
- Panel Size: 75 x 85mm
- Length: 18cm
- Insulation Resistance: 100MΩ at 100V
- Withstand Voltage: 250V RMS (50–60Hz)
- Storage Temperature: +15°C to +35°C
- Storage Humidity: 70% – 90%
Connecting with Arduino:
- Install the required libraries: Keypad and I2C LCD.
- In Arduino IDE, go to Sketch > Include Library > Add .ZIP Library to add them.
- Use the sample code below to get started.
Example Arduino Code:
#include "Wire.h"
#include "LiquidCrystal_I2C.h"
#include "Keypad.h"

LiquidCrystal_I2C lcd(0x27, 20, 4);

const byte numRows = 5;
const byte numCols = 4;

char keymap[numRows][numCols] = {
  {'A','B','#','*'},
  {'1','2','3','U'},
  {'4','5','6','D'},
  {'7','8','9','C'},
  {'L','0','R','E'}
};

byte rowPins[numRows] = {10, 9, 8, 7, 6};
byte colPins[numCols] = {2, 3, 4, 5};

Keypad myKeypad = Keypad(makeKeymap(keymap), rowPins, colPins, numRows, numCols);
String numstr = "";

void setup() {
  lcd.init();
  lcd.backlight();
  lcd.print("start LCD2004");
  delay(1000);
  lcd.clear();
}

void loop() {
  lcd.setCursor(0, 0);
  lcd.print("S187:4x5 20 Keypad");
  char keypressed = myKeypad.getKey();

  if (keypressed != NO_KEY) {
    lcd.setCursor(0, 1);
    lcd.print("keypressed=" + (String)keypressed + " ");

    // Handle key logic here

    if (numstr != "") {
      lcd.setCursor(0, 2);
      lcd.print("numstr=" + numstr + " ");
    }
  }
}