


Features:
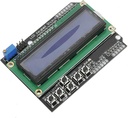
- 16x2 character LCD display: The module includes a 16x2 character LCD display that can display up to two lines of text with 16 characters per line.
- 6-button keypad: The module also includes a 6-button keypad with SELECT, LEFT, DOWN, UP, RIGHT, and RESET buttons for user input and control.
- Adjustable backlight: The module's backlight can be controlled using a potentiometer, allowing the brightness to be adjusted to suit the needs of the project.
- Direct mounting: The module is designed to be mounted directly on top of an Arduino board, making it easy to use and integrate with existing projects.
- LiquidCrystal library compatibility: The module is compatible with the LiquidCrystal library, a popular library for controlling LCD displays with Arduino, which makes it easy to use with existing Arduino code.
- Affordable: The LCD1602 module is a cost-effective solution for creating user interfaces and displaying data in Arduino projects.
Principle of Work:
The principle of operation for the LCD Display Keypad Shield Module Board (LCD1602) is relatively straightforward. The module connects to an Arduino board via the shield interface, which provides power and data connectivity between the two boards. Once connected, the module can be programmed using an Arduino sketch to display text on the LCD display and respond to user input from the keypad. The module's LCD display is driven by a driver chip (typically the HD44780 or a compatible chip), which provides a set of instructions for controlling the display. These instructions include commands for setting the cursor position, clearing the display, and displaying text on the screen. The Arduino sketch can use these commands to display information on the LCD display, such as sensor readings, menu options, or system status. The keypad on the module is connected to the Arduino board through a set of digital input pins, which can be used to detect when a button has been pressed. The Arduino sketch can read the state of these pins using digitalRead() commands and respond accordingly. For example, the sketch could use the keypad to navigate a menu, select options, or control the behavior of the project. The backlight on the LCD display is controlled using a potentiometer, which adjusts the voltage applied to the backlight LED. This allows the brightness of the display to be adjusted to suit the specific needs of the project.
Pinout of the Module:

LCD Display Pins:
- VSS: Ground
- VDD: +5V power supply
- VO: Contrast adjustment
- RS: Register and select
- RW: Read/write selection
- E: Enable signal
- D0-D7: Data pins
Keypad Pins:
- SELECT: Digital pin 0
- LEFT: Digital pin 1
- DOWN: Digital pin 2
- UP: Digital pin 3
- RIGHT: Digital pin 4
- RESET: Digital pin 5
Other Pins:
- LED+: Backlight anode (+)
- LED-: Backlight cathode (-)
Note that the pins on the shield are designed to be directly compatible with Arduino Uno and similar boards, but they may need to be adjusted or remapped if you are using a different type of board.
Applications:
- Home automation: The shield can be used to create a simple user interface for controlling lights, temperature, and other devices in a smart home system.
- Robotics: The shield can be used to provide a display and user input for a robot or other automated system.
- Education: The shield can be used in educational settings to teach programming concepts and create interactive projects.
- Gaming: The shield can be used to create simple games that use the LCD display and keypad for user input.
- Data logging: The shield can be used to display data from sensors or other sources, and to provide user input for setting up and controlling data logging operations.
- Prototyping: The shield can be used as a prototyping tool for quickly creating and testing user interfaces and control systems.
Circuit:
No circuit diagram is needed because you can just plug the shield onto the Arduino and wallah you can start programming.
Library:
The LiquidCrystal library is already included in Arduino IDE.
Code:
example code for the LCD Display Keypad Shield Module Board (LCD1602) that reads all the buttons on the shield and displays their status on the LCD display:
#include "LiquidCrystal.h"
LiquidCrystal lcd(8, 9, 4, 5, 6, 7); // initialize the library with the numbers of the interface pins
const int SELECT = 0;
const int LEFT = 1;
const int DOWN = 2;
const int UP = 3;
const int RIGHT = 4;
const int RESET = 5;
void setup() {
 lcd.begin(16, 2); // set up the LCD's number of columns and rows
 lcd.print("Button Test");
}
void loop() {
 lcd.setCursor(0, 1);
 lcd.print("SELECT: ");
 lcd.print(digitalRead(SELECT));
 lcd.setCursor(0, 2);
 lcd.print("LEFT: ");
 lcd.print(digitalRead(LEFT));
 lcd.setCursor(0, 3);
 lcd.print("DOWN: ");
 lcd.print(digitalRead(DOWN));
 lcd.setCursor(9, 1);
 lcd.print("UP: ");
 lcd.print(digitalRead(UP));
 lcd.setCursor(9, 2);
 lcd.print("RIGHT: ");
 lcd.print(digitalRead(RIGHT));
 lcd.setCursor(9, 3);
 lcd.print("RESET: ");
 lcd.print(digitalRead(RESET));
 delay(100); // wait a short time before updating the display
}
- the code initializes the LiquidCrystal library with the pins used to connect to the LCD display and defines constants for each of the buttons on the shield. In the
setup()function, it sets up the LCD display by calling thebegin()function and prints a title message on the display using theprint()function. - In the
loop()function, the code continuously updates the LCD display with the status of each button on the shield. It first sets the cursor position on the display using thesetCursor()function, and then prints a label for the button (such as "SELECT" or "LEFT") usingprint(). It then reads the status of the corresponding button using thedigitalRead()function, and prints the status (either 0 or
Technical Details:
- Input Voltage: 5V
- Model: HD4478X 1602 LCD
- Library: 4-Bit Arduino LCD Library
- The keypad interface uses only one ADC channel.
- Display: 16x2 character LCD display with backlight
- Keypad: 6 push buttons (SELECT, LEFT, DOWN, UP, RIGHT, RESET)
- Interface: 6-pin header for connection to Arduino or compatible microcontrollers
- Contrast: Can be adjusted using the onboard potentiometer
- Dimensions(mm):80.0(L)x56.6(W)x20.0(H)
Resources:
Features:
- 16x2 character LCD display: The module includes a 16x2 character LCD display that can display up to two lines of text with 16 characters per line.
- 6-button keypad: The module also includes a 6-button keypad with SELECT, LEFT, DOWN, UP, RIGHT, and RESET buttons for user input and control.
- Adjustable backlight: The module's backlight can be controlled using a potentiometer, allowing the brightness to be adjusted to suit the needs of the project.
- Direct mounting: The module is designed to be mounted directly on top of an Arduino board, making it easy to use and integrate with existing projects.
- LiquidCrystal library compatibility: The module is compatible with the LiquidCrystal library, a popular library for controlling LCD displays with Arduino, which makes it easy to use with existing Arduino code.
- Affordable: The LCD1602 module is a cost-effective solution for creating user interfaces and displaying data in Arduino projects.
Principle of Work:
The principle of operation for the LCD Display Keypad Shield Module Board (LCD1602) is relatively straightforward. The module connects to an Arduino board via the shield interface, which provides power and data connectivity between the two boards. Once connected, the module can be programmed using an Arduino sketch to display text on the LCD display and respond to user input from the keypad. The module's LCD display is driven by a driver chip (typically the HD44780 or a compatible chip), which provides a set of instructions for controlling the display. These instructions include commands for setting the cursor position, clearing the display, and displaying text on the screen. The Arduino sketch can use these commands to display information on the LCD display, such as sensor readings, menu options, or system status. The keypad on the module is connected to the Arduino board through a set of digital input pins, which can be used to detect when a button has been pressed. The Arduino sketch can read the state of these pins using digitalRead() commands and respond accordingly. For example, the sketch could use the keypad to navigate a menu, select options, or control the behavior of the project. The backlight on the LCD display is controlled using a potentiometer, which adjusts the voltage applied to the backlight LED. This allows the brightness of the display to be adjusted to suit the specific needs of the project.
Pinout of the Module:
LCD Display Pins:
- VSS: Ground
- VDD: +5V power supply
- VO: Contrast adjustment
- RS: Register and select
- RW: Read/write selection
- E: Enable signal
- D0-D7: Data pins
Keypad Pins:
- SELECT: Digital pin 0
- LEFT: Digital pin 1
- DOWN: Digital pin 2
- UP: Digital pin 3
- RIGHT: Digital pin 4
- RESET: Digital pin 5
Other Pins:
- LED+: Backlight anode (+)
- LED-: Backlight cathode (-)
Note that the pins on the shield are designed to be directly compatible with Arduino Uno and similar boards, but they may need to be adjusted or remapped if you are using a different type of board.
Applications:
- Home automation: The shield can be used to create a simple user interface for controlling lights, temperature, and other devices in a smart home system.
- Robotics: The shield can be used to provide a display and user input for a robot or other automated system.
- Education: The shield can be used in educational settings to teach programming concepts and create interactive projects.
- Gaming: The shield can be used to create simple games that use the LCD display and keypad for user input.
- Data logging: The shield can be used to display data from sensors or other sources, and to provide user input for setting up and controlling data logging operations.
- Prototyping: The shield can be used as a prototyping tool for quickly creating and testing user interfaces and control systems.
Circuit:
No circuit diagram is needed because you can just plug the shield onto the Arduino and wallah you can start programming.
Library:
The LiquidCrystal library is already included in Arduino IDE.
Code:
example code for the LCD Display Keypad Shield Module Board (LCD1602) that reads all the buttons on the shield and displays their status on the LCD display:
#include "LiquidCrystal.h"
LiquidCrystal lcd(8, 9, 4, 5, 6, 7); // initialize the library with the numbers of the interface pins
const int SELECT = 0;
const int LEFT = 1;
const int DOWN = 2;
const int UP = 3;
const int RIGHT = 4;
const int RESET = 5;
void setup() {
 lcd.begin(16, 2); // set up the LCD's number of columns and rows
 lcd.print("Button Test");
}
void loop() {
 lcd.setCursor(0, 1);
 lcd.print("SELECT: ");
 lcd.print(digitalRead(SELECT));
 lcd.setCursor(0, 2);
 lcd.print("LEFT: ");
 lcd.print(digitalRead(LEFT));
 lcd.setCursor(0, 3);
 lcd.print("DOWN: ");
 lcd.print(digitalRead(DOWN));
 lcd.setCursor(9, 1);
 lcd.print("UP: ");
 lcd.print(digitalRead(UP));
 lcd.setCursor(9, 2);
 lcd.print("RIGHT: ");
 lcd.print(digitalRead(RIGHT));
 lcd.setCursor(9, 3);
 lcd.print("RESET: ");
 lcd.print(digitalRead(RESET));
 delay(100); // wait a short time before updating the display
}
- the code initializes the LiquidCrystal library with the pins used to connect to the LCD display and defines constants for each of the buttons on the shield. In the
setup()function, it sets up the LCD display by calling thebegin()function and prints a title message on the display using theprint()function. - In the
loop()function, the code continuously updates the LCD display with the status of each button on the shield. It first sets the cursor position on the display using thesetCursor()function, and then prints a label for the button (such as "SELECT" or "LEFT") usingprint(). It then reads the status of the corresponding button using thedigitalRead()function, and prints the status (either 0 or
Technical Details:
- Input Voltage: 5V
- Model: HD4478X 1602 LCD
- Library: 4-Bit Arduino LCD Library
- The keypad interface uses only one ADC channel.
- Display: 16x2 character LCD display with backlight
- Keypad: 6 push buttons (SELECT, LEFT, DOWN, UP, RIGHT, RESET)
- Interface: 6-pin header for connection to Arduino or compatible microcontrollers
- Contrast: Can be adjusted using the onboard potentiometer
- Dimensions(mm):80.0(L)x56.6(W)x20.0(H)