- All products
- Development Boards
- Digispark
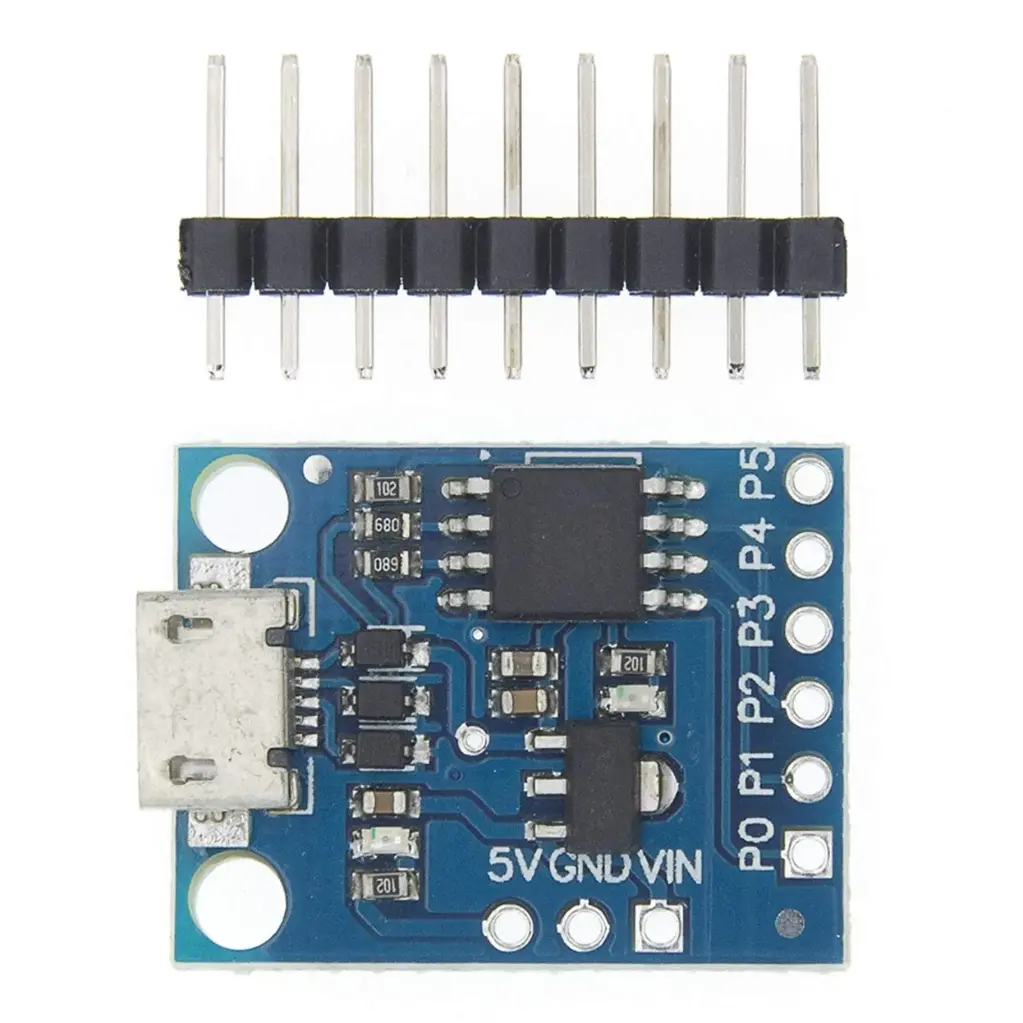
- Digispark ATtiny85 Blue
- Digispark
Features
-
Microcontroller: AVR ATtiny85 (8-bit)
-
Power Supply: 7–12V
-
Digital I/O Pins: 6
-
Analog I/O Pins: 4
-
Total I/O Pins: 6 (shared Digital + Analog)
-
Clock Speed: 16.5 MHz
-
SRAM: 512 bytes
-
EEPROM: 512 bytes
-
Flash Memory: 8KB (2KB used by bootloader, 6KB usable)
-
Communication: I2C, SPI
-
LEDs: Power LED and Status LED
-
Voltage Regulator: 5V output
Description
The Digispark is an Arduino-like development board based on the ATtiny85 microcontroller. It is smaller, less expensive, and slightly less powerful than a standard Arduino. It includes a built-in bootloader for USB connectivity and can be programmed using the Arduino IDE in C. Only 6KB of flash memory is available for programming due to the 2KB bootloader.
Principle of Work
Digispark is open-source hardware and software. Its design enables developers to build on the same ecosystem as Arduino using libraries and the Arduino IDE. With support for embedded USB functionality through the V-USB library, users can emulate USB devices without a hardware USB module.
Pinout
| Interface | Pins |
|---|---|
| GPIO | P0, P1, P2, P3, P4, P5 (6 GPIO) |
| SPI | MOSI (P0), MISO (P1), SCK (P2) |
| PWM | P0, P1, P3, P4 (4 PWM) |
| ADC | A1, A3, A4, A5 (4 ADC) |
| I2C | SDA (P0), SCL (P2) |
I/O Description
-
Digital I/O: 6 pins for digital input/output, with 4 PWM-capable pins.
-
Analog I/O: 4 analog inputs for sensors or other analog components.
-
SDA/SCL: I2C communication pins.
-
AREF: Analog reference voltage pin.
-
USB: Built-in USB interface using software USB via V-USB library.
-
Onboard LED: Controlled by digital pin 1.
-
Voltage Regulator: Converts 7–12V input to 5V output.
-
Power Pin (5V): Provides regulated 5V output.
-
VIN: Input for 7–12V external power.
-
Power LED: Indicates proper board power status.
Applications
-
Industrial control systems
-
Solar power systems
-
IoT projects
-
Power and charging systems
-
Weather monitoring
-
Wireless communication
-
Security systems
-
Medical equipment
-
Automotive electronics
Circuit
No external circuit is required for testing. The onboard LED on pin 1 is used for the following example.
Getting Started
1. Open Arduino IDE
Download the Arduino IDE if not already installed.
2. Connect the Board to Your Computer
Add Board Manager URL:
-
Open File → Preferences
-
Paste the URL:
http://digistump.com/package_digistump_index.json
(Separate multiple URLs with commas) -
Click OK
Install Digispark Board:
-
Go to Tools → Board → Boards Manager
-
Search for Digispark
-
Install Digistump AVR Boards
-
Click Close after installation
Install Windows Drivers:
-
Download Digistump.Drivers.zip
-
Extract and run
DPinst64.exe(64-bit) orDPinst.exe(32-bit) -
Install the drivers (allow unsigned drivers if prompted)
3. Select Board
-
Go to Tools → Board → Digispark (Default - 16.5MHz)
(No need to select Programmer or Port)
4. Upload a Sketch
-
Write or open a Digispark sketch
-
Click Upload
-
Then, plug in the Digispark board when prompted
Note: After uploading, there will be a 5-second delay before your code runs. This delay allows reprogramming attempts.
Example Code
void setup() {
  pinMode(1, OUTPUT); // Onboard LED connected to pin 1
}

void loop() {
  digitalWrite(1, HIGH);
  delay(200);
  digitalWrite(1, LOW);
  delay(200);
}
Technical Specifications
-
Microcontroller: ATtiny85
-
Clock Speed: 16.5 MHz
-
Operating Voltage: +5V
-
Input Voltage (recommended): 7–12V
-
Output Voltage: 5V
-
Digital I/O Pins: 6
-
Current per Pin: 20mA
-
USB Current: Up to 500mA
-
Low-Power Modes:
-
Active: 300μA @ 1.8V
-
Power Down: 0.1μA @ 1.8V
-
-
Temperature Range: -40°C to +105°C
-
Dimensions: 23 × 17.5 mm
Resources
Comparison
While the Digispark is less capable than an Arduino Uno, it can act as a USB device (keyboard, mouse, etc.) using the V-USB library, which emulates USB 1.1 without dedicated hardware. It's ideal for small projects but not recommended for beginners due to limited resources and driver complexity. An onboard LDO regulator enables 7–12V VIN power.