
Features
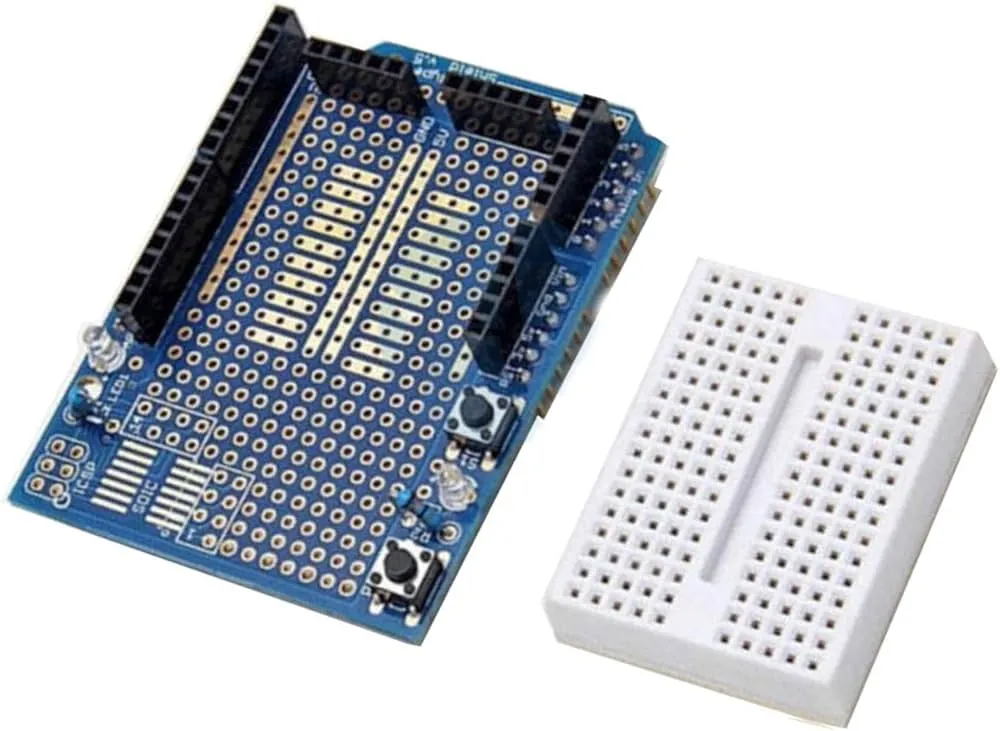
- Arduino UNO R3 Compatible: Uses the standard Arduino UNO R3 shield pin configuration for easy installation and access to the Arduino I/O pins.
- Mini Breadboard Included: Provides a solder-free area for quickly assembling and modifying prototype circuits.
- Easy Prototyping: Allows components such as resistors, LEDs, sensors, buttons, and integrated circuits to be connected without permanent soldering.
- Full Pin Access: Arduino UNO digital, analog, power, and control pins are routed to the shield for convenient connection of external components.
- Through-Hole Component Support: The prototyping area can be used to permanently install standard through-hole components.
- SMD Component Support: Provides a dedicated area for experimenting with surface-mount components.
- Built-In Reset Button: Allows the Arduino board to be reset directly from the Proto Shield.
- General-Purpose Push Button: An additional onboard button can be connected to an Arduino input for testing user-input applications.
- Two Onboard LED Circuits: Pre-wired LED circuits provide convenient indicators for testing digital outputs and simple Arduino programs.
- Compact Design: The shield and mini breadboard form a compact prototyping platform that fits directly on top of an Arduino UNO.
- Reusable Development Platform: Suitable for experimenting with circuits before transferring the final design to a custom PCB.
Principle of Operation
The Proto Shield does not contain a microcontroller or perform processing by itself. Instead, it acts as an interface and prototyping platform between an Arduino UNO and the electronic components used in a project. The shield is installed directly onto the Arduino UNO through its header connectors. The Arduino's digital and analog I/O pins, power connections, and ground connections are made available on the Proto Shield, allowing external components to be connected conveniently.

During the development stage, components can be placed on the included solderless breadboard. The breadboard allows components to be connected using jumper wires without soldering, making it easy to change the circuit while developing and debugging the project. Once the circuit has been tested, components can optionally be installed permanently in the prototyping area. The available prototyping space supports both through-hole and suitable SMD components, allowing the shield to be used for more permanent circuit implementations. The onboard push button and LEDs can also be connected to Arduino pins and used as simple input and output devices for testing programs and hardware.
Applications
- Arduino UNO circuit prototyping.
- Rapid electronic circuit development.
- Testing sensors and modules.
- LED and button experiments.
- Arduino programming and electronics education.
- Testing custom circuits before PCB development.
- Through-hole component prototyping.
- SMD component experimentation.
- Robotics and automation prototypes.
- IoT and embedded-system prototypes.
- Temporary and semi-permanent Arduino projects.
Pinout
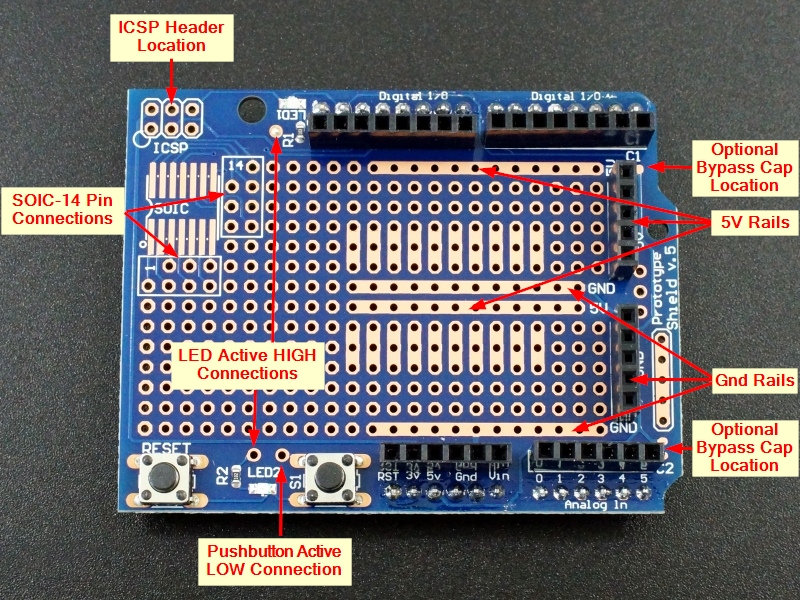
The Proto Shield follows the standard Arduino UNO R3 pin arrangement. The shield provides access to the Arduino UNO's main power, analog, and digital I/O connections.
Wiring
The Proto Shield is designed to be installed directly on top of an Arduino UNO. No additional wiring is required to connect the shield to the Arduino because the shield's header pins mate with the corresponding Arduino UNO headers.

For prototyping, electronic components can then be connected to the mini breadboard using jumper wires. The required Arduino pins can be accessed from the corresponding headers on the shield.
Example: An LED, push button, and resistor can be assembled on the mini breadboard and connected to an Arduino digital pin and GND. The circuit can then be programmed and tested without permanently soldering the components.
Specifications
| Parameter | Specification |
|---|---|
| Product Type | Arduino UNO Proto Shield |
| Compatibility | Arduino UNO / UNO R3 compatible boards |
| Prototype Shield Dimensions | Approx. 2.72 × 2.09 × 0.71 inches |
| Mini Breadboard Dimensions | Approx. 1.85 × 1.38 × 0.35 inches |
| Digital I/O Access | D0–D13 |
| Analog Input Access | A0–A5 |
| Buttons | 1 × Reset button, 1 × General-purpose button |
| LEDs | 2 × Integrated LED circuits |
| Component Support | Through-hole and SMD components |
| Prototyping Area | Mini solderless breadboard and dedicated prototype area |
| Connectors | Arduino-compatible header connectors |
| Pin Standard | Arduino UNO R3 layout |
Features
- Arduino UNO R3 Compatible: Uses the standard Arduino UNO R3 shield pin configuration for easy installation and access to the Arduino I/O pins.
- Mini Breadboard Included: Provides a solder-free area for quickly assembling and modifying prototype circuits.
- Easy Prototyping: Allows components such as resistors, LEDs, sensors, buttons, and integrated circuits to be connected without permanent soldering.
- Full Pin Access: Arduino UNO digital, analog, power, and control pins are routed to the shield for convenient connection of external components.
- Through-Hole Component Support: The prototyping area can be used to permanently install standard through-hole components.
- SMD Component Support: Provides a dedicated area for experimenting with surface-mount components.
- Built-In Reset Button: Allows the Arduino board to be reset directly from the Proto Shield.
- General-Purpose Push Button: An additional onboard button can be connected to an Arduino input for testing user-input applications.
- Two Onboard LED Circuits: Pre-wired LED circuits provide convenient indicators for testing digital outputs and simple Arduino programs.
- Compact Design: The shield and mini breadboard form a compact prototyping platform that fits directly on top of an Arduino UNO.
- Reusable Development Platform: Suitable for experimenting with circuits before transferring the final design to a custom PCB.
Principle of Operation
The Proto Shield does not contain a microcontroller or perform processing by itself. Instead, it acts as an interface and prototyping platform between an Arduino UNO and the electronic components used in a project. The shield is installed directly onto the Arduino UNO through its header connectors. The Arduino's digital and analog I/O pins, power connections, and ground connections are made available on the Proto Shield, allowing external components to be connected conveniently.
During the development stage, components can be placed on the included solderless breadboard. The breadboard allows components to be connected using jumper wires without soldering, making it easy to change the circuit while developing and debugging the project. Once the circuit has been tested, components can optionally be installed permanently in the prototyping area. The available prototyping space supports both through-hole and suitable SMD components, allowing the shield to be used for more permanent circuit implementations. The onboard push button and LEDs can also be connected to Arduino pins and used as simple input and output devices for testing programs and hardware.
Applications
- Arduino UNO circuit prototyping.
- Rapid electronic circuit development.
- Testing sensors and modules.
- LED and button experiments.
- Arduino programming and electronics education.
- Testing custom circuits before PCB development.
- Through-hole component prototyping.
- SMD component experimentation.
- Robotics and automation prototypes.
- IoT and embedded-system prototypes.
- Temporary and semi-permanent Arduino projects.
Pinout
The Proto Shield follows the standard Arduino UNO R3 pin arrangement. The shield provides access to the Arduino UNO's main power, analog, and digital I/O connections.
Wiring
The Proto Shield is designed to be installed directly on top of an Arduino UNO. No additional wiring is required to connect the shield to the Arduino because the shield's header pins mate with the corresponding Arduino UNO headers.
For prototyping, electronic components can then be connected to the mini breadboard using jumper wires. The required Arduino pins can be accessed from the corresponding headers on the shield.
Example: An LED, push button, and resistor can be assembled on the mini breadboard and connected to an Arduino digital pin and GND. The circuit can then be programmed and tested without permanently soldering the components.
Specifications
| Parameter | Specification |
|---|---|
| Product Type | Arduino UNO Proto Shield |
| Compatibility | Arduino UNO / UNO R3 compatible boards |
| Prototype Shield Dimensions | Approx. 2.72 × 2.09 × 0.71 inches |
| Mini Breadboard Dimensions | Approx. 1.85 × 1.38 × 0.35 inches |
| Digital I/O Access | D0–D13 |
| Analog Input Access | A0–A5 |
| Buttons | 1 × Reset button, 1 × General-purpose button |
| LEDs | 2 × Integrated LED circuits |
| Component Support | Through-hole and SMD components |
| Prototyping Area | Mini solderless breadboard and dedicated prototype area |
| Connectors | Arduino-compatible header connectors |
| Pin Standard | Arduino UNO R3 layout |