Features:
- This kind of switch is safer than mercury switches and has the same characteristics as the wizard rock single pass but the assembly is more convenient
- Made of environmentally friendly raw material
- The module is easy to interface with microcontrollers.
- Cheap and reliable
- It has a great durability rate.
Principle of Work:
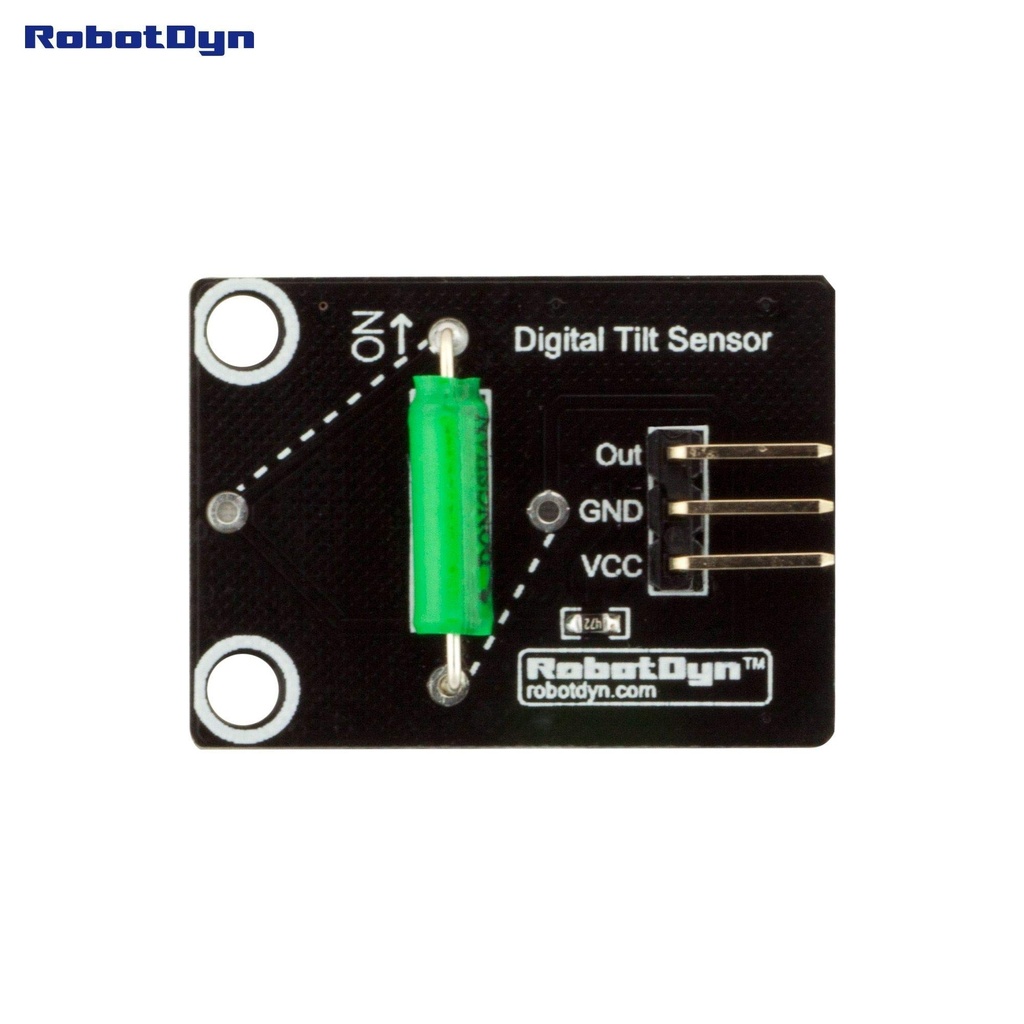
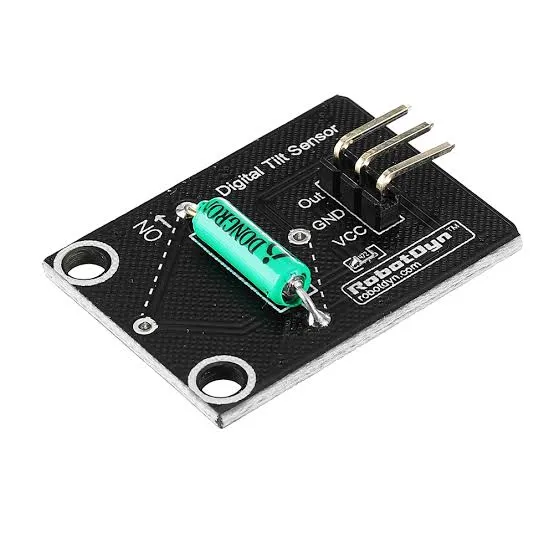
Typically, the module consists of a metal tube with a small ball that rolls inside it making up a ball tilt sensor. Two conducting poles at the end of the sensor on the module. The sensor is made to allow the ball to roll and make or break an electrical connection with just the right amount of tilt. The ball touches the poles and creates an electrical connection when the sensor is upright. The ball rolls off the poles when the sensor is tilted, breaking the connection.

Pinout of the Module:
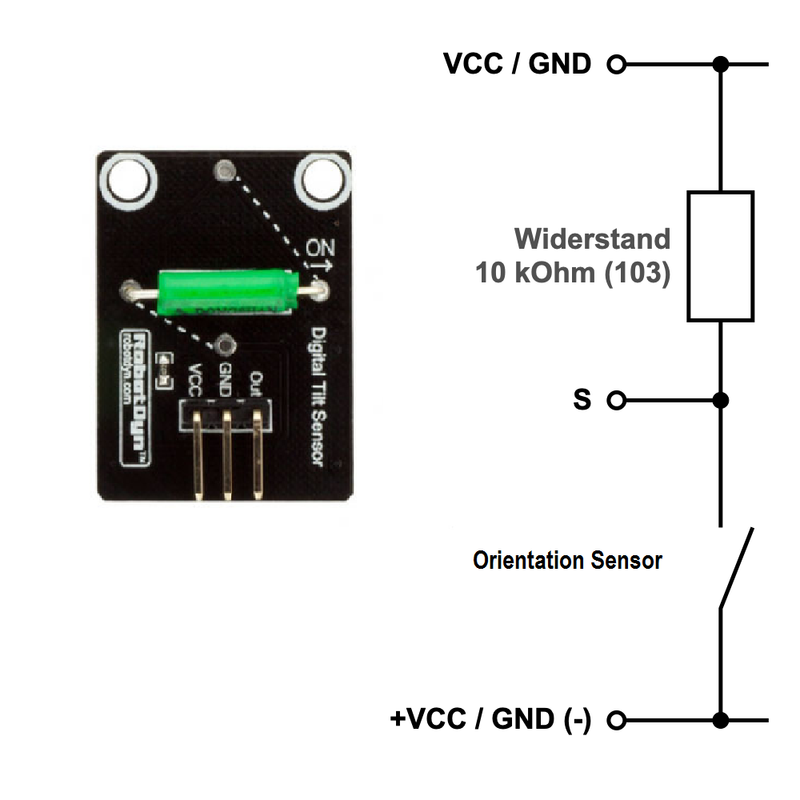
(GND): ground (GND) and zero volts
Out: The voltage divider's connection point
VCC: 3.3 or 5 volts
Applications:
- Robotics makes extensive use of it.
- It can also be applied to automobiles.
- to determine the direction.
- to be aware of the desire.
Circuit:
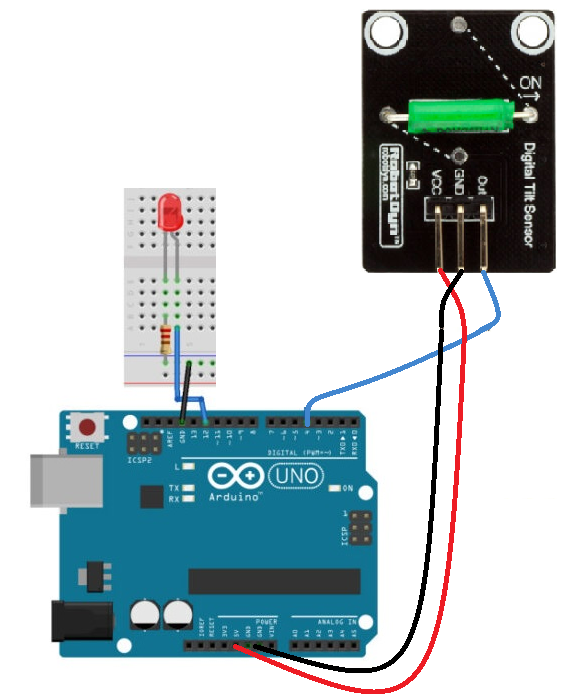
Assemble the Orientation Sensor using the Arduino UNO by connecting an LED to pin 12 with a 220ohm resistor and connecting the sensor Out to pin 4 and GND to GND and VCC to VCC5v. Now, copy and paste the code into your Arduino IDE. The code is then uploaded to Arduino. To see the glowing LED, tilt and move the sensor.
Library:
No Library is needed for this module to function
Code:
The input sensor pin and output LED pin that are connected to the Arduino pins has been defined. Then, by declaring the variable LastTiltState, we have shown that the sensor's previous stage was high. Next, we must specify the variables debounceDelay and lastdebounce time.
We have specified the sensor pin as the Arduino's input in the void setup. Led is also an output. Additionally, we initialized the serial monitor there.
We have defined the function digitalRead() in the void loop to examine the sensor reading. The sensor will reset the debouncing time if it detects a value identical to the previous lastTiltState stated above, as long as the requirement is met.
additionally returns the millisecond's value. The condition has been created since then. The lastTiltState becomes the sensorValue if the condition is verified. The lastTiltState is also taken by the LED pin. To display the sensor value on the serial monitor, use the Serial. println command.
int ledPin = 12;
int sensorPin = 4;
int sensorValue;
int lastTiltState = HIGH; // the previous reading from the tilt sensor
// the following variables are long's because the time, measured in miliseconds,
// will quickly become a bigger number than can be stored in an int.
long lastDebounceTime = 0; // the last time the output pin was toggled
long debounceDelay = 50; // the debounce time; increase if the output flickers
void setup(){
 pinMode(sensorPin, INPUT);
 digitalWrite(sensorPin, HIGH);
 pinMode(ledPin, OUTPUT);
 Serial.begin(9600);
}
void loop(){
 sensorValue = digitalRead(sensorPin);
 // If the switch changed, due to noise or pressing:
 if (sensorValue == lastTiltState) {
 // reset the debouncing timer
 lastDebounceTime = millis();
 }
 if ((millis() - lastDebounceTime) > debounceDelay) {
 // whatever the reading is at, it's been there for longer
 // than the debounce delay, so take it as the actual current state:
 lastTiltState = sensorValue;
 }
 digitalWrite(ledPin, lastTiltState);
 Serial.println(sensorValue);
 delay(500);
}
Technical Details:
- ON at 30-90 degrees from a horizontal position
- Max Current: 30mA
- Max voltage: 5V
- Insulation Resistance:>10M ohm
- Dimensions: 0.94 x 0.59 x 0.35inch (2.4 x 1.5 x 0.9cm)
Resources:
Features:
- This kind of switch is safer than mercury switches and has the same characteristics as the wizard rock single pass but the assembly is more convenient
- Made of environmentally friendly raw material
- The module is easy to interface with microcontrollers.
- Cheap and reliable
- It has a great durability rate.
Principle of Work:
Typically, the module consists of a metal tube with a small ball that rolls inside it making up a ball tilt sensor. Two conducting poles at the end of the sensor on the module. The sensor is made to allow the ball to roll and make or break an electrical connection with just the right amount of tilt. The ball touches the poles and creates an electrical connection when the sensor is upright. The ball rolls off the poles when the sensor is tilted, breaking the connection.
Pinout of the Module:
(GND): ground (GND) and zero volts
Out: The voltage divider's connection point
VCC: 3.3 or 5 volts
Applications:
- Robotics makes extensive use of it.
- It can also be applied to automobiles.
- to determine the direction.
- to be aware of the desire.
Circuit:
Assemble the Orientation Sensor using the Arduino UNO by connecting an LED to pin 12 with a 220ohm resistor and connecting the sensor Out to pin 4 and GND to GND and VCC to VCC5v. Now, copy and paste the code into your Arduino IDE. The code is then uploaded to Arduino. To see the glowing LED, tilt and move the sensor.
Library:
No Library is needed for this module to function
Code:
The input sensor pin and output LED pin that are connected to the Arduino pins has been defined. Then, by declaring the variable LastTiltState, we have shown that the sensor's previous stage was high. Next, we must specify the variables debounceDelay and lastdebounce time.
We have specified the sensor pin as the Arduino's input in the void setup. Led is also an output. Additionally, we initialized the serial monitor there.
We have defined the function digitalRead() in the void loop to examine the sensor reading. The sensor will reset the debouncing time if it detects a value identical to the previous lastTiltState stated above, as long as the requirement is met.
additionally returns the millisecond's value. The condition has been created since then. The lastTiltState becomes the sensorValue if the condition is verified. The lastTiltState is also taken by the LED pin. To display the sensor value on the serial monitor, use the Serial. println command.
int ledPin = 12;
int sensorPin = 4;
int sensorValue;
int lastTiltState = HIGH; // the previous reading from the tilt sensor
// the following variables are long's because the time, measured in miliseconds,
// will quickly become a bigger number than can be stored in an int.
long lastDebounceTime = 0; // the last time the output pin was toggled
long debounceDelay = 50; // the debounce time; increase if the output flickers
void setup(){
 pinMode(sensorPin, INPUT);
 digitalWrite(sensorPin, HIGH);
 pinMode(ledPin, OUTPUT);
 Serial.begin(9600);
}
void loop(){
 sensorValue = digitalRead(sensorPin);
 // If the switch changed, due to noise or pressing:
 if (sensorValue == lastTiltState) {
 // reset the debouncing timer
 lastDebounceTime = millis();
 }
 if ((millis() - lastDebounceTime) > debounceDelay) {
 // whatever the reading is at, it's been there for longer
 // than the debounce delay, so take it as the actual current state:
 lastTiltState = sensorValue;
 }
 digitalWrite(ledPin, lastTiltState);
 Serial.println(sensorValue);
 delay(500);
}
Technical Details:
- ON at 30-90 degrees from a horizontal position
- Max Current: 30mA
- Max voltage: 5V
- Insulation Resistance:>10M ohm
- Dimensions: 0.94 x 0.59 x 0.35inch (2.4 x 1.5 x 0.9cm)