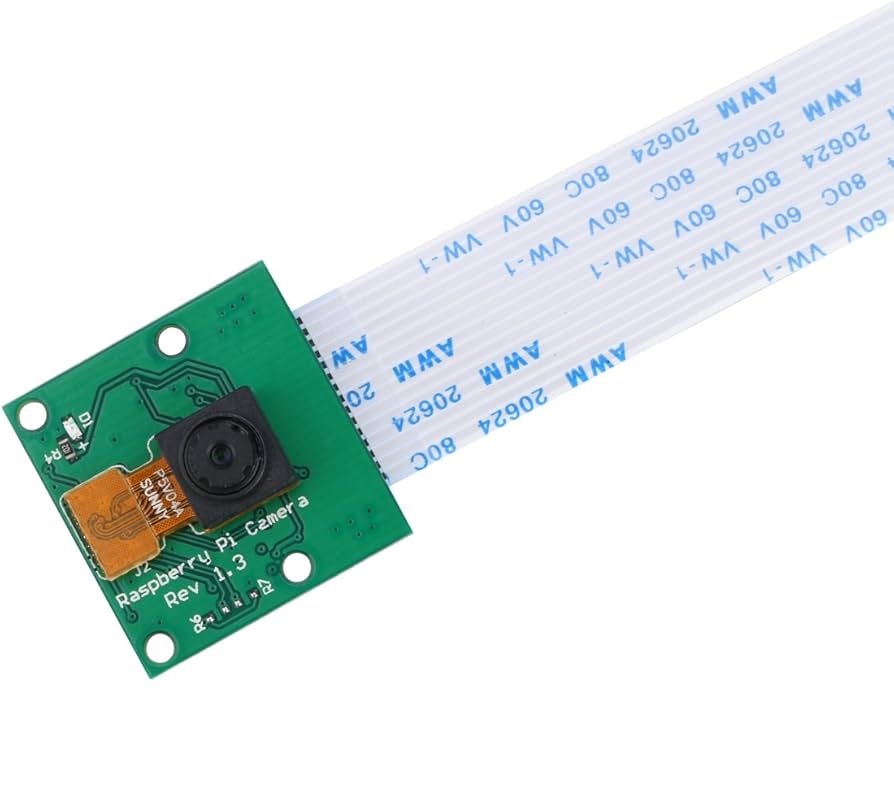
Camera RPi Cam 5MP 1080p V1.3 For Raspberry Pi
The RPi Cam 5MP 1080p V1.3 is a camera module designed to be used with a Raspberry Pi board. It has a 5-megapixel resolution and can capture 1080p video. The module is compact and easy to attach to the Raspberry Pi's CSI interface, and it includes a flexible ribbon cable for easy positioning. It also features automatic control of exposure, white balance, and other image settings. it is a great option for hobbyists or makers looking to add camera capabilities to their Raspberry Pi projects.
Package Includes:
- 1 x RPi Cam 5MP 1080p V1.3
Features:
- High-resolution imaging: The camera module is equipped with a 5-megapixel sensor that can capture still images with a maximum resolution of 2592x1944 pixels.
- 1080p video capture: The camera module can capture 1080p video at 30 frames per second, making it a great option for video projects.
- Automatic image control: The module includes automatic control of exposure, white balance, and gain, allowing for easy adjustment and optimization of image quality.
- Flexible ribbon cable: The camera module comes with a flexible ribbon cable that allows for easy positioning and placement of the camera.
- CSI interface: The camera module connects to the Raspberry Pi board via the CSI (Camera Serial Interface) port, which provides high-speed data transfer between the camera and the board.
- Time-lapse and motion detection: The camera module supports time-lapse and motion detection, making it a versatile option for a wide range of applications.
- Compact and lightweight: The camera module is small and lightweight, making it easy to attach to a Raspberry Pi board without adding significant weight or bulk.
Principle of Work:
The RPi Cam 5MP 1080p V1.3 camera module connects to the Raspberry Pi board via the CSI (Camera Serial Interface) port, which provides a high-speed data transfer between the camera and the board. Here's how you can connect the camera module to your Raspberry Pi:
- Power off the Raspberry Pi and disconnect all cables.
- Locate the CSI port on the Raspberry Pi board (it's usually near the HDMI port).
- Gently lift the clips on either side of the CSI port.
- Insert the ribbon cable that comes with the camera module into the CSI port with the silver connectors facing the HDMI port.
- Push the clips back down to secure the ribbon cable in place.

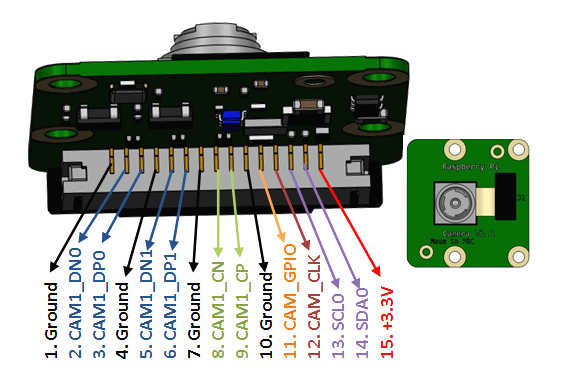
Pinout of the module:
Applications:
- Surveillance and security: The camera module can be used for monitoring and surveillance applications, such as monitoring a room or outdoor area for security purposes.
- Time-lapse photography: The camera module supports time-lapse photography, making it a great option for capturing footage of natural phenomena like sunsets or plant growth.
- Robotics: The camera module can be used for robotics applications, such as enabling a robot to navigate and explore its environment.
- Wildlife monitoring: The camera module can be used for wildlife monitoring and research applications, such as observing and studying animal behavior.
- Drones: The camera module can be used with drones, allowing you to capture aerial footage and images with your Raspberry Pi.
- Virtual reality: The camera module can be used to capture 360-degree images and video for virtual reality applications.
- Scientific research: The camera module can be used in scientific research applications, such as capturing images of specimens or conducting experiments that require visual monitoring.
Circuit:
Just plug the camera in the RPI and you are good to go as it mentioned in the "principle of work" section.
Library:
Once you've connected the camera module to the Raspberry Pi, you'll need to set up the software to use it. Here are the basic steps:
- Ensure that your Raspberry Pi is running the latest version of the Raspbian operating system.
- Open the terminal and enter the following command to update the system software:
sudo apt-get update && sudo apt-get upgrade - Install the necessary software packages by entering the following command:
sudo apt-get install python-picamera - Reboot your Raspberry Pi to ensure that all updates are applied. After you've completed these steps, you can start using the camera module with Python programs or command-line tools such as raspistill and raspivid. The Python Picamera library provides an easy-to-use interface for capturing images and video with the camera module, and there are many examples available online to help you get started.
Code:
A simple Python code that uses the RPi Cam 5MP 1080p V1.3 camera module to capture a photo:
from picamera import PiCamera
from time import sleep

# Initialize the camera object
camera = PiCamera()

# Start the camera preview
camera.start_preview()

# Wait for the camera to warm up
sleep(2)

# Capture a photo
camera.capture('/home/pi/Desktop/image.jpg')

# Stop the camera preview
camera.stop_preview()
- This code uses the
picameralibrary to control the camera module and capture an image. Thestart_preview()method initializes the camera and starts a preview of the image on the screen. Thesleep(2)command waits for 2 seconds to give the camera time to adjust to the lighting conditions before capturing the photo using thecamera.capture()method. The photo is saved to the desktop with the filenameimage.jpg. Finally, thestop_preview()the method stops the camera preview and frees up the resources used by the camera. - You can save this code to a Python file (e.g.,
capture_photo.py) and run it from the terminal using the commandpython capture_photo.py. Make sure you have installed thepicameralibrary as described in my previous response before running the code.
Technical Details:
- Image sensor: OmniVision OV5647
- Resolution: 5 megapixels (2592 x 1944 pixels)
- Video resolution: 1080p30, 720p60, and 640x480p60/90
- Lens: Fixed focus (1m to infinity), f/2.9 aperture
- Field of view: 54 degrees horizontal
- Connector: CSI (Camera Serial Interface)
- Dimensions: 25mm x 24mm x 9mm
- Weight: 3 grams
Resources:
Comparisons:
The RPi Cam 5MP 1080p V1.3 and V2.0 camera modules are both designed for use with the Raspberry Pi and offer similar features, but there are a few key differences between them:
- Resolution: The V1.3 camera module has a maximum resolution of 5 megapixels, while the V2.0 module can capture images of up to 8 megapixels.
- Sensor: The V1.3 module uses the OmniVision OV5647 sensor, while the V2.0 module uses the Sony IMX219 sensor. The IMX219 is a newer and more advanced sensor that offers improved low-light performance and better image quality.
- Lens: The V1.3 module has a fixed focus lens, while the V2.0 module features a 1/4 inch, 8-megapixel sensor with a CS-mount lens that can be adjusted for focus and zoom.
- Field of view: The V1.3 module has a field of view of 54 degrees, while the V2.0 module has a slightly wider field of view at 62.2 degrees.
- Video modes: The V1.3 module supports 1080p video at up to 30 frames per second, while the V2.0 module can capture 1080p video at up to 60 frames per second.
Features:
- High-resolution imaging: The camera module is equipped with a 5-megapixel sensor that can capture still images with a maximum resolution of 2592x1944 pixels.
- 1080p video capture: The camera module can capture 1080p video at 30 frames per second, making it a great option for video projects.
- Automatic image control: The module includes automatic control of exposure, white balance, and gain, allowing for easy adjustment and optimization of image quality.
- Flexible ribbon cable: The camera module comes with a flexible ribbon cable that allows for easy positioning and placement of the camera.
- CSI interface: The camera module connects to the Raspberry Pi board via the CSI (Camera Serial Interface) port, which provides high-speed data transfer between the camera and the board.
- Time-lapse and motion detection: The camera module supports time-lapse and motion detection, making it a versatile option for a wide range of applications.
- Compact and lightweight: The camera module is small and lightweight, making it easy to attach to a Raspberry Pi board without adding significant weight or bulk.
Principle of Work:
The RPi Cam 5MP 1080p V1.3 camera module connects to the Raspberry Pi board via the CSI (Camera Serial Interface) port, which provides a high-speed data transfer between the camera and the board. Here's how you can connect the camera module to your Raspberry Pi:
- Power off the Raspberry Pi and disconnect all cables.
- Locate the CSI port on the Raspberry Pi board (it's usually near the HDMI port).
- Gently lift the clips on either side of the CSI port.
- Insert the ribbon cable that comes with the camera module into the CSI port with the silver connectors facing the HDMI port.
- Push the clips back down to secure the ribbon cable in place.
Pinout of the module:
Applications:
- Surveillance and security: The camera module can be used for monitoring and surveillance applications, such as monitoring a room or outdoor area for security purposes.
- Time-lapse photography: The camera module supports time-lapse photography, making it a great option for capturing footage of natural phenomena like sunsets or plant growth.
- Robotics: The camera module can be used for robotics applications, such as enabling a robot to navigate and explore its environment.
- Wildlife monitoring: The camera module can be used for wildlife monitoring and research applications, such as observing and studying animal behavior.
- Drones: The camera module can be used with drones, allowing you to capture aerial footage and images with your Raspberry Pi.
- Virtual reality: The camera module can be used to capture 360-degree images and video for virtual reality applications.
- Scientific research: The camera module can be used in scientific research applications, such as capturing images of specimens or conducting experiments that require visual monitoring.
Circuit:
Just plug the camera in the RPI and you are good to go as it mentioned in the "principle of work" section.
Library:
Once you've connected the camera module to the Raspberry Pi, you'll need to set up the software to use it. Here are the basic steps:
- Ensure that your Raspberry Pi is running the latest version of the Raspbian operating system.
- Open the terminal and enter the following command to update the system software:
sudo apt-get update && sudo apt-get upgrade - Install the necessary software packages by entering the following command:
sudo apt-get install python-picamera - Reboot your Raspberry Pi to ensure that all updates are applied. After you've completed these steps, you can start using the camera module with Python programs or command-line tools such as raspistill and raspivid. The Python Picamera library provides an easy-to-use interface for capturing images and video with the camera module, and there are many examples available online to help you get started.
Code:
A simple Python code that uses the RPi Cam 5MP 1080p V1.3 camera module to capture a photo:
from picamera import PiCamera
from time import sleep

# Initialize the camera object
camera = PiCamera()

# Start the camera preview
camera.start_preview()

# Wait for the camera to warm up
sleep(2)

# Capture a photo
camera.capture('/home/pi/Desktop/image.jpg')

# Stop the camera preview
camera.stop_preview()
- This code uses the
picameralibrary to control the camera module and capture an image. Thestart_preview()method initializes the camera and starts a preview of the image on the screen. Thesleep(2)command waits for 2 seconds to give the camera time to adjust to the lighting conditions before capturing the photo using thecamera.capture()method. The photo is saved to the desktop with the filenameimage.jpg. Finally, thestop_preview()the method stops the camera preview and frees up the resources used by the camera. - You can save this code to a Python file (e.g.,
capture_photo.py) and run it from the terminal using the commandpython capture_photo.py. Make sure you have installed thepicameralibrary as described in my previous response before running the code.
Technical Details:
- Image sensor: OmniVision OV5647
- Resolution: 5 megapixels (2592 x 1944 pixels)
- Video resolution: 1080p30, 720p60, and 640x480p60/90
- Lens: Fixed focus (1m to infinity), f/2.9 aperture
- Field of view: 54 degrees horizontal
- Connector: CSI (Camera Serial Interface)
- Dimensions: 25mm x 24mm x 9mm
- Weight: 3 grams
Resources:
Comparisons:
The RPi Cam 5MP 1080p V1.3 and V2.0 camera modules are both designed for use with the Raspberry Pi and offer similar features, but there are a few key differences between them:
- Resolution: The V1.3 camera module has a maximum resolution of 5 megapixels, while the V2.0 module can capture images of up to 8 megapixels.
- Sensor: The V1.3 module uses the OmniVision OV5647 sensor, while the V2.0 module uses the Sony IMX219 sensor. The IMX219 is a newer and more advanced sensor that offers improved low-light performance and better image quality.
- Lens: The V1.3 module has a fixed focus lens, while the V2.0 module features a 1/4 inch, 8-megapixel sensor with a CS-mount lens that can be adjusted for focus and zoom.
- Field of view: The V1.3 module has a field of view of 54 degrees, while the V2.0 module has a slightly wider field of view at 62.2 degrees.
- Video modes: The V1.3 module supports 1080p video at up to 30 frames per second, while the V2.0 module can capture 1080p video at up to 60 frames per second.