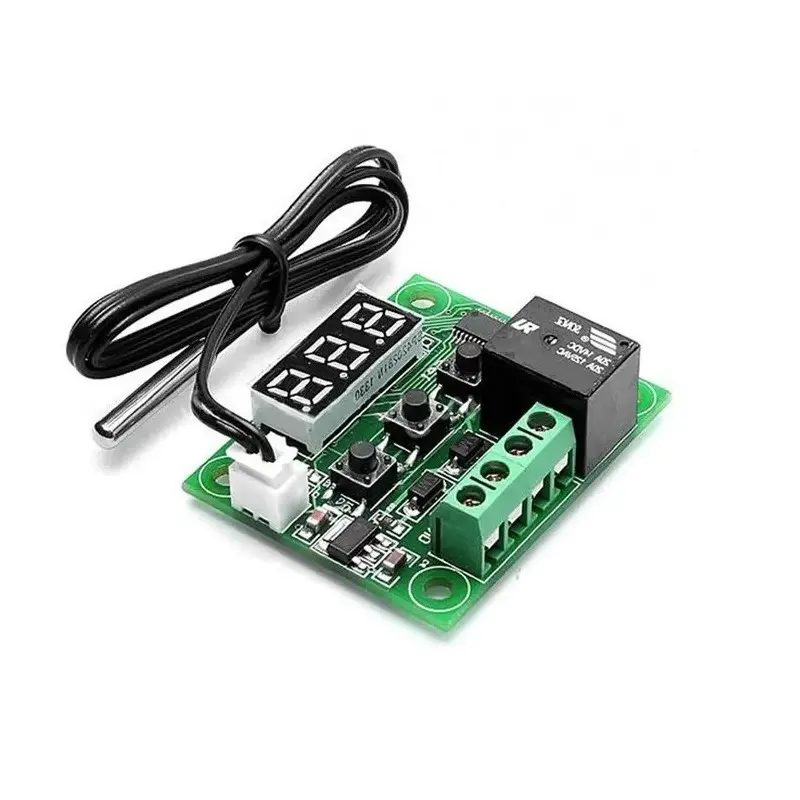
Features:
- High Accuracy: Utilizes a waterproof NTC thermistor with 0.1°C precision for accurate temperature measurements.
- Simple Operation: User-friendly 3-button interface and 3-digit LED display for easy parameter setup and monitoring.
- Customizable Trigger Temperature: Set trigger points in 0.1°C increments with automatic memory retention.
- Advanced Parameter Settings: Configure heating/cooling mode, hysteresis, temperature limits, calibration offset, delay, and over-temperature alarm.
- Robust Relay Control: Integrated relay supports loads up to 240V AC / 5A or 14V DC / 10A for versatile control.
Specifications:
- Power Supply: 12V DC
- Temperature Range: -10°C to 60°C
- Humidity Range: 20% – 85% RH
- Temperature Accuracy: ±0.1°C
- Static Current: ≤35mA
- Operating Current: ≤65mA
- Relay Contact Capacity: 240V AC / 5A or 14V DC / 10A (resistive load)
- Sensor Type: NTC waterproof thermistor
Parameter Configuration Guide:
- Enter Setup Mode: Press and hold
SETfor 5 seconds to enter parameter menu. - P0 – Mode:
C= Cooling,H= Heating (default is C) - P1 – Hysteresis: Sets the on/off buffer range (default: 2°C)
- P2 – Maximum Temp Limit: Sets the highest allowable trigger temp (default: 110°C)
- P3 – Minimum Temp Limit: Sets the lowest allowable trigger temp (default: -39°C)
- P4 – Temperature Calibration: Offsets measured temperature to correct sensor variation (default: 0)
- P5 – Trigger Delay: Delays relay response by 1–10 minutes (default: 0)
- P6 – High Temperature Alarm: Sets a cut-off value to disable relay and alert user (default: OFF)
Usage Tips:
- Reset to Default: Hold
+and-simultaneously to restore factory settings. - Real-Time Temperature: Display shows live temperature value by default.
- Fault Codes:
LLLindicates sensor error;HHHindicates over-temperature.
Applications:
- Refrigeration and freezer automation
- Aquarium temperature control
- Incubators
- Heating pads and thermal chambers
- Home automation and climate control systems
Device Wiring
-
The XH-W1209 Digital Temperature Thermostat Controller operates from a 12V DC supply and uses an onboard relay to control either AC or DC loads. The wiring method depends on the type of load being switched, as illustrated in the diagrams.
Power Supply Connection (Required for All Modes)
- +12V: Connect to the positive terminal of a 12V DC power supply.
- GND: Connect to the negative terminal of the 12V DC power supply.
The controller itself must always be powered by 12V DC, regardless of the load voltage.
Relay Terminals Identification
- K0: Relay Common (COM)
- K1: Relay Normally Open (NO)
When the temperature reaches the set condition, the relay connects K0 to K1.
220V AC Load Wiring
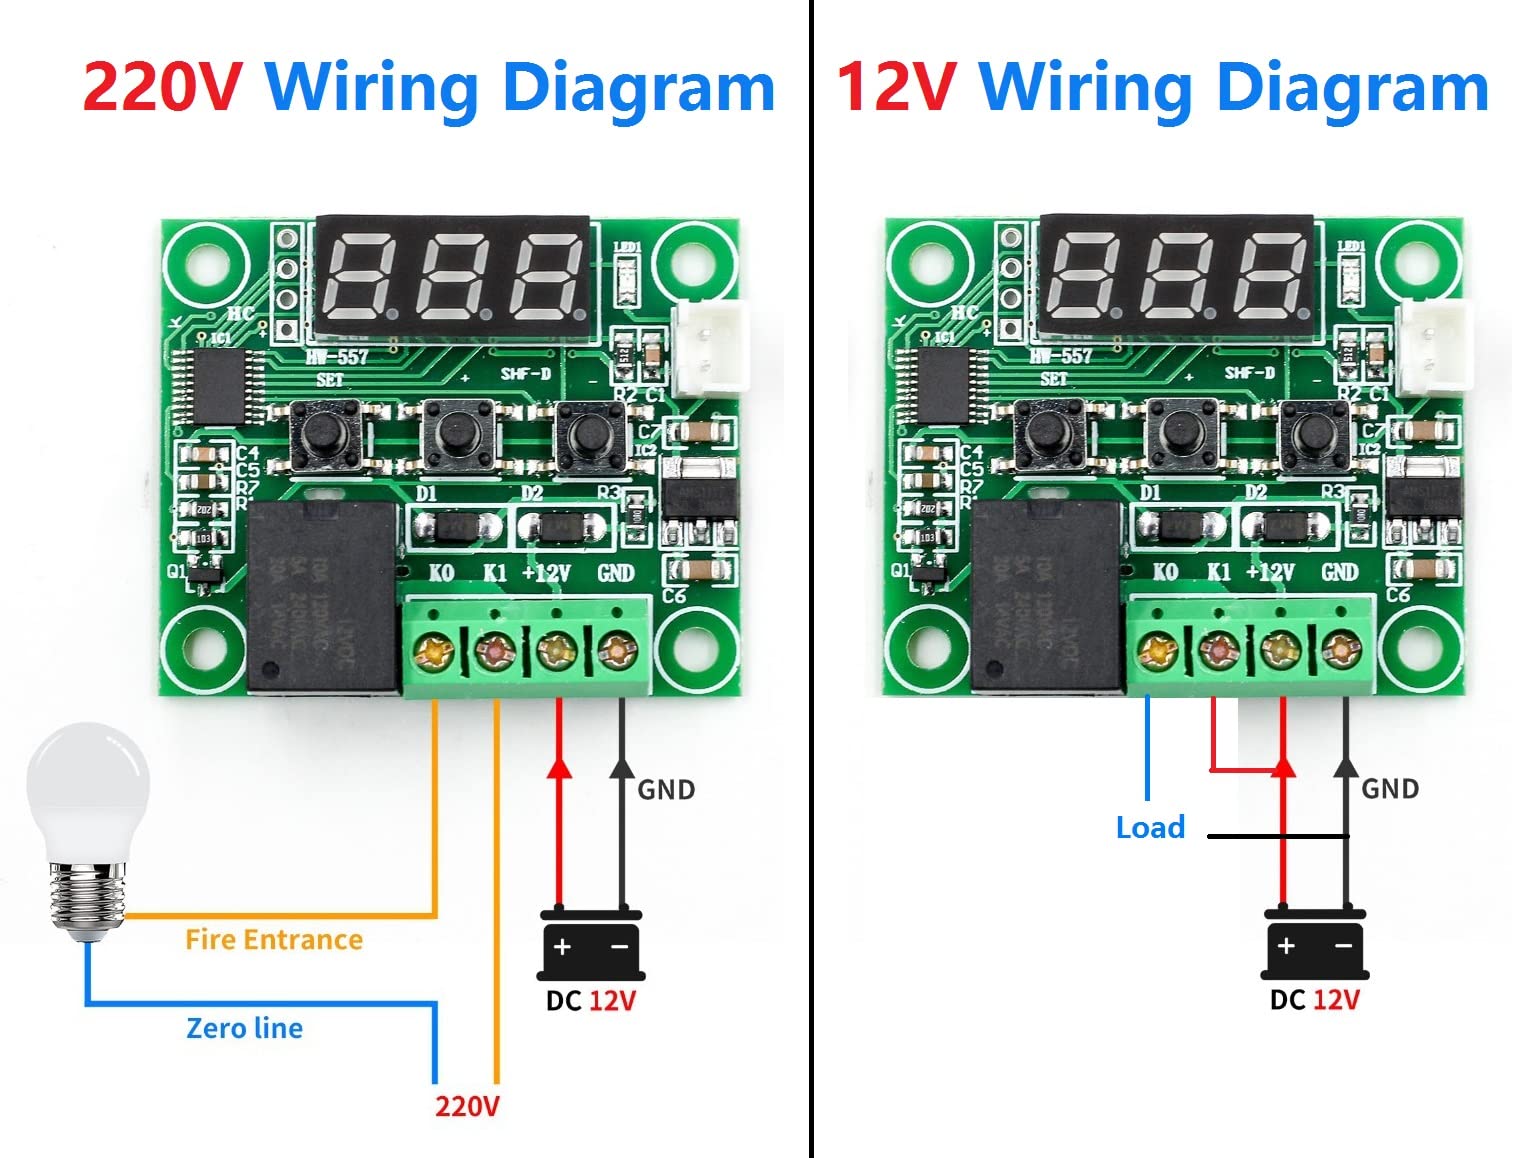
This wiring method is used for AC devices such as lamps, heaters, or fans operating on mains voltage.
- Connect the AC live wire (fire line) to K0.
- Connect K1 to one terminal of the AC load.
- Connect the other terminal of the AC load directly to the AC neutral line (zero line).
Only the live wire is switched by the relay. The neutral wire is connected directly to the load.
12V DC Load Wiring
This wiring method is suitable for DC loads such as 12V fans, pumps, or DC heaters.
- Connect the positive output of the 12V supply to K0.
- Connect K1 to the positive terminal of the DC load.
- Connect the negative terminal of the DC load directly to GND.
When the relay activates, 12V is supplied to the load through K1.
Temperature Sensor Connection
- Connect the waterproof NTC temperature sensor to the 2-pin sensor socket on the board.
- Polarity is not important.
Safety Notes
- Ensure mains voltage wiring is fully insulated and handled by qualified personnel.
- Do not exceed the relay current rating.
- Always disconnect power before wiring or modifying connections.
Features:
- High Accuracy: Utilizes a waterproof NTC thermistor with 0.1°C precision for accurate temperature measurements.
- Simple Operation: User-friendly 3-button interface and 3-digit LED display for easy parameter setup and monitoring.
- Customizable Trigger Temperature: Set trigger points in 0.1°C increments with automatic memory retention.
- Advanced Parameter Settings: Configure heating/cooling mode, hysteresis, temperature limits, calibration offset, delay, and over-temperature alarm.
- Robust Relay Control: Integrated relay supports loads up to 240V AC / 5A or 14V DC / 10A for versatile control.
Specifications:
- Power Supply: 12V DC
- Temperature Range: -10°C to 60°C
- Humidity Range: 20% – 85% RH
- Temperature Accuracy: ±0.1°C
- Static Current: ≤35mA
- Operating Current: ≤65mA
- Relay Contact Capacity: 240V AC / 5A or 14V DC / 10A (resistive load)
- Sensor Type: NTC waterproof thermistor
Parameter Configuration Guide:
- Enter Setup Mode: Press and hold
SETfor 5 seconds to enter parameter menu. - P0 – Mode:
C= Cooling,H= Heating (default is C) - P1 – Hysteresis: Sets the on/off buffer range (default: 2°C)
- P2 – Maximum Temp Limit: Sets the highest allowable trigger temp (default: 110°C)
- P3 – Minimum Temp Limit: Sets the lowest allowable trigger temp (default: -39°C)
- P4 – Temperature Calibration: Offsets measured temperature to correct sensor variation (default: 0)
- P5 – Trigger Delay: Delays relay response by 1–10 minutes (default: 0)
- P6 – High Temperature Alarm: Sets a cut-off value to disable relay and alert user (default: OFF)
Usage Tips:
- Reset to Default: Hold
+and-simultaneously to restore factory settings. - Real-Time Temperature: Display shows live temperature value by default.
- Fault Codes:
LLLindicates sensor error;HHHindicates over-temperature.
Applications:
- Refrigeration and freezer automation
- Aquarium temperature control
- Incubators
- Heating pads and thermal chambers
- Home automation and climate control systems
Device Wiring
-
The XH-W1209 Digital Temperature Thermostat Controller operates from a 12V DC supply and uses an onboard relay to control either AC or DC loads. The wiring method depends on the type of load being switched, as illustrated in the diagrams.
Power Supply Connection (Required for All Modes)
- +12V: Connect to the positive terminal of a 12V DC power supply.
- GND: Connect to the negative terminal of the 12V DC power supply.
The controller itself must always be powered by 12V DC, regardless of the load voltage.
Relay Terminals Identification
- K0: Relay Common (COM)
- K1: Relay Normally Open (NO)
When the temperature reaches the set condition, the relay connects K0 to K1.
220V AC Load Wiring
This wiring method is used for AC devices such as lamps, heaters, or fans operating on mains voltage.
- Connect the AC live wire (fire line) to K0.
- Connect K1 to one terminal of the AC load.
- Connect the other terminal of the AC load directly to the AC neutral line (zero line).
Only the live wire is switched by the relay. The neutral wire is connected directly to the load.
12V DC Load Wiring
This wiring method is suitable for DC loads such as 12V fans, pumps, or DC heaters.
- Connect the positive output of the 12V supply to K0.
- Connect K1 to the positive terminal of the DC load.
- Connect the negative terminal of the DC load directly to GND.
When the relay activates, 12V is supplied to the load through K1.
Temperature Sensor Connection
- Connect the waterproof NTC temperature sensor to the 2-pin sensor socket on the board.
- Polarity is not important.
Safety Notes
- Ensure mains voltage wiring is fully insulated and handled by qualified personnel.
- Do not exceed the relay current rating.
- Always disconnect power before wiring or modifying connections.