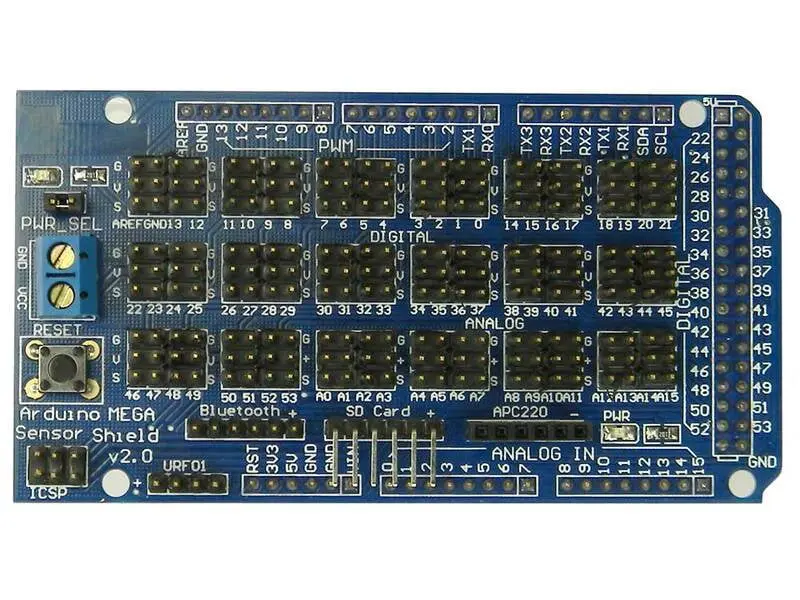
Power Supply Options:
- Jumper ON: +5V power comes from the Arduino, limited to about 300 mA.
- Jumper OFF: +5V power is supplied externally via the blue terminal strip. External power ground must also be connected to the terminal strip. This supports higher current for servos, relays, and other devices (commonly +5V or up to +6V if all devices are rated for it).
Dedicated Connectors (Top to Bottom, Left to Right):
- ICSP: RST, D52/SCK, D50/MISO, GND, D51/MOSI, 5V
- Bluetooth: 3V3, GND, D0/RX0, D1/TX0, GND, 5V
- SD Card: D50/MISO, D52/SCK, D53/SS, D51/MOSI, 5V, GND
- APC220 (Wireless): --, D19/RX1, D18/TX1, --, 5V, GND
- URF01 (Ultrasonic): 5V, D48, D49, GND
Interfacing SD Card Module to MEGA Sensor Shield V2:
Learn how to connect an SD Card Module to the Arduino Mega via the Sensor Shield.
| Mega Sensor Shield, SD Card Header | Corresponding Arduino Mega Pins |
|---|---|
| Pin 1 | 50 MOSI |
| Pin 2 | 52 SCK |
| Pin 3 | 53 CS / SDCS |
| Pin 4 | 51 MOSI |
| Pin 5 | GND |
| Pin 6 | 5V |
The 6-pin SD Card connector uses SPI communication. Using the MEGA Sensor Shield simplifies wiring and increases reliability. The Arduino Mega is preferred over the Uno for SD card interfacing due to its larger SRAM (8KB vs 2KB), which is necessary for buffering SD card data.
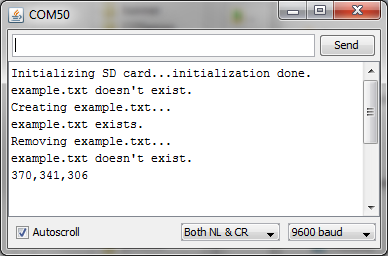
Troubleshooting:
- Close Serial Monitor, unplug USB, wait ~10 seconds (capacitors discharge).
- Plug back USB, reopen Serial Monitor, press reset button.
Power Supply Options:
- Jumper ON: +5V power comes from the Arduino, limited to about 300 mA.
- Jumper OFF: +5V power is supplied externally via the blue terminal strip. External power ground must also be connected to the terminal strip. This supports higher current for servos, relays, and other devices (commonly +5V or up to +6V if all devices are rated for it).
Dedicated Connectors (Top to Bottom, Left to Right):
- ICSP: RST, D52/SCK, D50/MISO, GND, D51/MOSI, 5V
- Bluetooth: 3V3, GND, D0/RX0, D1/TX0, GND, 5V
- SD Card: D50/MISO, D52/SCK, D53/SS, D51/MOSI, 5V, GND
- APC220 (Wireless): --, D19/RX1, D18/TX1, --, 5V, GND
- URF01 (Ultrasonic): 5V, D48, D49, GND
Interfacing SD Card Module to MEGA Sensor Shield V2:
Learn how to connect an SD Card Module to the Arduino Mega via the Sensor Shield.
| Mega Sensor Shield, SD Card Header | Corresponding Arduino Mega Pins |
|---|---|
| Pin 1 | 50 MOSI |
| Pin 2 | 52 SCK |
| Pin 3 | 53 CS / SDCS |
| Pin 4 | 51 MOSI |
| Pin 5 | GND |
| Pin 6 | 5V |
The 6-pin SD Card connector uses SPI communication. Using the MEGA Sensor Shield simplifies wiring and increases reliability. The Arduino Mega is preferred over the Uno for SD card interfacing due to its larger SRAM (8KB vs 2KB), which is necessary for buffering SD card data.
Troubleshooting:
- Close Serial Monitor, unplug USB, wait ~10 seconds (capacitors discharge).
- Plug back USB, reopen Serial Monitor, press reset button.