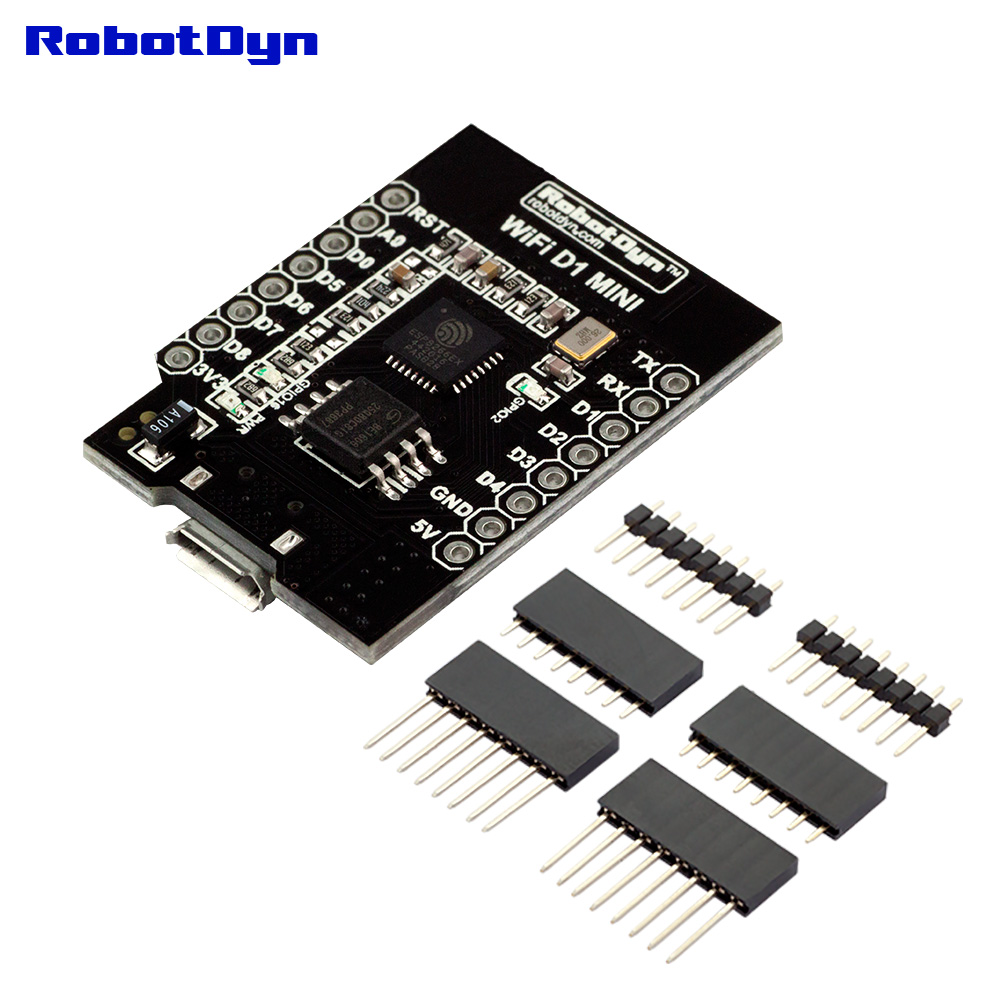
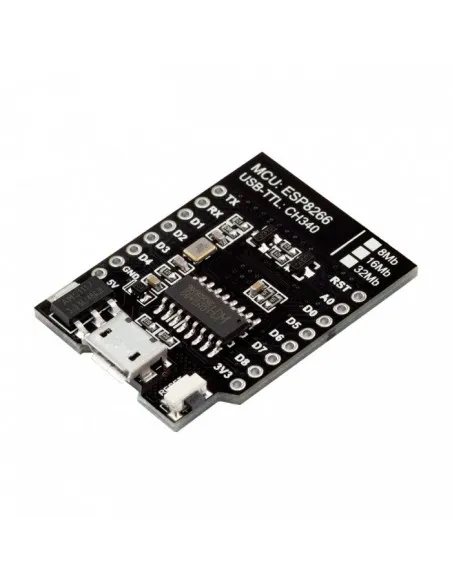
Features
- Based on the ESP8266 WiFi SoC
- Integrated 32Mb flash memory
- CH340G USB-to-Serial converter
- Onboard PCB WiFi antenna
- Micro USB interface for power and programming
- Compatible with Arduino IDE
- Standard D1 Mini pinout compatibility
Specifications
- Microcontroller: ESP8266
- Operating Voltage: 3.3V
- Input Voltage (USB): 5V
- Flash Memory: 32Mb (4MB)
- Clock Frequency: 80MHz / 160MHz
- WiFi Standard: 802.11 b/g/n
- Digital I/O Pins: 11
- Analog Input Pins: 1 (A0)
- Communication Interfaces: UART, SPI, I2C (software), PWM
- USB Interface: CH340G
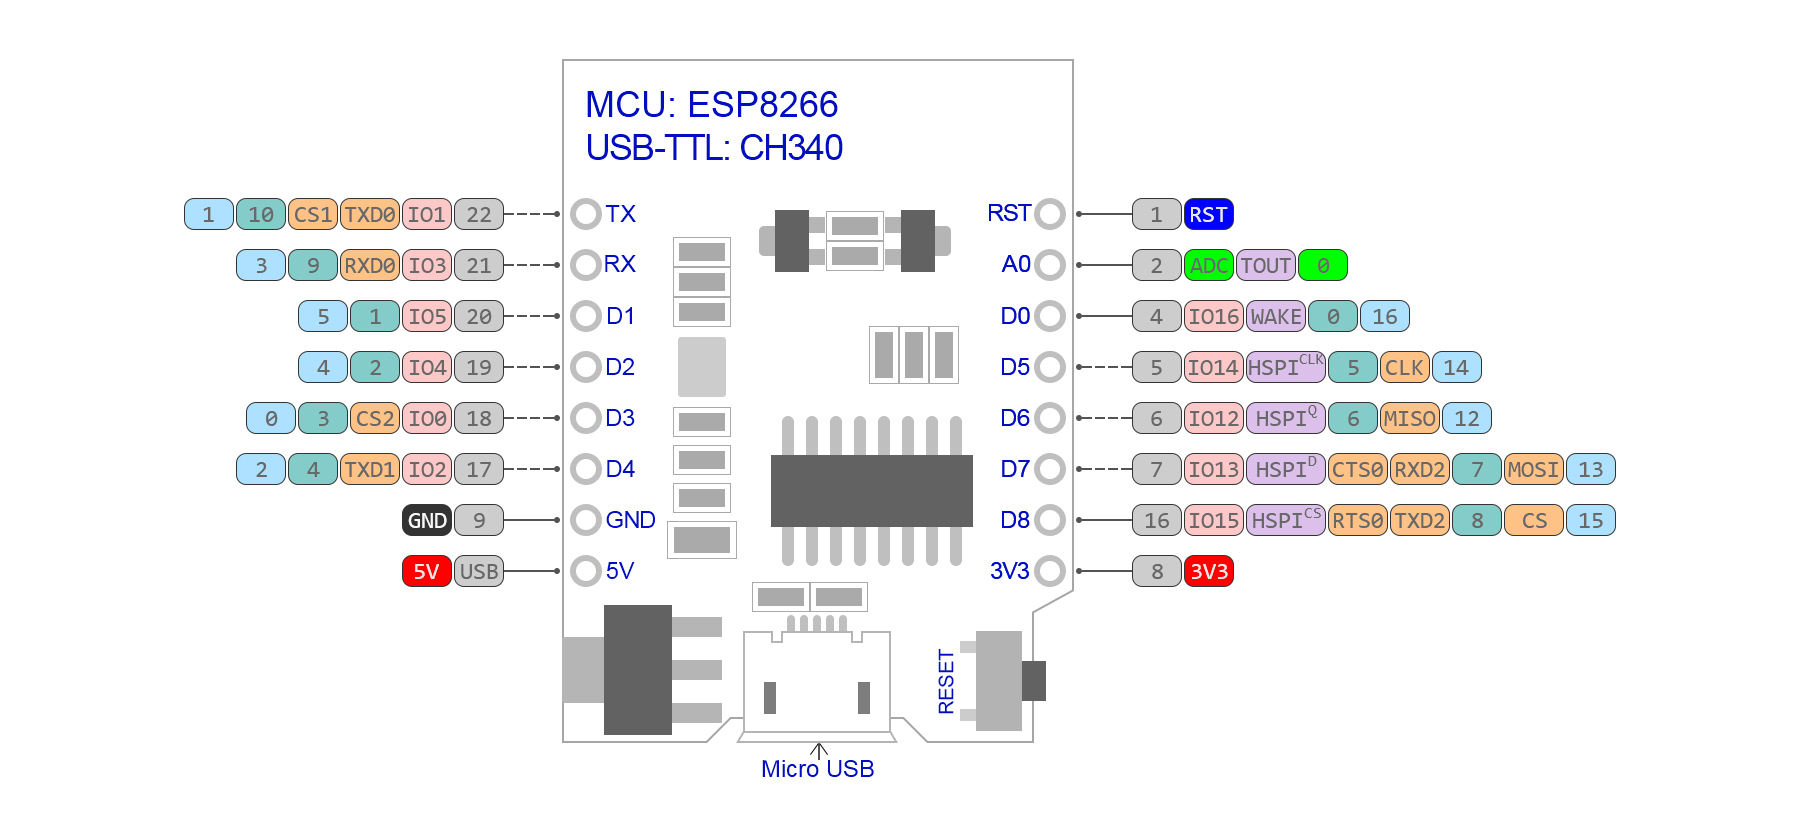
Pinout

- 5V – 5V Power Input
- 3V3 – 3.3V Output
- G – Ground
- D0 – GPIO16
- D1 – GPIO5 (I2C SCL)
- D2 – GPIO4 (I2C SDA)
- D3 – GPIO0
- D4 – GPIO2
- D5 – GPIO14 (SPI SCK)
- D6 – GPIO12 (SPI MISO)
- D7 – GPIO13 (SPI MOSI)
- D8 – GPIO15 (SPI CS)
- RX – UART RX
- TX – UART TX
- A0 – Analog Input (Max 3.3V)
- RST – Reset
How to Install ESP8266 D1 Mini Support in Arduino IDE
1. Install Arduino IDE
-
Download Arduino IDE from https://www.arduino.cc/en/software
-
Install and open the Arduino IDE
2. Add ESP8266 Board Manager URL
-
Open Arduino IDE
-
Go to File → Preferences
-
Find the field called Additional Boards Manager URLs
-
Add the following URL:
http://arduino.esp8266.com/stable/package_esp8266com_index.json
-
Click OK
3. Install ESP8266 Board Package
-
Go to Tools → Board → Boards Manager
-
Search for ESP8266
-
Find ESP8266 by ESP8266 Community
-
Click Install
-
Wait for installation to complete
4. Select the D1 Mini Board
-
Go to Tools → Board
-
Select LOLIN (WEMOS) D1 R2 & mini
5. Select Flash Size
-
Go to Tools → Flash Size
-
Select 4M (1M SPIFFS) for 32Mb flash version
6. Install CH340 Driver (If Needed)
-
Download CH340 driver from manufacturer website
-
Install the driver
-
Restart your computer if required
7. Connect and Upload
-
Connect D1 Mini using Micro USB cable
-
Go to Tools → Port and select the correct COM port
-
Click Upload to program the board
Optional: Verify Installation
-
Open File → Examples → ESP8266 → Blink
-
Upload the example sketch
-
Onboard LED should blink if installation is successful
Schematics
- ESP8266 core module with integrated flash
- CH340G USB-to-Serial interface circuit
- 3.3V voltage regulator section
- Micro USB power input circuit
- Reset and boot configuration circuit
Applications
- IoT devices
- Wireless sensor nodes
- Home automation systems
- MQTT-based control systems
- Web server projects
- Remote monitoring systems
Resources
Features
- Based on the ESP8266 WiFi SoC
- Integrated 32Mb flash memory
- CH340G USB-to-Serial converter
- Onboard PCB WiFi antenna
- Micro USB interface for power and programming
- Compatible with Arduino IDE
- Standard D1 Mini pinout compatibility
Specifications
- Microcontroller: ESP8266
- Operating Voltage: 3.3V
- Input Voltage (USB): 5V
- Flash Memory: 32Mb (4MB)
- Clock Frequency: 80MHz / 160MHz
- WiFi Standard: 802.11 b/g/n
- Digital I/O Pins: 11
- Analog Input Pins: 1 (A0)
- Communication Interfaces: UART, SPI, I2C (software), PWM
- USB Interface: CH340G
Pinout
- 5V – 5V Power Input
- 3V3 – 3.3V Output
- G – Ground
- D0 – GPIO16
- D1 – GPIO5 (I2C SCL)
- D2 – GPIO4 (I2C SDA)
- D3 – GPIO0
- D4 – GPIO2
- D5 – GPIO14 (SPI SCK)
- D6 – GPIO12 (SPI MISO)
- D7 – GPIO13 (SPI MOSI)
- D8 – GPIO15 (SPI CS)
- RX – UART RX
- TX – UART TX
- A0 – Analog Input (Max 3.3V)
- RST – Reset
How to Install ESP8266 D1 Mini Support in Arduino IDE
1. Install Arduino IDE
-
Download Arduino IDE from https://www.arduino.cc/en/software
-
Install and open the Arduino IDE
2. Add ESP8266 Board Manager URL
-
Open Arduino IDE
-
Go to File → Preferences
-
Find the field called Additional Boards Manager URLs
-
Add the following URL:
http://arduino.esp8266.com/stable/package_esp8266com_index.json
-
Click OK
3. Install ESP8266 Board Package
-
Go to Tools → Board → Boards Manager
-
Search for ESP8266
-
Find ESP8266 by ESP8266 Community
-
Click Install
-
Wait for installation to complete
4. Select the D1 Mini Board
-
Go to Tools → Board
-
Select LOLIN (WEMOS) D1 R2 & mini
5. Select Flash Size
-
Go to Tools → Flash Size
-
Select 4M (1M SPIFFS) for 32Mb flash version
6. Install CH340 Driver (If Needed)
-
Download CH340 driver from manufacturer website
-
Install the driver
-
Restart your computer if required
7. Connect and Upload
-
Connect D1 Mini using Micro USB cable
-
Go to Tools → Port and select the correct COM port
-
Click Upload to program the board
Optional: Verify Installation
-
Open File → Examples → ESP8266 → Blink
-
Upload the example sketch
-
Onboard LED should blink if installation is successful
Schematics
- ESP8266 core module with integrated flash
- CH340G USB-to-Serial interface circuit
- 3.3V voltage regulator section
- Micro USB power input circuit
- Reset and boot configuration circuit
Applications
- IoT devices
- Wireless sensor nodes
- Home automation systems
- MQTT-based control systems
- Web server projects
- Remote monitoring systems