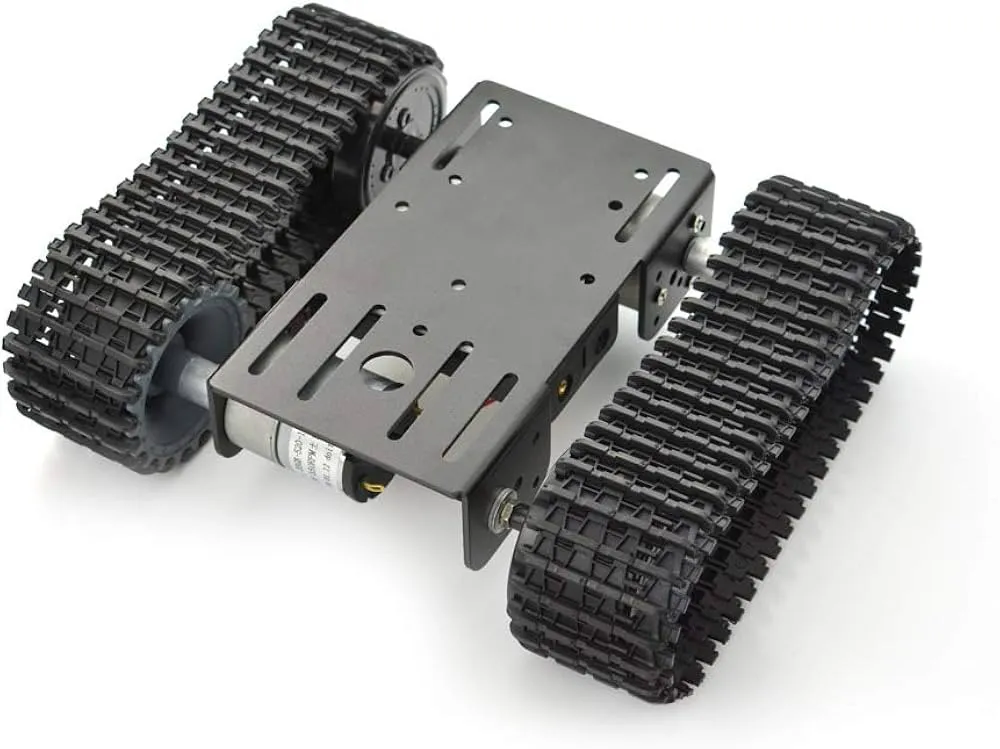
The platform is compatible with popular development boards such as Arduino and can easily integrate with motor drivers, sensors, wireless modules, and other electronic components. This makes it an ideal base for building mobile robots, autonomous vehicles, surveillance robots, and robotics learning projects.
Features
- Tracked robot chassis designed for robotics projects
- High-strength aluminum alloy base for durability
- Engineering plastic tracks with good elasticity and damping
- Two DC geared motors for strong driving power
- Stable movement with excellent road grip
- Compatible with Arduino and other microcontroller platforms
- Easy to assemble and customize
- Suitable for educational robotics and DIY projects

Specifications
- Assembled Dimensions: 19.3 x 16.3 x 6 cm
- Dimensions (inches): 7.60 x 6.42 x 2.36 in
- Net Weight: 0.47 kg
- Base Material: 2 mm Aluminum Alloy
- Track Material: Engineering Plastic
- Number of Motors: 2
- Motor Voltage Range: 6 V to 12 V
- Nominal Motor Voltage: 12 V DC
- No-load Speed: 170 to 350 RPM
- No-load Current: 100 mA
- Motor Weight: 100 g
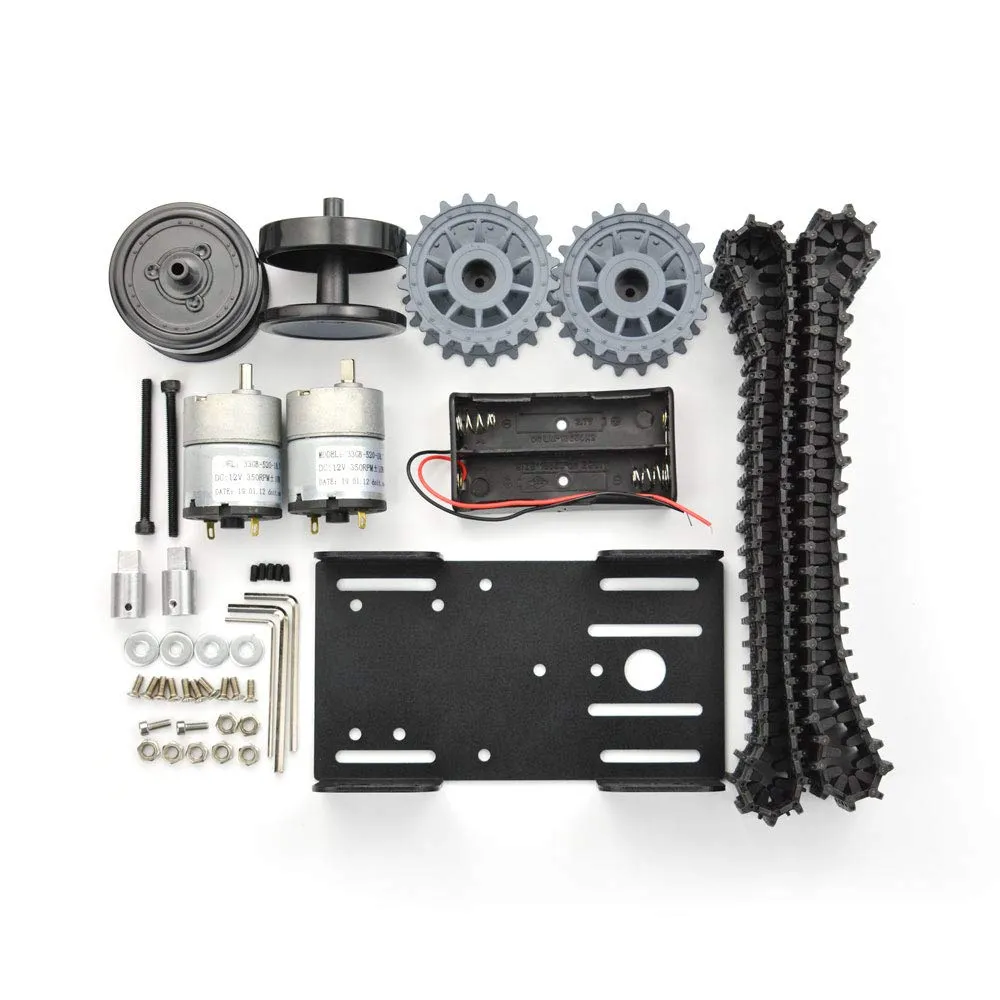
Installation Tutorial
Install the Load-Bearing Wheel
Insert the M4 x 50 long screw into the load-bearing wheel and secure the opposite side with an M4 screw to fix the wheel assembly.
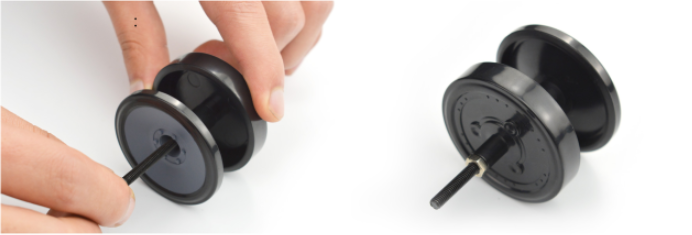
Insert the Load-Bearing Wheel into the Bracket
Place a gasket on each side of the load-bearing wheel, then insert the wheel into the bracket. Secure the assembly with an M4 nut. Avoid overtightening to ensure smooth rotation.
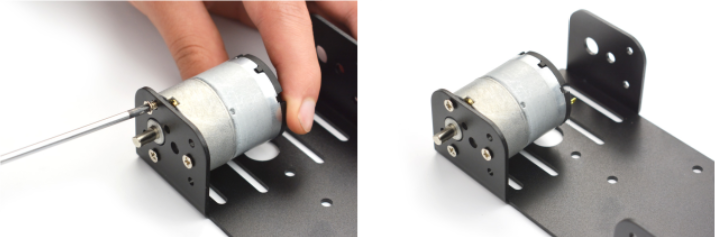
Install the Motor
Insert the DC motor into the mounting bracket and secure it using three M3 x 6 flat head screws to ensure proper alignment and stability.
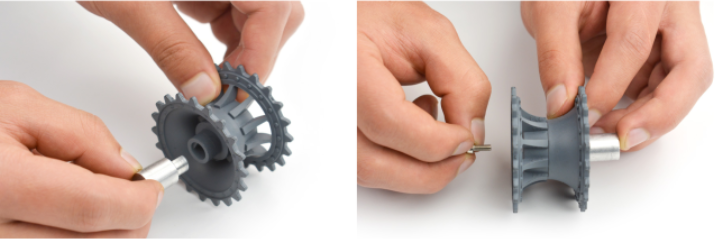
Install the Drive Wheel
Insert the coupling into the drive wheel and secure it using an M3 x 8 hex socket screw. Align the coupling hole with the flat side of the motor shaft to ensure proper torque transmission.
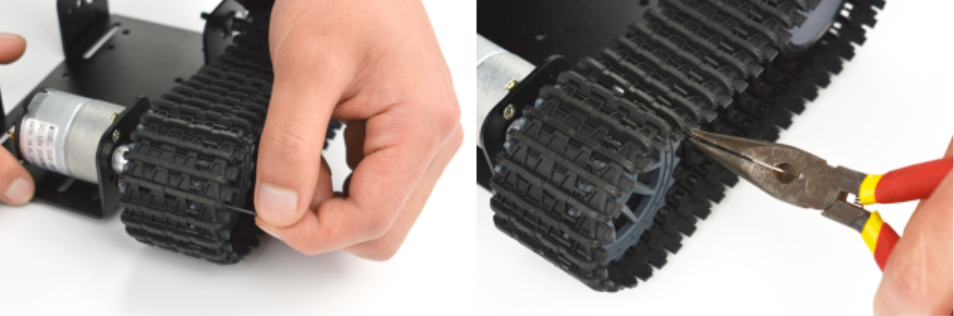
Adjust the Track Length
Measure the required track length and remove excess sections if necessary. Insert the track pin into the track links using pliers to reconnect the track.

Secure the Track Pin
Use pincers to embed the track pin fully into the track link, ensuring that the track forms a closed loop and fits tightly around the wheels.
The platform is compatible with popular development boards such as Arduino and can easily integrate with motor drivers, sensors, wireless modules, and other electronic components. This makes it an ideal base for building mobile robots, autonomous vehicles, surveillance robots, and robotics learning projects.
Features
- Tracked robot chassis designed for robotics projects
- High-strength aluminum alloy base for durability
- Engineering plastic tracks with good elasticity and damping
- Two DC geared motors for strong driving power
- Stable movement with excellent road grip
- Compatible with Arduino and other microcontroller platforms
- Easy to assemble and customize
- Suitable for educational robotics and DIY projects
Specifications
- Assembled Dimensions: 19.3 x 16.3 x 6 cm
- Dimensions (inches): 7.60 x 6.42 x 2.36 in
- Net Weight: 0.47 kg
- Base Material: 2 mm Aluminum Alloy
- Track Material: Engineering Plastic
- Number of Motors: 2
- Motor Voltage Range: 6 V to 12 V
- Nominal Motor Voltage: 12 V DC
- No-load Speed: 170 to 350 RPM
- No-load Current: 100 mA
- Motor Weight: 100 g
Installation Tutorial
Install the Load-Bearing Wheel
Insert the M4 x 50 long screw into the load-bearing wheel and secure the opposite side with an M4 screw to fix the wheel assembly.
Insert the Load-Bearing Wheel into the Bracket
Place a gasket on each side of the load-bearing wheel, then insert the wheel into the bracket. Secure the assembly with an M4 nut. Avoid overtightening to ensure smooth rotation.
Install the Motor
Insert the DC motor into the mounting bracket and secure it using three M3 x 6 flat head screws to ensure proper alignment and stability.
Install the Drive Wheel
Insert the coupling into the drive wheel and secure it using an M3 x 8 hex socket screw. Align the coupling hole with the flat side of the motor shaft to ensure proper torque transmission.
Adjust the Track Length
Measure the required track length and remove excess sections if necessary. Insert the track pin into the track links using pliers to reconnect the track.
Secure the Track Pin
Use pincers to embed the track pin fully into the track link, ensuring that the track forms a closed loop and fits tightly around the wheels.