- All products
- Kits
- Robotic Kits
- Robot 4WD Smart Robot Car Chassis Kit 2 Layers for Arduino With Speed Encoder (Black)
- Robotic Kits
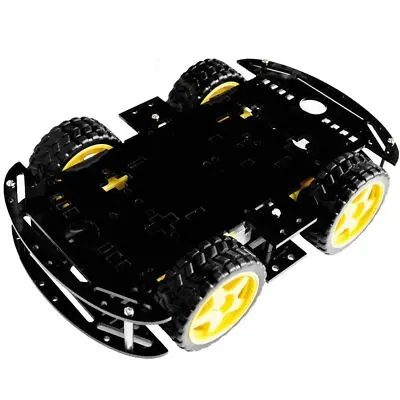
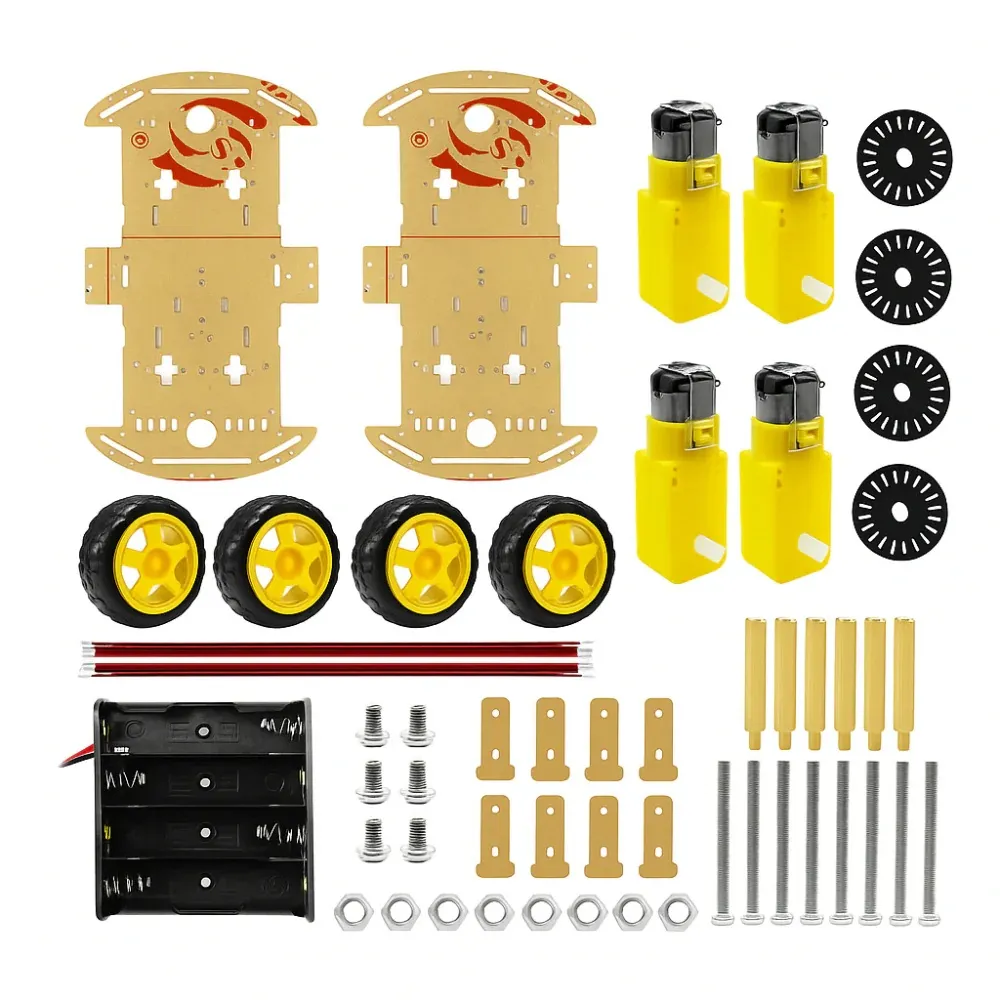
The mechanical structure is designed for simple and convenient installation. Adjustable copper pillars allow users to modify the height of the chassis, creating space for additional electronics such as motor drivers, batteries, sensors, wireless modules, and cameras. Because of its modular design, the chassis can support many robotics applications including obstacle avoidance robots, line tracking robots, and remote controlled vehicles.
Features
- Four wheel drive robot chassis platform
- Designed for DIY robotics projects and learning
- Easy mechanical structure for quick installation
- Four DC geared motors for powerful movement
- Adjustable chassis height using copper pillars
- Encoder disks included for speed measurement systems
- Expandable platform for sensors, cameras, and wireless modules
- Compatible with Arduino, ESP32, Raspberry Pi and other controllers
Specifications
- Drive System: Four wheel drive
- Working Voltage: DC 3 V to 6 V
- Working Current: 100 mA to 120 mA
- No Load Speed with Wheel: 100 RPM to 240 RPM
- No Load Speed: 20 m per minute to 48 m per minute
- Noise Level: Less than 65 dB
- Wheel Diameter: Approximately 66 mm
- Robot Dimensions: Approximately 25.5 × 15.5 × 6.5 cm
- Motor Type: DC geared motors
- Encoder Disk: Included for speed measurement systems
Applications
- Four wheel drive robot cars
- Obstacle avoidance robots
- Line following robots
- Remote controlled robot vehicles
- Autonomous robotics projects
- Educational robotics experiments
How to Use
- Attach the four DC geared motors to the chassis plates.
- Install the wheels onto each motor shaft.
- Mount the encoder disks onto the motor shafts if speed measurement is required.
- Assemble the chassis layers using screws and copper pillars.
- Install a battery pack and motor driver module such as L298N or L293D.
- Connect the motor driver to a microcontroller such as Arduino or ESP32.
- Add sensors such as ultrasonic sensors, line tracking modules, or wireless control modules.
- Upload a program to control the robot movement and sensor behavior.
Code for a WiFi-controlled car using an ESP32 and a simple web interface.
Connection
| ESP32 Pin | Motor Driver |
|---|---|
| 27 | LF IN1 |
| 26 | LF IN2 |
| 25 | LR IN1 |
| 33 | LR IN2 |
| 32 | RF IN1 |
| 23 | RF IN2 |
| 22 | RR IN1 |
| 21 | RR IN2 |
Power:
-
Motor Driver VCC → Battery (3–6V)
-
Motor Driver GND → ESP32 GND
-
ESP32 powered via USB or 5V regulator
The Code
#include <WiFi.h>
#include <WebServer.h>
#include <ESPmDNS.h>  // mDNS support

// WiFi credentials
const char* ssid = "YOUR_WIFI_SSID";
const char* password = "YOUR_WIFI_PASSWORD";

// Motor Pins
#define LF_IN1 27
#define LF_IN2 26
#define LR_IN1 25
#define LR_IN2 33
#define RF_IN1 32
#define RF_IN2 23
#define RR_IN1 22
#define RR_IN2 21

WebServer server(80);  // Web server on port 80

// HTML page
const char* htmlPage = R"rawliteral(
<!DOCTYPE html>
<html>
<head>
  <title>ESP32 4WD Robot Control</title>
  <style>
    body { text-align:center; font-family:Arial; }
    button { width:100px; height:50px; margin:10px; font-size:16px; }
  </style>
</head>
<body>
  <h1>ESP32 4WD Robot Control</h1>
  <button onclick="location.href='/forward'">Forward</button><br>
  <button onclick="location.href='/left'">Left</button>
  <button onclick="location.href='/stop'">Stop</button>
  <button onclick="location.href='/right'">Right</button><br>
  <button onclick="location.href='/backward'">Backward</button>
</body>
</html>
)rawliteral";

// Motor functions
void moveForward() {
  digitalWrite(LF_IN1,HIGH); digitalWrite(LF_IN2,LOW);
  digitalWrite(LR_IN1,HIGH); digitalWrite(LR_IN2,LOW);
  digitalWrite(RF_IN1,HIGH); digitalWrite(RF_IN2,LOW);
  digitalWrite(RR_IN1,HIGH); digitalWrite(RR_IN2,LOW);
}

void moveBackward() {
  digitalWrite(LF_IN1,LOW); digitalWrite(LF_IN2,HIGH);
  digitalWrite(LR_IN1,LOW); digitalWrite(LR_IN2,HIGH);
  digitalWrite(RF_IN1,LOW); digitalWrite(RF_IN2,HIGH);
  digitalWrite(RR_IN1,LOW); digitalWrite(RR_IN2,HIGH);
}

void turnLeft() {
  digitalWrite(LF_IN1,LOW); digitalWrite(LF_IN2,HIGH);
  digitalWrite(LR_IN1,LOW); digitalWrite(LR_IN2,HIGH);
  digitalWrite(RF_IN1,HIGH); digitalWrite(RF_IN2,LOW);
  digitalWrite(RR_IN1,HIGH); digitalWrite(RR_IN2,LOW);
}

void turnRight() {
  digitalWrite(LF_IN1,HIGH); digitalWrite(LF_IN2,LOW);
  digitalWrite(LR_IN1,HIGH); digitalWrite(LR_IN2,LOW);
  digitalWrite(RF_IN1,LOW); digitalWrite(RF_IN2,HIGH);
  digitalWrite(RR_IN1,LOW); digitalWrite(RR_IN2,HIGH);
}

void stopRobot() {
  digitalWrite(LF_IN1,LOW); digitalWrite(LF_IN2,LOW);
  digitalWrite(LR_IN1,LOW); digitalWrite(LR_IN2,LOW);
  digitalWrite(RF_IN1,LOW); digitalWrite(RF_IN2,LOW);
  digitalWrite(RR_IN1,LOW); digitalWrite(RR_IN2,LOW);
}

// Web routes
void setupRoutes() {
  server.on("/", [](){ server.send(200,"text/html", htmlPage); });
  server.on("/forward", [](){ moveForward(); server.send(200,"text/html", htmlPage); });
  server.on("/backward", [](){ moveBackward(); server.send(200,"text/html", htmlPage); });
  server.on("/left", [](){ turnLeft(); server.send(200,"text/html", htmlPage); });
  server.on("/right", [](){ turnRight(); server.send(200,"text/html", htmlPage); });
  server.on("/stop", [](){ stopRobot(); server.send(200,"text/html", htmlPage); });
}

void setup() {
  Serial.begin(115200);

  // Motor pins as output
  pinMode(LF_IN1,OUTPUT); pinMode(LF_IN2,OUTPUT);
  pinMode(LR_IN1,OUTPUT); pinMode(LR_IN2,OUTPUT);
  pinMode(RF_IN1,OUTPUT); pinMode(RF_IN2,OUTPUT);
  pinMode(RR_IN1,OUTPUT); pinMode(RR_IN2,OUTPUT);

  // Connect to WiFi
  WiFi.begin(ssid,password);
  Serial.print("Connecting to WiFi");
  while(WiFi.status() != WL_CONNECTED){
    delay(500);
    Serial.print(".");
  }
  Serial.println("\nWiFi connected!");
  Serial.print("IP address: ");
  Serial.println(WiFi.localIP());

  // Start mDNS
  if(!MDNS.begin("robot")) {
    Serial.println("Error setting up mDNS");
  } else {
    Serial.println("mDNS responder started: http://robot.local");
  }

  // Setup web server
  setupRoutes();
  server.begin();
}

void loop() {
  server.handleClient();
}
How it works
-
Upload this to your ESP32.
-
Open the Serial Monitor → confirm WiFi connected. You’ll see:
WiFi connected!
IP address: 192.168.x.x
mDNS responder started: http://robot.local -
On any mobile phone or PC on the same WiFi, open http://robot.local/ the control page with buttons appears.
-
Tap the buttons to control the robot.
The mechanical structure is designed for simple and convenient installation. Adjustable copper pillars allow users to modify the height of the chassis, creating space for additional electronics such as motor drivers, batteries, sensors, wireless modules, and cameras. Because of its modular design, the chassis can support many robotics applications including obstacle avoidance robots, line tracking robots, and remote controlled vehicles.
Features
- Four wheel drive robot chassis platform
- Designed for DIY robotics projects and learning
- Easy mechanical structure for quick installation
- Four DC geared motors for powerful movement
- Adjustable chassis height using copper pillars
- Encoder disks included for speed measurement systems
- Expandable platform for sensors, cameras, and wireless modules
- Compatible with Arduino, ESP32, Raspberry Pi and other controllers
Specifications
- Drive System: Four wheel drive
- Working Voltage: DC 3 V to 6 V
- Working Current: 100 mA to 120 mA
- No Load Speed with Wheel: 100 RPM to 240 RPM
- No Load Speed: 20 m per minute to 48 m per minute
- Noise Level: Less than 65 dB
- Wheel Diameter: Approximately 66 mm
- Robot Dimensions: Approximately 25.5 × 15.5 × 6.5 cm
- Motor Type: DC geared motors
- Encoder Disk: Included for speed measurement systems
Applications
- Four wheel drive robot cars
- Obstacle avoidance robots
- Line following robots
- Remote controlled robot vehicles
- Autonomous robotics projects
- Educational robotics experiments
How to Use
- Attach the four DC geared motors to the chassis plates.
- Install the wheels onto each motor shaft.
- Mount the encoder disks onto the motor shafts if speed measurement is required.
- Assemble the chassis layers using screws and copper pillars.
- Install a battery pack and motor driver module such as L298N or L293D.
- Connect the motor driver to a microcontroller such as Arduino or ESP32.
- Add sensors such as ultrasonic sensors, line tracking modules, or wireless control modules.
- Upload a program to control the robot movement and sensor behavior.
Code for a WiFi-controlled car using an ESP32 and a simple web interface.
Connection
| ESP32 Pin | Motor Driver |
|---|---|
| 27 | LF IN1 |
| 26 | LF IN2 |
| 25 | LR IN1 |
| 33 | LR IN2 |
| 32 | RF IN1 |
| 23 | RF IN2 |
| 22 | RR IN1 |
| 21 | RR IN2 |
Power:
-
Motor Driver VCC → Battery (3–6V)
-
Motor Driver GND → ESP32 GND
-
ESP32 powered via USB or 5V regulator
The Code
#include <WiFi.h>
#include <WebServer.h>
#include <ESPmDNS.h>  // mDNS support

// WiFi credentials
const char* ssid = "YOUR_WIFI_SSID";
const char* password = "YOUR_WIFI_PASSWORD";

// Motor Pins
#define LF_IN1 27
#define LF_IN2 26
#define LR_IN1 25
#define LR_IN2 33
#define RF_IN1 32
#define RF_IN2 23
#define RR_IN1 22
#define RR_IN2 21

WebServer server(80);  // Web server on port 80

// HTML page
const char* htmlPage = R"rawliteral(
<!DOCTYPE html>
<html>
<head>
  <title>ESP32 4WD Robot Control</title>
  <style>
    body { text-align:center; font-family:Arial; }
    button { width:100px; height:50px; margin:10px; font-size:16px; }
  </style>
</head>
<body>
  <h1>ESP32 4WD Robot Control</h1>
  <button onclick="location.href='/forward'">Forward</button><br>
  <button onclick="location.href='/left'">Left</button>
  <button onclick="location.href='/stop'">Stop</button>
  <button onclick="location.href='/right'">Right</button><br>
  <button onclick="location.href='/backward'">Backward</button>
</body>
</html>
)rawliteral";

// Motor functions
void moveForward() {
  digitalWrite(LF_IN1,HIGH); digitalWrite(LF_IN2,LOW);
  digitalWrite(LR_IN1,HIGH); digitalWrite(LR_IN2,LOW);
  digitalWrite(RF_IN1,HIGH); digitalWrite(RF_IN2,LOW);
  digitalWrite(RR_IN1,HIGH); digitalWrite(RR_IN2,LOW);
}

void moveBackward() {
  digitalWrite(LF_IN1,LOW); digitalWrite(LF_IN2,HIGH);
  digitalWrite(LR_IN1,LOW); digitalWrite(LR_IN2,HIGH);
  digitalWrite(RF_IN1,LOW); digitalWrite(RF_IN2,HIGH);
  digitalWrite(RR_IN1,LOW); digitalWrite(RR_IN2,HIGH);
}

void turnLeft() {
  digitalWrite(LF_IN1,LOW); digitalWrite(LF_IN2,HIGH);
  digitalWrite(LR_IN1,LOW); digitalWrite(LR_IN2,HIGH);
  digitalWrite(RF_IN1,HIGH); digitalWrite(RF_IN2,LOW);
  digitalWrite(RR_IN1,HIGH); digitalWrite(RR_IN2,LOW);
}

void turnRight() {
  digitalWrite(LF_IN1,HIGH); digitalWrite(LF_IN2,LOW);
  digitalWrite(LR_IN1,HIGH); digitalWrite(LR_IN2,LOW);
  digitalWrite(RF_IN1,LOW); digitalWrite(RF_IN2,HIGH);
  digitalWrite(RR_IN1,LOW); digitalWrite(RR_IN2,HIGH);
}

void stopRobot() {
  digitalWrite(LF_IN1,LOW); digitalWrite(LF_IN2,LOW);
  digitalWrite(LR_IN1,LOW); digitalWrite(LR_IN2,LOW);
  digitalWrite(RF_IN1,LOW); digitalWrite(RF_IN2,LOW);
  digitalWrite(RR_IN1,LOW); digitalWrite(RR_IN2,LOW);
}

// Web routes
void setupRoutes() {
  server.on("/", [](){ server.send(200,"text/html", htmlPage); });
  server.on("/forward", [](){ moveForward(); server.send(200,"text/html", htmlPage); });
  server.on("/backward", [](){ moveBackward(); server.send(200,"text/html", htmlPage); });
  server.on("/left", [](){ turnLeft(); server.send(200,"text/html", htmlPage); });
  server.on("/right", [](){ turnRight(); server.send(200,"text/html", htmlPage); });
  server.on("/stop", [](){ stopRobot(); server.send(200,"text/html", htmlPage); });
}

void setup() {
  Serial.begin(115200);

  // Motor pins as output
  pinMode(LF_IN1,OUTPUT); pinMode(LF_IN2,OUTPUT);
  pinMode(LR_IN1,OUTPUT); pinMode(LR_IN2,OUTPUT);
  pinMode(RF_IN1,OUTPUT); pinMode(RF_IN2,OUTPUT);
  pinMode(RR_IN1,OUTPUT); pinMode(RR_IN2,OUTPUT);

  // Connect to WiFi
  WiFi.begin(ssid,password);
  Serial.print("Connecting to WiFi");
  while(WiFi.status() != WL_CONNECTED){
    delay(500);
    Serial.print(".");
  }
  Serial.println("\nWiFi connected!");
  Serial.print("IP address: ");
  Serial.println(WiFi.localIP());

  // Start mDNS
  if(!MDNS.begin("robot")) {
    Serial.println("Error setting up mDNS");
  } else {
    Serial.println("mDNS responder started: http://robot.local");
  }

  // Setup web server
  setupRoutes();
  server.begin();
}

void loop() {
  server.handleClient();
}
How it works
-
Upload this to your ESP32.
-
Open the Serial Monitor → confirm WiFi connected. You’ll see:
WiFi connected!
IP address: 192.168.x.x
mDNS responder started: http://robot.local -
On any mobile phone or PC on the same WiFi, open http://robot.local/ the control page with buttons appears.
-
Tap the buttons to control the robot.