Assembly Instructions:
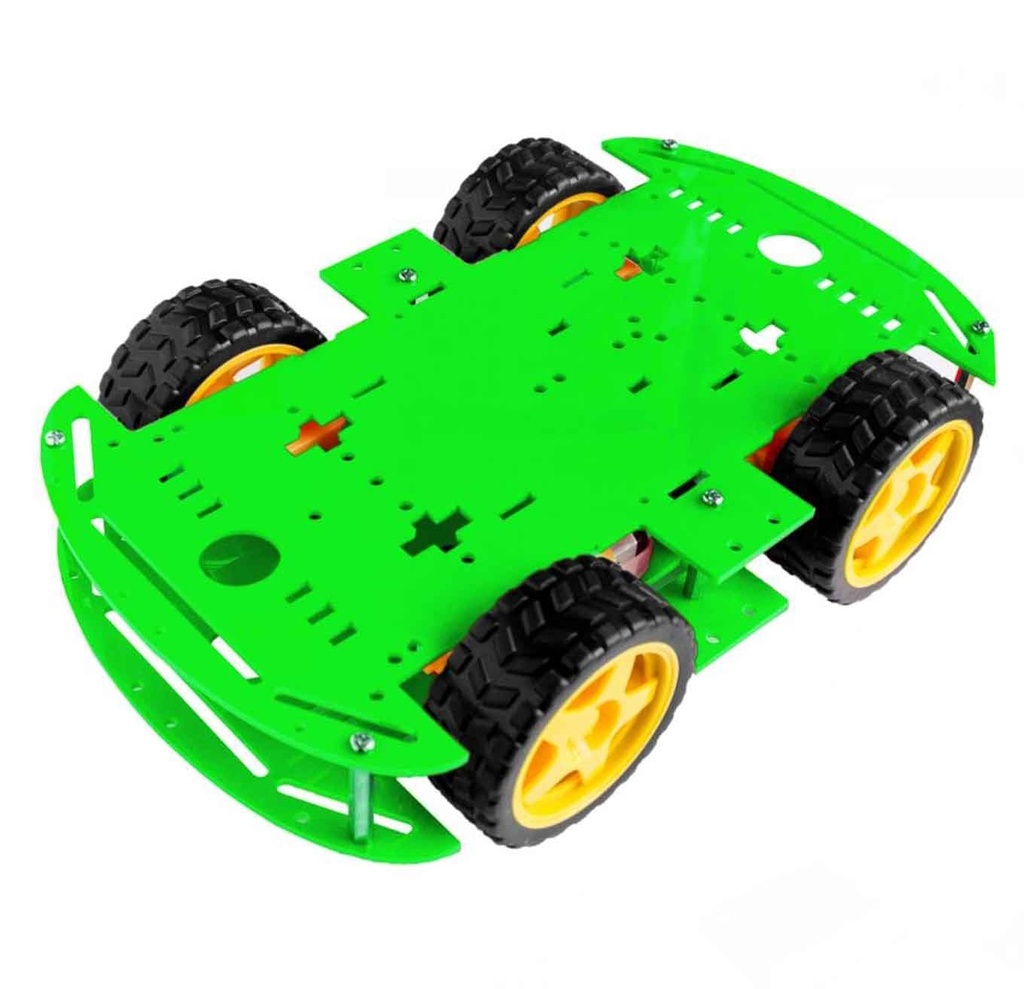
- Start by assembling the chassis: join the two smart car chassis pieces using the screws and nuts.
- Attach the four DC gear motors to the bottom of the chassis using screws and nuts.
- Secure the four encoders to the DC gear motors with the provided screws and nuts.
- Fix the four tires onto the shafts of the respective gear motors.
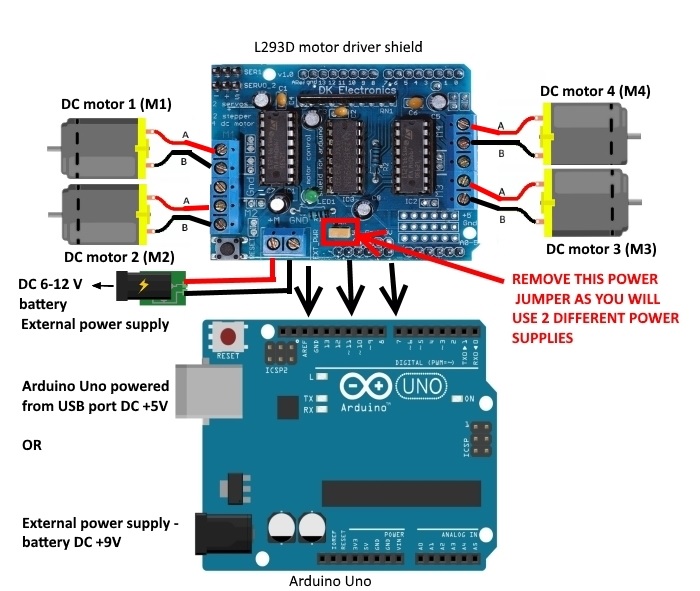
- Connect the wires from each motor to a motor driver board or microcontroller, following your specific hardware instructions.
- Power the robot with a battery or power supply and test movement by sending commands to the motor driver or microcontroller.
Circuit Connection:
Below is the connection guide for the L293D 4 motor shield with Arduino:

| L293D Motor Shield |
Arduino Uno |
| VCC |
5V |
| GND |
GND |
| IN1 |
Digital Pin 2 (D2) |
| IN2 |
Digital Pin 3 (D3) |
| IN3 |
Digital Pin 4 (D4) |
| IN4 |
Digital Pin 5 (D5) |
Connect motors to the motor shield's M1, M2, M3, and M4 ports. Each motor has two wires: the positive connects to terminal A and the negative to terminal B on the shield.
Library Installation for L293D Motor Shield:
- Download the Adafruit Motor Shield library from GitHub.
- Extract the downloaded ZIP file to a folder on your computer.
- Open the Arduino IDE.
- Go to Sketch > Include Library > Add .ZIP Library.
- Select the extracted ZIP file
Adafruit_Motor_Shield_library-master.zip and click Open.
- The library will be installed, and a success message will appear in the IDE.
Example Arduino Code to Control 4WD Robot Using L293D Shield
// Include the AFMotor library
#include <AFMotor.h>

// Create motor objects for the four motors
AF_DCMotor motor1(1, MOTOR12_64KHZ);
AF_DCMotor motor2(2, MOTOR12_64KHZ);
AF_DCMotor motor3(3, MOTOR34_64KHZ);
AF_DCMotor motor4(4, MOTOR34_64KHZ);

void setup() {
  Serial.begin(9600);
  AFMS.begin(); // Initialize motor shield, default freq 1.6KHz

  motor1.setSpeed(200);
  motor2.setSpeed(200);
  motor3.setSpeed(200);
  motor4.setSpeed(200);
}

void loop() {
  moveForward();
  delay(1000);

  stopRobot();
  delay(500);

  turnLeft();
  delay(1000);

  stopRobot();
  delay(500);

  turnRight();
  delay(1000);

  stopRobot();
  delay(500);

  moveBackward();
  delay(1000);

  stopRobot();
  delay(500);
}

void moveForward() {
  motor1.run(FORWARD);
  motor2.run(FORWARD);
  motor3.run(FORWARD);
  motor4.run(FORWARD);
}

void moveBackward() {
  motor1.run(BACKWARD);
  motor2.run(BACKWARD);
  motor3.run(BACKWARD);
  motor4.run(BACKWARD);
}

void turnLeft() {
  motor1.run(FORWARD);
  motor2.run(FORWARD);
  motor3.run(BACKWARD);
  motor4.run(BACKWARD);
}

void turnRight() {
  motor1.run(BACKWARD);
  motor2.run(BACKWARD);
  motor3.run(FORWARD);
  motor4.run(FORWARD);
}

void stopRobot() {
  motor1.run(RELEASE);
  motor2.run(RELEASE);
  motor3.run(RELEASE);
  motor4.run(RELEASE);
}
Specifications:
- Working Voltage: DC 3V / 5V / 6V
- Working Current: 100mA / 100mA / 120mA
- No-load Speed (with wheel): 100 RPM / 190 RPM / 240 RPM
- Speed (no-load): 20 m/min, 39 m/min, 48 m/min
- Noise: < 65 dB
- Wheel Diameter: 66 mm (approx.)
- Dimensions (L × W × H): 25.5 × 15.5 × 6.5 cm (approx.)
Note: The robot's performance depends on the motor driver or microcontroller used, power source, and programming.
Assembly Instructions:
- Start by assembling the chassis: join the two smart car chassis pieces using the screws and nuts.
- Attach the four DC gear motors to the bottom of the chassis using screws and nuts.
- Secure the four encoders to the DC gear motors with the provided screws and nuts.
- Fix the four tires onto the shafts of the respective gear motors.
- Connect the wires from each motor to a motor driver board or microcontroller, following your specific hardware instructions.
- Power the robot with a battery or power supply and test movement by sending commands to the motor driver or microcontroller.
Circuit Connection:
Below is the connection guide for the L293D 4 motor shield with Arduino:

| L293D Motor Shield |
Arduino Uno |
| VCC |
5V |
| GND |
GND |
| IN1 |
Digital Pin 2 (D2) |
| IN2 |
Digital Pin 3 (D3) |
| IN3 |
Digital Pin 4 (D4) |
| IN4 |
Digital Pin 5 (D5) |
Connect motors to the motor shield's M1, M2, M3, and M4 ports. Each motor has two wires: the positive connects to terminal A and the negative to terminal B on the shield.
Library Installation for L293D Motor Shield:
- Download the Adafruit Motor Shield library from GitHub.
- Extract the downloaded ZIP file to a folder on your computer.
- Open the Arduino IDE.
- Go to Sketch > Include Library > Add .ZIP Library.
- Select the extracted ZIP file
Adafruit_Motor_Shield_library-master.zip and click Open.
- The library will be installed, and a success message will appear in the IDE.
Example Arduino Code to Control 4WD Robot Using L293D Shield
// Include the AFMotor library
#include <AFMotor.h>

// Create motor objects for the four motors
AF_DCMotor motor1(1, MOTOR12_64KHZ);
AF_DCMotor motor2(2, MOTOR12_64KHZ);
AF_DCMotor motor3(3, MOTOR34_64KHZ);
AF_DCMotor motor4(4, MOTOR34_64KHZ);

void setup() {
  Serial.begin(9600);
  AFMS.begin(); // Initialize motor shield, default freq 1.6KHz

  motor1.setSpeed(200);
  motor2.setSpeed(200);
  motor3.setSpeed(200);
  motor4.setSpeed(200);
}

void loop() {
  moveForward();
  delay(1000);

  stopRobot();
  delay(500);

  turnLeft();
  delay(1000);

  stopRobot();
  delay(500);

  turnRight();
  delay(1000);

  stopRobot();
  delay(500);

  moveBackward();
  delay(1000);

  stopRobot();
  delay(500);
}

void moveForward() {
  motor1.run(FORWARD);
  motor2.run(FORWARD);
  motor3.run(FORWARD);
  motor4.run(FORWARD);
}

void moveBackward() {
  motor1.run(BACKWARD);
  motor2.run(BACKWARD);
  motor3.run(BACKWARD);
  motor4.run(BACKWARD);
}

void turnLeft() {
  motor1.run(FORWARD);
  motor2.run(FORWARD);
  motor3.run(BACKWARD);
  motor4.run(BACKWARD);
}

void turnRight() {
  motor1.run(BACKWARD);
  motor2.run(BACKWARD);
  motor3.run(FORWARD);
  motor4.run(FORWARD);
}

void stopRobot() {
  motor1.run(RELEASE);
  motor2.run(RELEASE);
  motor3.run(RELEASE);
  motor4.run(RELEASE);
}
Specifications:
- Working Voltage: DC 3V / 5V / 6V
- Working Current: 100mA / 100mA / 120mA
- No-load Speed (with wheel): 100 RPM / 190 RPM / 240 RPM
- Speed (no-load): 20 m/min, 39 m/min, 48 m/min
- Noise: < 65 dB
- Wheel Diameter: 66 mm (approx.)
- Dimensions (L × W × H): 25.5 × 15.5 × 6.5 cm (approx.)
Note: The robot's performance depends on the motor driver or microcontroller used, power source, and programming.

