Features:
- Supports full-step, half-step, 1/4, 1/8, and 1/16 microstepping
- Wide operating voltage: 8V to 35V
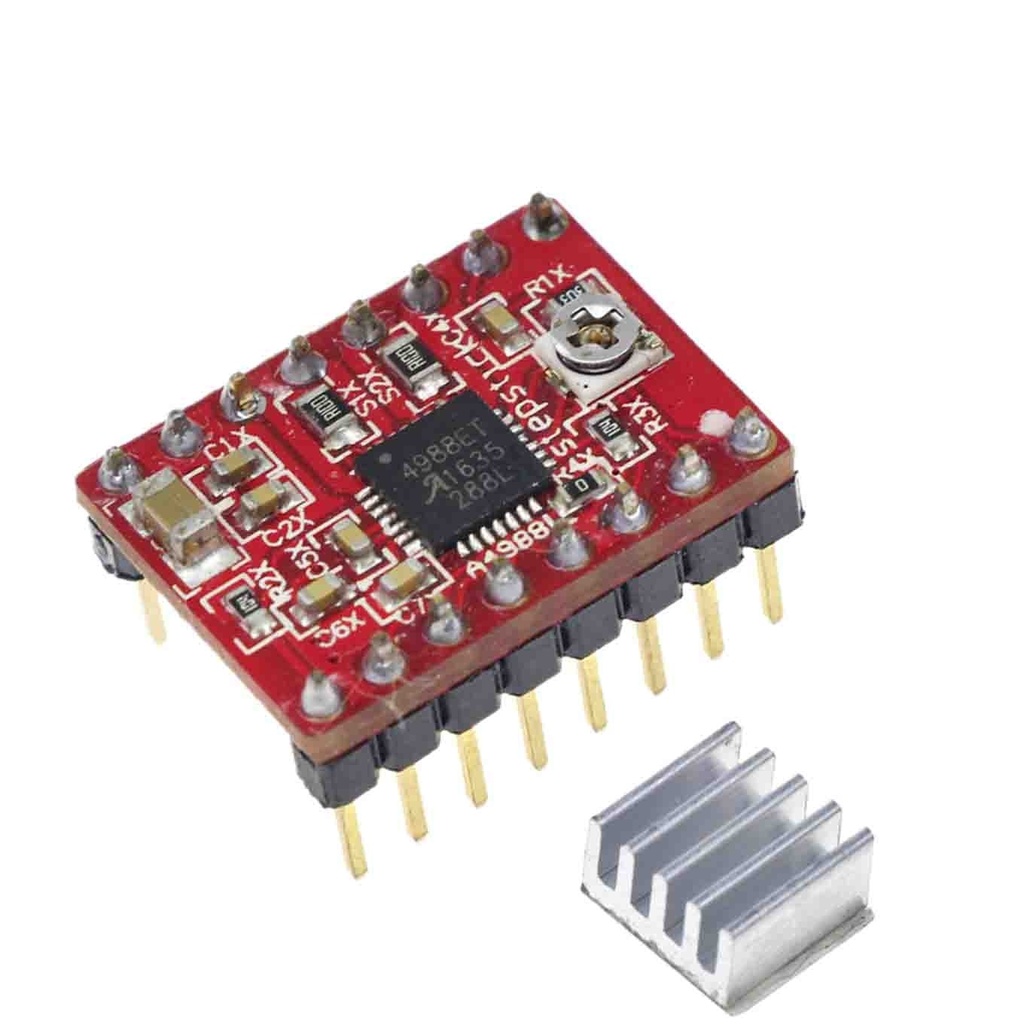
- Up to 2A current per coil (with heatsink)
- Adjustable current control via onboard potentiometer
- Over-current, over-temperature, and under-voltage protection
- Sleep and reset pins for power saving and reinitialization
- Compatible with Arduino, Raspberry Pi, and other microcontrollers
Pinout:
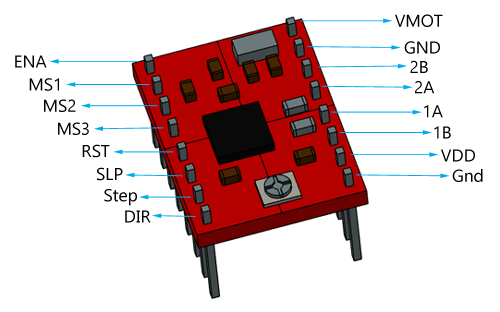
- ENABLE: Activates the driver when LOW
- MS1, MS2, MS3: Set microstepping mode
- RESET: Resets internal logic
- SLEEP: Puts driver into low-power mode
- STEP: Each pulse moves the motor one microstep
- DIR: Sets motor rotation direction
- GND: Ground connection
- VMOT: Motor power supply (8–35V)
- VDD: Logic power supply (3–5V)
Applications:
- 3D Printers (e.g., Prusa, Ender series)
- CNC machines and mills
- Robotics (actuators, wheels, grippers)
- Automated camera and telescope positioning
- Conveyor and sorting automation systems
Principle of Work:
The A4988 uses pulse-width modulation (PWM) to regulate motor current through an H-bridge driver. Microstepping is achieved by controlling current ratio through both motor coils. Each STEP signal from the microcontroller advances the motor one microstep in the direction defined by DIR. The driver alternates power between A and B windings to rotate the motor shaft.
Wiring / Circuit:
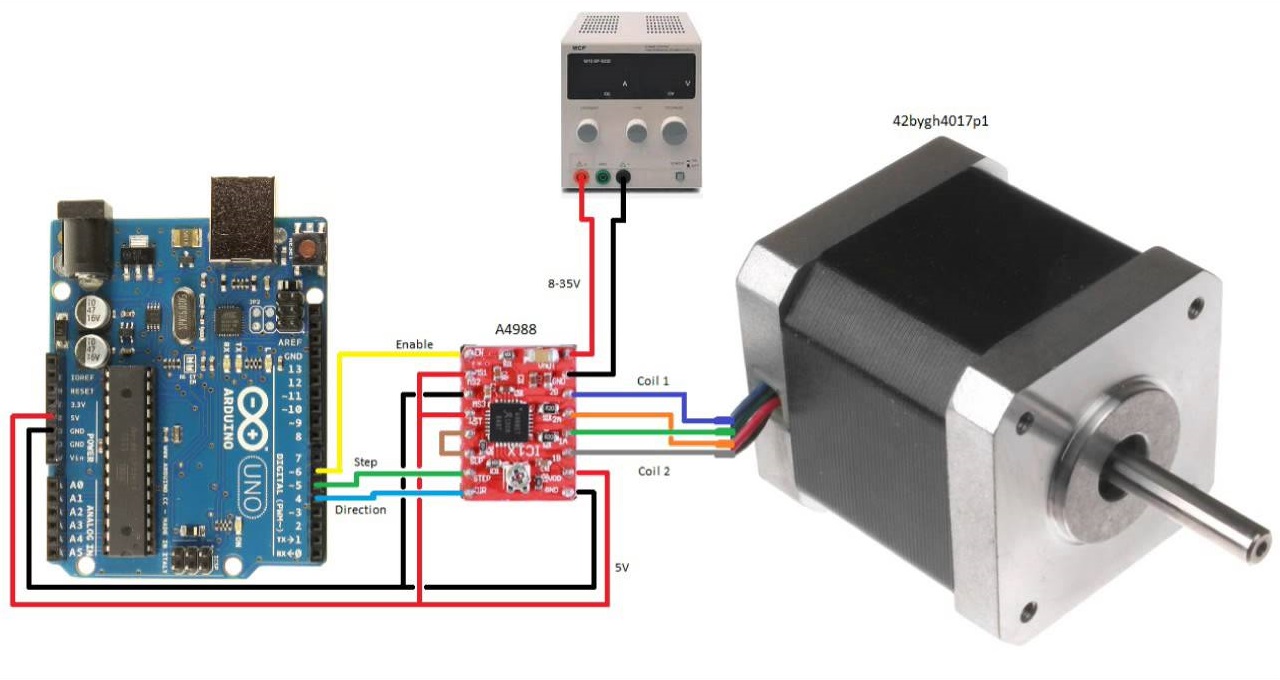
- VMOT → Motor Power Supply (8–35V)
- GND → Common Ground
- VDD → 5V (logic supply)
- DIR → Arduino Pin 4
- STEP → Arduino Pin 5
- ENABLE → Arduino Pin 6
- Connect stepper motor coils to A1, A2 and B1, B2 pins
- Add 100µF capacitor across VMOT and GND for stability
Library:
The AccelStepper library is recommended for smooth acceleration and speed control:
- Open Arduino IDE
- Go to Sketch → Include Library → Manage Libraries...
- Search for AccelStepper and click Install
Sample Code:
#include <AccelStepper.h>

#define dirPin 4
#define stepPin 5
#define enablePin 6

AccelStepper stepper(AccelStepper::DRIVER, stepPin, dirPin);

void setup() {
  pinMode(enablePin, OUTPUT);
  digitalWrite(enablePin, LOW); // Enable motor driver

  stepper.setMaxSpeed(200);
  stepper.setAcceleration(100);
}

void loop() {
  stepper.moveTo(1000);
  while (stepper.distanceToGo() != 0) {
    stepper.run();
  }

  stepper.moveTo(-1000);
  while (stepper.distanceToGo() != 0) {
    stepper.run();
  }

  digitalWrite(enablePin, HIGH); // Disable motor
  delay(1000);
}
Technical Specifications:
- Supply Voltage: 8–35V
- Logic Voltage: 3–5V
- Max Output Current: 2A per coil (with heatsink)
- Microstepping: Full, 1/2, 1/4, 1/8, 1/16
- Current Limiting: Adjustable via potentiometer
- Protections: Over-temp, Over-current, Under-voltage
- Max Step Rate: 30,000 steps/sec
- Operating Temp: -20°C to +85°C
Comparison with DRV8825:
| Feature | A4988 | DRV8825 |
|---|---|---|
| Voltage Range | 8 – 35V | 8.2 – 45V |
| Max Current | 2A | 2.5A |
| Microstepping | 1/16 | 1/32 |
| Step Rate | 30k/s | 250k/s |
| Cost | Lower | Higher |
| Heat Management | Heatsink required at full load | Better thermal performance |
Resources:
Features:
- Supports full-step, half-step, 1/4, 1/8, and 1/16 microstepping
- Wide operating voltage: 8V to 35V
- Up to 2A current per coil (with heatsink)
- Adjustable current control via onboard potentiometer
- Over-current, over-temperature, and under-voltage protection
- Sleep and reset pins for power saving and reinitialization
- Compatible with Arduino, Raspberry Pi, and other microcontrollers
Pinout:
- ENABLE: Activates the driver when LOW
- MS1, MS2, MS3: Set microstepping mode
- RESET: Resets internal logic
- SLEEP: Puts driver into low-power mode
- STEP: Each pulse moves the motor one microstep
- DIR: Sets motor rotation direction
- GND: Ground connection
- VMOT: Motor power supply (8–35V)
- VDD: Logic power supply (3–5V)
Applications:
- 3D Printers (e.g., Prusa, Ender series)
- CNC machines and mills
- Robotics (actuators, wheels, grippers)
- Automated camera and telescope positioning
- Conveyor and sorting automation systems
Principle of Work:
The A4988 uses pulse-width modulation (PWM) to regulate motor current through an H-bridge driver. Microstepping is achieved by controlling current ratio through both motor coils. Each STEP signal from the microcontroller advances the motor one microstep in the direction defined by DIR. The driver alternates power between A and B windings to rotate the motor shaft.
Wiring / Circuit:
- VMOT → Motor Power Supply (8–35V)
- GND → Common Ground
- VDD → 5V (logic supply)
- DIR → Arduino Pin 4
- STEP → Arduino Pin 5
- ENABLE → Arduino Pin 6
- Connect stepper motor coils to A1, A2 and B1, B2 pins
- Add 100µF capacitor across VMOT and GND for stability
Library:
The AccelStepper library is recommended for smooth acceleration and speed control:
- Open Arduino IDE
- Go to Sketch → Include Library → Manage Libraries...
- Search for AccelStepper and click Install
Sample Code:
#include <AccelStepper.h>

#define dirPin 4
#define stepPin 5
#define enablePin 6

AccelStepper stepper(AccelStepper::DRIVER, stepPin, dirPin);

void setup() {
  pinMode(enablePin, OUTPUT);
  digitalWrite(enablePin, LOW); // Enable motor driver

  stepper.setMaxSpeed(200);
  stepper.setAcceleration(100);
}

void loop() {
  stepper.moveTo(1000);
  while (stepper.distanceToGo() != 0) {
    stepper.run();
  }

  stepper.moveTo(-1000);
  while (stepper.distanceToGo() != 0) {
    stepper.run();
  }

  digitalWrite(enablePin, HIGH); // Disable motor
  delay(1000);
}
Technical Specifications:
- Supply Voltage: 8–35V
- Logic Voltage: 3–5V
- Max Output Current: 2A per coil (with heatsink)
- Microstepping: Full, 1/2, 1/4, 1/8, 1/16
- Current Limiting: Adjustable via potentiometer
- Protections: Over-temp, Over-current, Under-voltage
- Max Step Rate: 30,000 steps/sec
- Operating Temp: -20°C to +85°C
Comparison with DRV8825:
| Feature | A4988 | DRV8825 |
|---|---|---|
| Voltage Range | 8 – 35V | 8.2 – 45V |
| Max Current | 2A | 2.5A |
| Microstepping | 1/16 | 1/32 |
| Step Rate | 30k/s | 250k/s |
| Cost | Lower | Higher |
| Heat Management | Heatsink required at full load | Better thermal performance |