Features:
- Low noise and power consumption
- Wide frequency response: 50Hz – 20kHz
- Sensitivity: 56 – 58dB
- Multi-channel capability
- Compatible with computers, mobile phones, voice-activated toys, tape recorders, etc.
- Conforms to IEC sensitivity standards
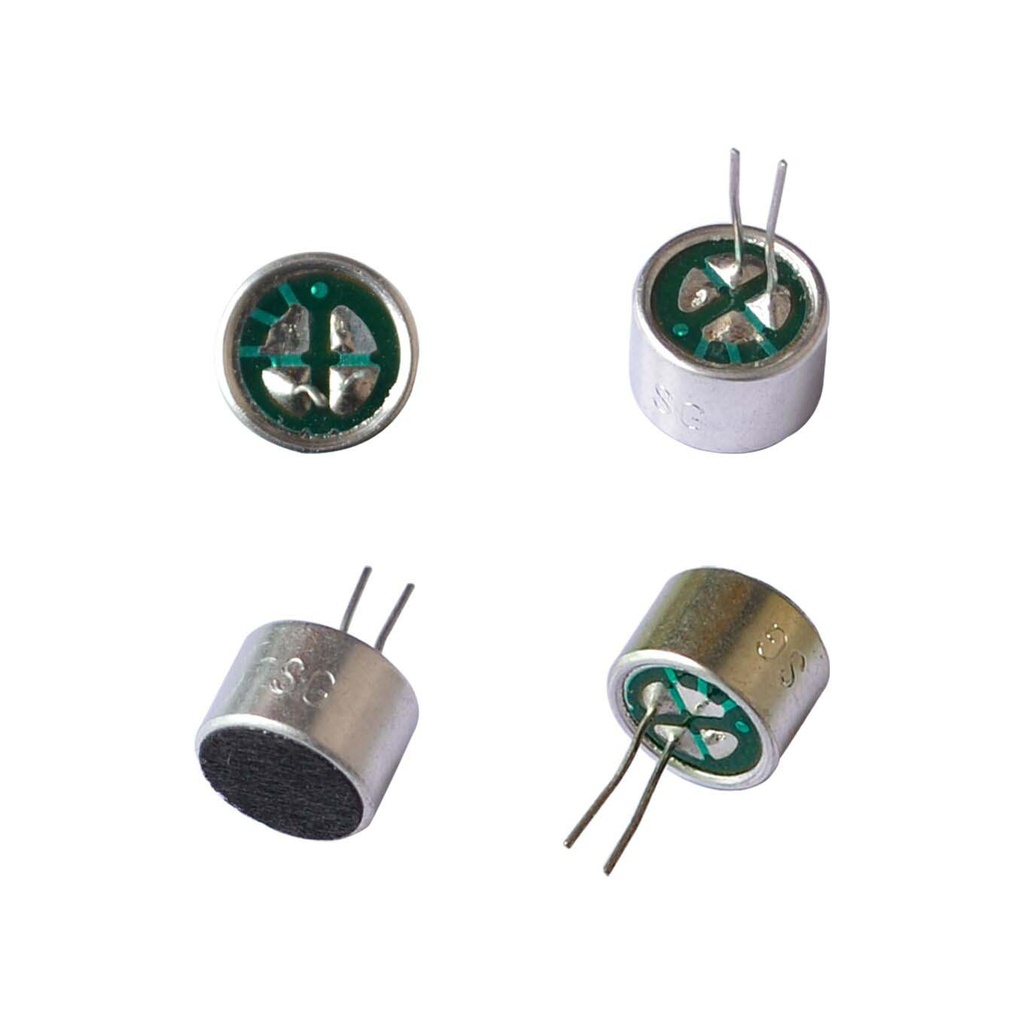
Principle of Work:
The electret microphone works on the principle of capacitance variation. It consists of two metal plates—one fixed and one movable (the diaphragm)—with a permanent charge (the "electret") embedded in the diaphragm. When sound waves hit the diaphragm, it vibrates, causing a change in capacitance. These changes are converted into electrical signals using a built-in JFET transistor. The signal is weak and typically needs to be amplified with an op-amp or transistor amplifier before further use.
Pinout & Circuit:

- + (Output): Connects to a resistor and VCC (typically 2–5V); provides audio signal
- - (GND): Connects to system ground
The output voltage fluctuates with the sound waves. Always connect the microphone with the correct polarity. Though it can handle up to 10V, it's recommended to use 2V to 5V for safe operation.
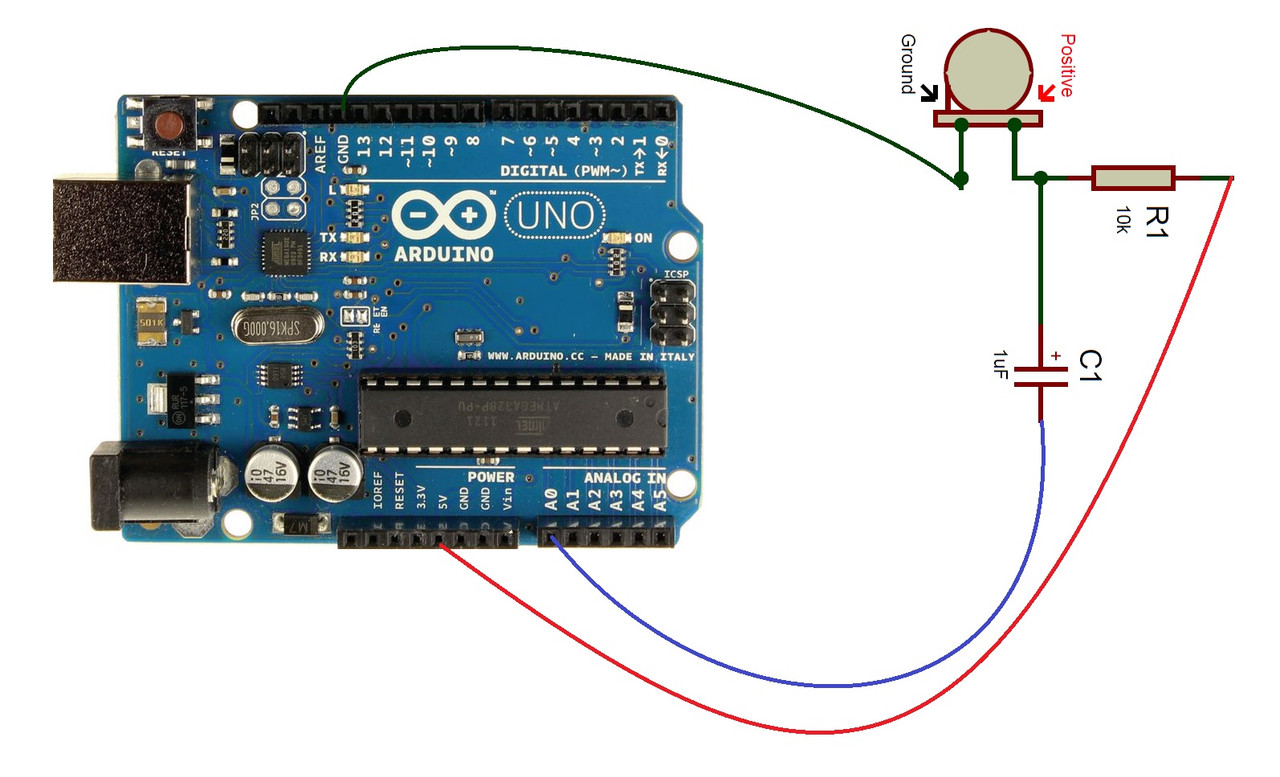
In this simple example, the microphone output is connected to Arduino analog pin A0 through a capacitor and resistor setup. The signal is not amplified, so it may be weak for certain applications.
Applications:
- Noise detection systems
- Voice command interfaces
- Sound-activated toys and devices
- Basic audio recording
- Activity monitoring
Code Example (Arduino):
const int sensorPIN = A0;
const int sampleWindow = 50; // 50ms window = 20Hz

void setup() {
  Serial.begin(9600);
}

void loop() {
  unsigned long startMillis = millis();
  unsigned int signalMax = 0;
  unsigned int signalMin = 1024;
  unsigned int sample;

  while (millis() - startMillis < sampleWindow) {
    sample = analogRead(sensorPIN);
    if (sample < 1024) {
      if (sample > signalMax) signalMax = sample;
      if (sample < signalMin) signalMin = sample;
    }
  }

  unsigned int peakToPeak = signalMax - signalMin;
  double volts = (peakToPeak * 5.0) / 1024;
  Serial.println(volts);
}
Technical Specifications:
| Parameter | Value |
|---|---|
| Microphone Type | Electret Condenser |
| Dimensions | 9mm × 7mm |
| Frequency Range | 50Hz – 20kHz |
| Sensitivity | -48 to -66dB |
| Operating Voltage | 1.5V – 10V (3V recommended) |
| Current Consumption | Max 500µA |
| Pin Pitch | 1mm |
| Material | Aluminum housing |
Resources:
Comparisons:
- This Electret MIC: Requires an op-amp or external amplifier to use effectively. It's a component, not a standalone module.
- KY-37 / KY-38: Pre-built microphone modules with onboard op-amps and analog/digital outputs. Easier to use for beginners and plug-and-play with Arduino.
- MAX9814: High-end module with automatic gain control, designed for dynamic audio range and low noise.
If you're a beginner or want a quick solution, consider using a ready-to-use module like KY-038 or MAX9814 instead of the raw electret microphone for better and more reliable results without extra circuitry.
Features:
- Low noise and power consumption
- Wide frequency response: 50Hz – 20kHz
- Sensitivity: 56 – 58dB
- Multi-channel capability
- Compatible with computers, mobile phones, voice-activated toys, tape recorders, etc.
- Conforms to IEC sensitivity standards
Principle of Work:
The electret microphone works on the principle of capacitance variation. It consists of two metal plates—one fixed and one movable (the diaphragm)—with a permanent charge (the "electret") embedded in the diaphragm. When sound waves hit the diaphragm, it vibrates, causing a change in capacitance. These changes are converted into electrical signals using a built-in JFET transistor. The signal is weak and typically needs to be amplified with an op-amp or transistor amplifier before further use.
Pinout & Circuit:
- + (Output): Connects to a resistor and VCC (typically 2–5V); provides audio signal
- - (GND): Connects to system ground
The output voltage fluctuates with the sound waves. Always connect the microphone with the correct polarity. Though it can handle up to 10V, it's recommended to use 2V to 5V for safe operation.
In this simple example, the microphone output is connected to Arduino analog pin A0 through a capacitor and resistor setup. The signal is not amplified, so it may be weak for certain applications.
Applications:
- Noise detection systems
- Voice command interfaces
- Sound-activated toys and devices
- Basic audio recording
- Activity monitoring
Code Example (Arduino):
const int sensorPIN = A0;
const int sampleWindow = 50; // 50ms window = 20Hz

void setup() {
  Serial.begin(9600);
}

void loop() {
  unsigned long startMillis = millis();
  unsigned int signalMax = 0;
  unsigned int signalMin = 1024;
  unsigned int sample;

  while (millis() - startMillis < sampleWindow) {
    sample = analogRead(sensorPIN);
    if (sample < 1024) {
      if (sample > signalMax) signalMax = sample;
      if (sample < signalMin) signalMin = sample;
    }
  }

  unsigned int peakToPeak = signalMax - signalMin;
  double volts = (peakToPeak * 5.0) / 1024;
  Serial.println(volts);
}
Technical Specifications:
| Parameter | Value |
|---|---|
| Microphone Type | Electret Condenser |
| Dimensions | 9mm × 7mm |
| Frequency Range | 50Hz – 20kHz |
| Sensitivity | -48 to -66dB |
| Operating Voltage | 1.5V – 10V (3V recommended) |
| Current Consumption | Max 500µA |
| Pin Pitch | 1mm |
| Material | Aluminum housing |
Resources:
Comparisons:
- This Electret MIC: Requires an op-amp or external amplifier to use effectively. It's a component, not a standalone module.
- KY-37 / KY-38: Pre-built microphone modules with onboard op-amps and analog/digital outputs. Easier to use for beginners and plug-and-play with Arduino.
- MAX9814: High-end module with automatic gain control, designed for dynamic audio range and low noise.
If you're a beginner or want a quick solution, consider using a ready-to-use module like KY-038 or MAX9814 instead of the raw electret microphone for better and more reliable results without extra circuitry.