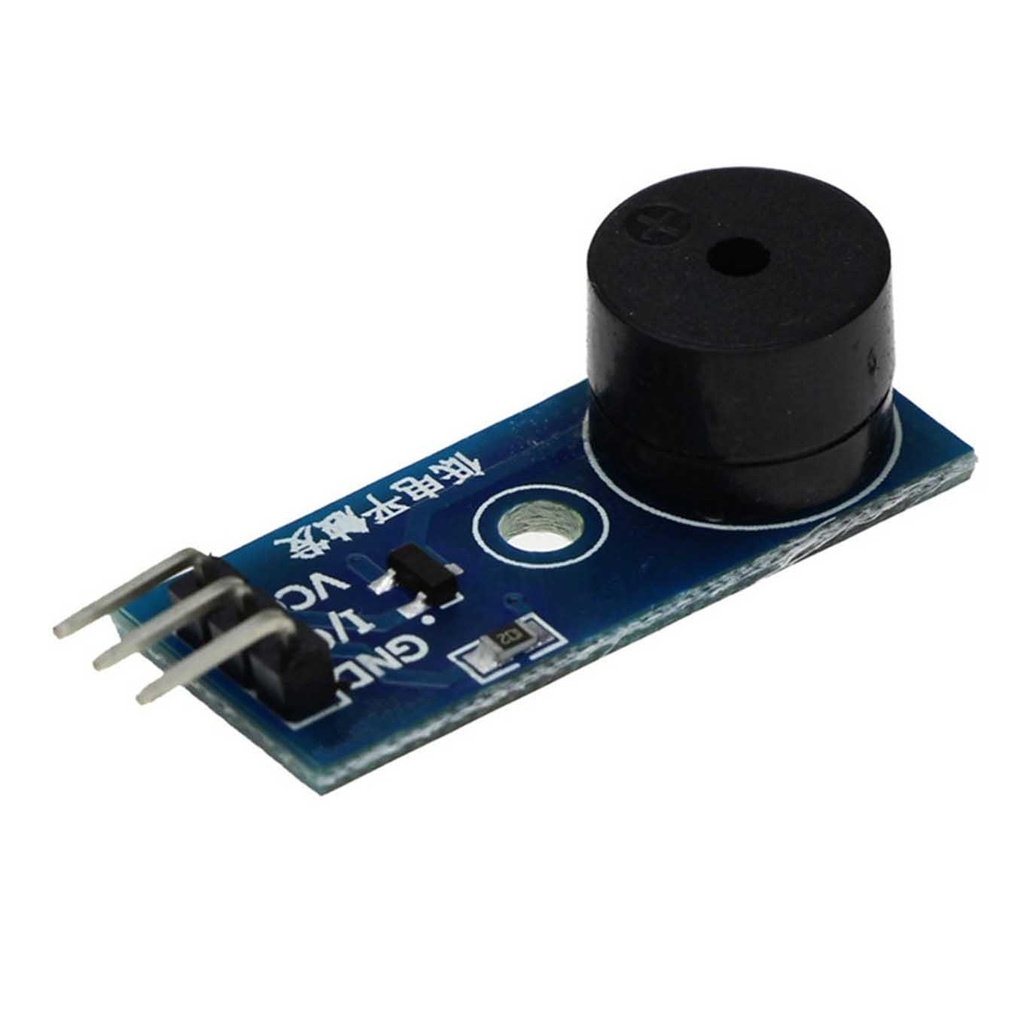
Passive Buzzer Module With Low Level Trigger
A passive buzzer (also called a magnetic transducer) produces sound by receiving an oscillating electronic signal at a certain frequency. The frequency determines the tone. Simply applying a fixed DC voltage will not generate sound, only possibly a slight "tick" when power is connected or disconnected.
This module is a low-level trigger type using a 9012 transistor to drive the buzzer. It does not contain an internal oscillator, so it must be driven by a square wave signal between 2 kHz and 5 kHz. In some cases, the control pin can be multiplexed with an LED. The buzzer frequency is controllable to produce various sound effects.
Active vs Passive Buzzers
- Active buzzer: Contains an internal oscillator. It sounds continuously when powered and can be controlled simply by setting the voltage high or low.
- Passive buzzer: Requires an external oscillating signal to generate sound. Cannot be controlled just by DC power.
Module Features
- Driven by 9012 transistor
- Six fixed mounting holes for easy installation
- Small PCB size: 3.3 cm × 1.3 cm
- 3-wire interface: VCC (3.3–5V), GND, I/O (control signal)
Pinout
| Pin | Description |
|---|---|
| VCC | 3.3V to 5V power supply |
| GND | Ground |
| I/O | Microcontroller control signal (oscillating for passive buzzer) |
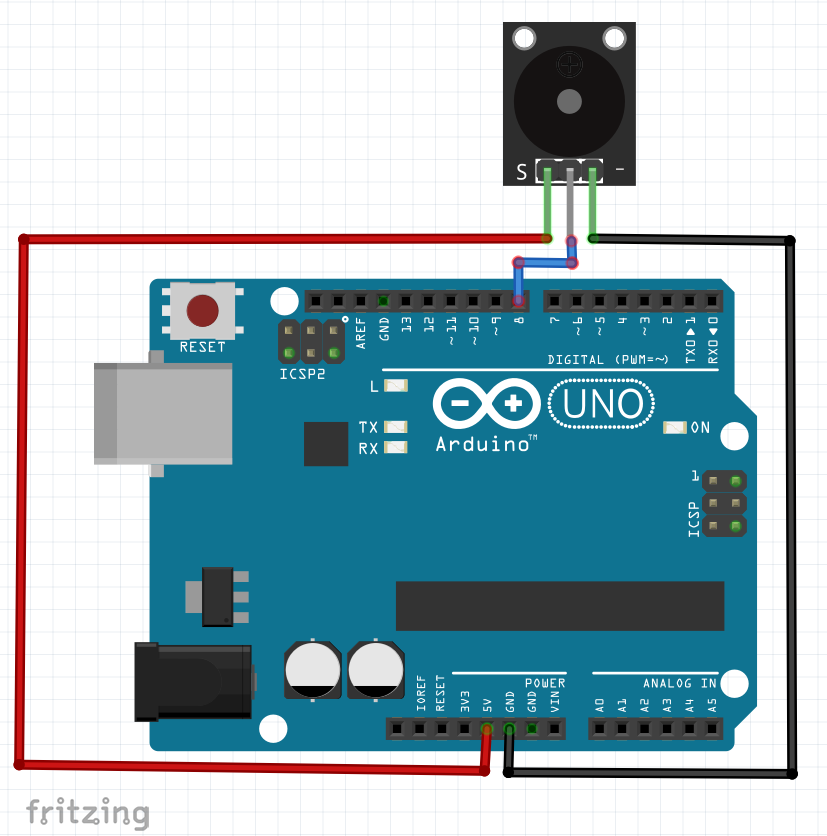
Controlling the Passive Buzzer with Arduino
An Arduino can generate the required oscillating signal using the tone() function on a digital pin. However, since an Arduino pin can only supply about 40mA max, for louder sound or higher current buzzers, use a transistor driver circuit.
The Arduino pin signal connects to the base of a transistor via a base resistor. The transistor switches power from the external supply to the buzzer, allowing higher current safely. Without the transistor, you can only drive small buzzers with low current requirements.
Wiring Diagram
Example Arduino Code 1: Simple tone generation
// For 3-pin module, connect I/O pin to Arduino digital pin 8
int buzzer = 8;

void setup() {
  // nothing needed here
}

void loop() {
  tone(buzzer, 1000); // Play 1 kHz tone
  delay(1000);
  tone(buzzer, 2000); // Play 2 kHz tone
  delay(1000);
  noTone(buzzer);     // Stop sound
  delay(1000);
}
Example Arduino Code 2: Sweep frequency up and down
int buzzer = 8;

void setup() {}

void loop() {
  for (int i = 100; i < 2000; i++) {
    tone(buzzer, i);
    delay(10);
  }
  for (int i = 2000; i > 100; i--) {
    tone(buzzer, i);
    delay(10);
  }
}
Example Arduino Code 3: Star Wars Theme (With LEDs)
const int buzzerPin = 8;
const int ledPin1 = 12;
const int ledPin2 = 13;

const int c = 261; const int d = 294; const int e = 329; const int f = 349;
const int g = 391; const int gS = 415; const int a = 440; const int aS = 455;
const int b = 466; const int cH = 523; const int cSH = 554; const int dH = 587;
const int dSH = 622; const int eH = 659; const int fH = 698; const int fSH = 740;
const int gH = 784; const int gSH = 830; const int aH = 880;

int counter = 0;

void setup() {
  pinMode(buzzerPin, OUTPUT);
  pinMode(ledPin1, OUTPUT);
  pinMode(ledPin2, OUTPUT);
}

void loop() {
  firstSection();
  secondSection();

  beep(f, 250); beep(gS, 500); beep(f, 350); beep(a, 125);
  beep(cH, 500); beep(a, 375); beep(cH, 125); beep(eH, 650);

  delay(500);
  secondSection();

  beep(f, 250); beep(gS, 500); beep(f, 375); beep(cH, 125);
  beep(a, 500); beep(f, 375); beep(cH, 125); beep(a, 650);

  delay(650);
}

void beep(int note, int duration) {
  tone(buzzerPin, note, duration);
  if (counter % 2 == 0) {
    digitalWrite(ledPin1, HIGH);
    delay(duration);
    digitalWrite(ledPin1, LOW);
  } else {
    digitalWrite(ledPin2, HIGH);
    delay(duration);
    digitalWrite(ledPin2, LOW);
  }
  noTone(buzzerPin);
  delay(50);
  counter++;
}

void firstSection() {
  beep(a, 500); beep(a, 500); beep(a, 500); beep(f, 350); beep(cH, 150);
  beep(a, 500); beep(f, 350); beep(cH, 150); beep(a, 650);
  delay(500);
  beep(eH, 500); beep(eH, 500); beep(eH, 500); beep(fH, 350); beep(cH, 150);
  beep(gS, 500); beep(f, 350); beep(cH, 150); beep(a, 650);
  delay(500);
}

void secondSection() {
  beep(aH, 500); beep(a, 300); beep(a, 150); beep(aH, 500); beep(gSH, 325);
  beep(gH, 175); beep(fSH, 125); beep(fH, 125); beep(fSH, 250);
  delay(325);
  beep(aS, 250); beep(dSH, 500); beep(dH, 325); beep(cSH, 175); beep(cH, 125);
  beep(b, 125); beep(cH, 250);
  delay(350);
}
A passive buzzer (also called a magnetic transducer) produces sound by receiving an oscillating electronic signal at a certain frequency. The frequency determines the tone. Simply applying a fixed DC voltage will not generate sound, only possibly a slight "tick" when power is connected or disconnected.
This module is a low-level trigger type using a 9012 transistor to drive the buzzer. It does not contain an internal oscillator, so it must be driven by a square wave signal between 2 kHz and 5 kHz. In some cases, the control pin can be multiplexed with an LED. The buzzer frequency is controllable to produce various sound effects.
Active vs Passive Buzzers
- Active buzzer: Contains an internal oscillator. It sounds continuously when powered and can be controlled simply by setting the voltage high or low.
- Passive buzzer: Requires an external oscillating signal to generate sound. Cannot be controlled just by DC power.
Module Features
- Driven by 9012 transistor
- Six fixed mounting holes for easy installation
- Small PCB size: 3.3 cm × 1.3 cm
- 3-wire interface: VCC (3.3–5V), GND, I/O (control signal)
Pinout
| Pin | Description |
|---|---|
| VCC | 3.3V to 5V power supply |
| GND | Ground |
| I/O | Microcontroller control signal (oscillating for passive buzzer) |
Controlling the Passive Buzzer with Arduino
An Arduino can generate the required oscillating signal using the tone() function on a digital pin. However, since an Arduino pin can only supply about 40mA max, for louder sound or higher current buzzers, use a transistor driver circuit.
The Arduino pin signal connects to the base of a transistor via a base resistor. The transistor switches power from the external supply to the buzzer, allowing higher current safely. Without the transistor, you can only drive small buzzers with low current requirements.
Wiring Diagram
Example Arduino Code 1: Simple tone generation
// For 3-pin module, connect I/O pin to Arduino digital pin 8
int buzzer = 8;

void setup() {
  // nothing needed here
}

void loop() {
  tone(buzzer, 1000); // Play 1 kHz tone
  delay(1000);
  tone(buzzer, 2000); // Play 2 kHz tone
  delay(1000);
  noTone(buzzer);     // Stop sound
  delay(1000);
}
Example Arduino Code 2: Sweep frequency up and down
int buzzer = 8;

void setup() {}

void loop() {
  for (int i = 100; i < 2000; i++) {
    tone(buzzer, i);
    delay(10);
  }
  for (int i = 2000; i > 100; i--) {
    tone(buzzer, i);
    delay(10);
  }
}
Example Arduino Code 3: Star Wars Theme (With LEDs)
const int buzzerPin = 8;
const int ledPin1 = 12;
const int ledPin2 = 13;

const int c = 261; const int d = 294; const int e = 329; const int f = 349;
const int g = 391; const int gS = 415; const int a = 440; const int aS = 455;
const int b = 466; const int cH = 523; const int cSH = 554; const int dH = 587;
const int dSH = 622; const int eH = 659; const int fH = 698; const int fSH = 740;
const int gH = 784; const int gSH = 830; const int aH = 880;

int counter = 0;

void setup() {
  pinMode(buzzerPin, OUTPUT);
  pinMode(ledPin1, OUTPUT);
  pinMode(ledPin2, OUTPUT);
}

void loop() {
  firstSection();
  secondSection();

  beep(f, 250); beep(gS, 500); beep(f, 350); beep(a, 125);
  beep(cH, 500); beep(a, 375); beep(cH, 125); beep(eH, 650);

  delay(500);
  secondSection();

  beep(f, 250); beep(gS, 500); beep(f, 375); beep(cH, 125);
  beep(a, 500); beep(f, 375); beep(cH, 125); beep(a, 650);

  delay(650);
}

void beep(int note, int duration) {
  tone(buzzerPin, note, duration);
  if (counter % 2 == 0) {
    digitalWrite(ledPin1, HIGH);
    delay(duration);
    digitalWrite(ledPin1, LOW);
  } else {
    digitalWrite(ledPin2, HIGH);
    delay(duration);
    digitalWrite(ledPin2, LOW);
  }
  noTone(buzzerPin);
  delay(50);
  counter++;
}

void firstSection() {
  beep(a, 500); beep(a, 500); beep(a, 500); beep(f, 350); beep(cH, 150);
  beep(a, 500); beep(f, 350); beep(cH, 150); beep(a, 650);
  delay(500);
  beep(eH, 500); beep(eH, 500); beep(eH, 500); beep(fH, 350); beep(cH, 150);
  beep(gS, 500); beep(f, 350); beep(cH, 150); beep(a, 650);
  delay(500);
}

void secondSection() {
  beep(aH, 500); beep(a, 300); beep(a, 150); beep(aH, 500); beep(gSH, 325);
  beep(gH, 175); beep(fSH, 125); beep(fH, 125); beep(fSH, 250);
  delay(325);
  beep(aS, 250); beep(dSH, 500); beep(dH, 325); beep(cSH, 175); beep(cH, 125);
  beep(b, 125); beep(cH, 250);
  delay(350);
}