Skip to Content

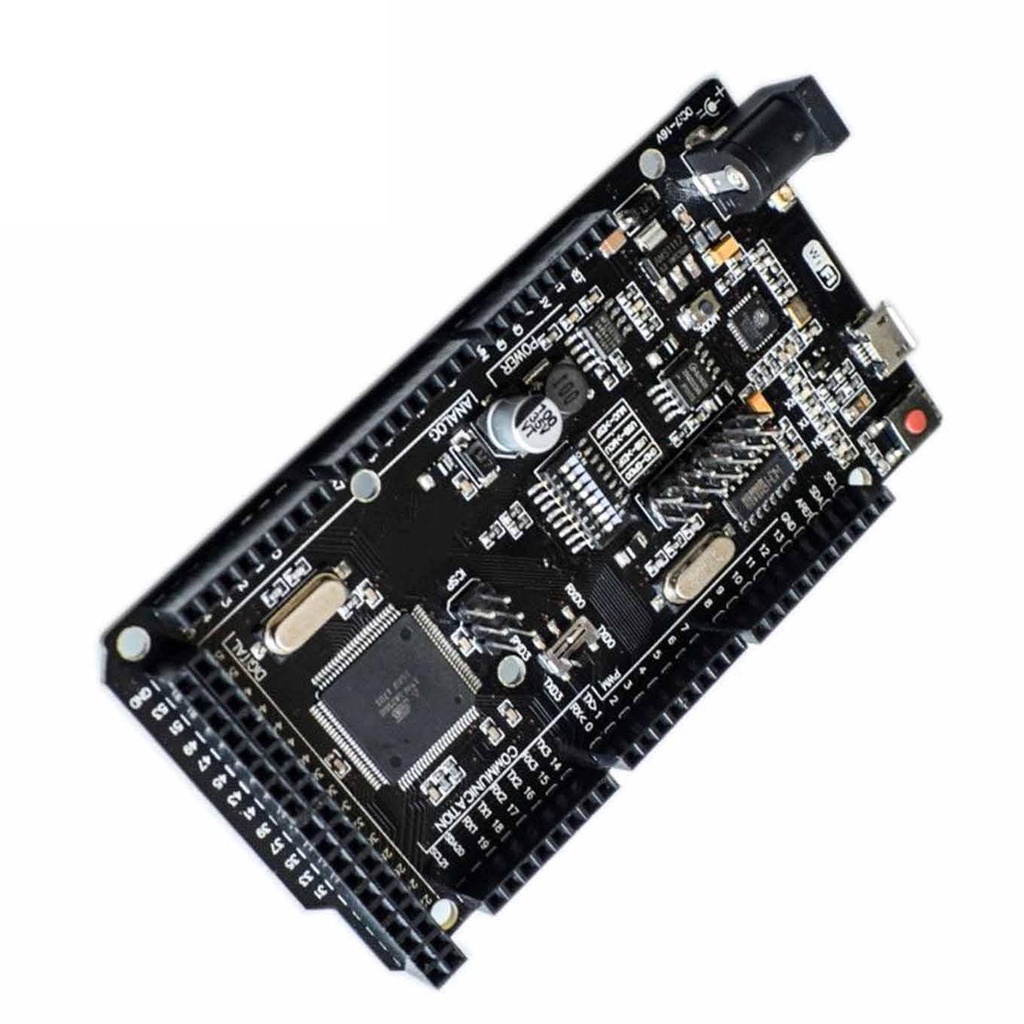
Mega2560 + WiFi R3 ATMEGA2560+ESP8266 32MB Memory USB-TTL CH340g

The Mega2560 + WiFi R3 is a powerful all-in-one development board that combines the ATmega2560 microcontroller with the ESP8266 WiFi module, offering both advanced processing and wireless networking capabilities. With built-in 32Mb of flash memory and a CH340G USB-to-TTL converter, this board supports dual microcontroller operation, making it ideal for IoT, robotics, and wireless automation projects. Both the ATmega2560 and ESP8266 can be programmed independently or together via USB, with configuration easily controlled using an onboard DIP switch.

This board is an enhanced version of the original Arduino Mega R3. It integrates:

  • ATmega2560 Microcontroller
  • ESP8266 WiFi Module
  • 32Mb (megabits) of Flash Memory
  • CH340G USB-to-TTL Converter

All components can function together or independently. Each has its own pinout headers, making it a flexible choice for projects that combine WiFi and Mega-level performance. Both the ATmega2560 and ESP8266 can be programmed via USB.

135.45 AED 135.45 AED Tax Included
135.45 AED Tax Included

Not Available For Sale

This combination does not exist.

Terms and Conditions
30-day money-back guarantee
Shipping: 2-3 Business Days


Board Layout:

  • Same dimensions as the original Arduino Mega
  • ATmega2560 shifted to the right, ESP8266 on the left
  • Micro USB connector (Type-B to Micro-B) located above the ESP8266
  • Communication through CH340G and 8-pin DIP switch

DIP Switch Configuration Table:

Mode 1 2 3 4 5 6 7 8
CH340 → ESP8266 (Upload Sketch) OFF OFF OFF OFF ON ON ON No Use
CH340 → ESP8266 (Connect) OFF OFF OFF OFF ON ON OFF No Use
CH340 → ATmega2560 (Upload Sketch) OFF OFF ON ON OFF OFF OFF No Use
CH340 → Mega2560 + COM3 ↔ ESP8266 ON ON ON ON OFF OFF OFF No Use
Mega2560 + ESP8266 ON ON OFF OFF OFF OFF OFF No Use
All modules independent OFF OFF OFF OFF OFF OFF OFF No Use

Driver Installation (CH340):

  1. Download the Windows CH340 Driver
  2. Unzip the downloaded file
  3. Run the installer
  4. Open Arduino IDE → Tools → Port and select the COM port that appears (varies per system)

Board Setup in Arduino IDE:

  1. Go to File → Preferences → Additional Board Manager URLs
  2. Paste: http://arduino.esp8266.com/stable/package_esp8266com_index.json and click OK
  3. Navigate to Tools → Board → Board Manager
  4. Search for "ESP" and install it

DIP Switch Setting Example (USB → ATmega2560):

Mode 1 2 3 4 5 6 7 8 RXD/TXD
USB → ATmega2560 --- --- ON ON --- --- --- 0 RXD/TXD

Flashing and Testing:

  1. Connect the board to your PC via USB
  2. Open Arduino IDE
  3. Select Tools → Board → Arduino / Genuino Mega or Mega 2560
  4. Select the COM port from Tools → Port
  5. Open test sketch: File → Sketch Folder → TEST_MEGA
  6. Upload the sketch via Sketch → Upload

Serial Monitor Test Commands:

  • Baud Rate: 115200
  • Send a – LED will blink for 20 seconds
  • Send b – Display available memory: SRAM and EEPROM
  • Send c – Run output pin test (Pins 0, 1, 13 may show faults due to UART and onboard LED)

Note: After all checks are completed, disconnect the board from the USB port.