Features
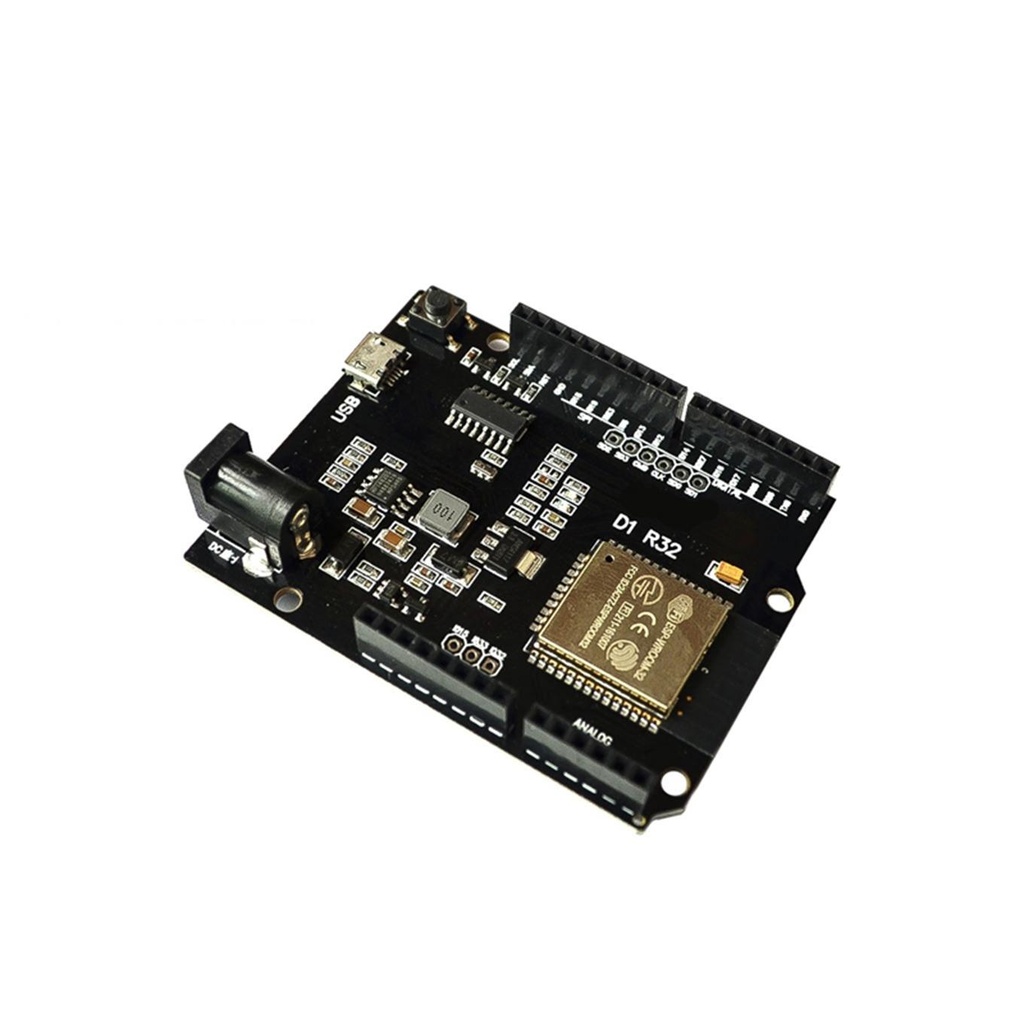
- Standard Arduino UNO size and headers
- ESP-WROOM-32 module (ESP32S) with Xtensa® 32-bit LX6 dual-core CPU
- CPU Performance: Up to 600 DMIPS
- Memory:
- 4 MByte SPI Flash
- 448 KByte ROM
- 520 KByte SRAM
- 16 KByte SRAM in RTC
- Compact size: 68mm x 53mm x 3.1mm (±0.2mm)
- Supply Voltage: 5V to 12V DC
Wi-Fi Capabilities
- Standards: 802.11 b/g/n/e/i (2.4GHz)
- Max Speed: Up to 150 Mbps
- Wi-Fi Direct (P2P), SoftAP, Station Mode
- Security: WPA/WPA2/WPA2-Enterprise/WPS
- Advanced Features: QoS (WMM-PS), UAPSD, TSN, MPDU/A-MSDU, Beacon scanning
- UMA compliant and certified
Bluetooth Capabilities
- Bluetooth v4.2: BR/EDR & BLE
- Transmit Power: +10 dBm
- Receiver Sensitivity: -98 dBm (NZIF)
- High-speed UART HCI: up to 4 Mbps
- Profiles: SDP, GAP, SMP, HID, GATT, ATT, SPP, BLE Beacon, A2DP, AVRCP, HSP, HFP, RFCOMM
- Supports Bluetooth Piconet and Scatternet
Getting Started with the ESP32 CH340 Wemos D1 R32 Mini
- Install Arduino IDE
Download and install Arduino IDE from https://www.arduino.cc/en/Guide/HomePage
- Add ESP32 Board Support
Open Arduino IDE and go to File → Preferences. In the "Additional Board Manager URLs" field, add:
https://dl.espressif.com/dl/package_esp32_index.json
- Install ESP32 Board Package
Navigate to Tools → Board → Boards Manager, search for "ESP32", and click Install.
- Select Board
Go to Tools → Board and select ESP32 Dev Module.
- Example Code
Upload the following test sketch:
void setup() {
  Serial.begin(112500);
  pinMode(2, OUTPUT);
  vTaskDelay(1000 / portTICK_PERIOD_MS);
  xTaskCreate(task1, "task1", 2048, NULL, 1, NULL);
  xTaskCreate(task2, "task2", 2048, NULL, 1, NULL);
}

void loop() {
  vTaskDelay(1000 / portTICK_PERIOD_MS);
}

void task1(void * parameter) {
  while(1) {
    Serial.println("Hello World!");
    vTaskDelay(1000 / portTICK_PERIOD_MS);
  }
}

void task2(void * parameter) {
  while(1) {
    digitalWrite(2, HIGH);
    vTaskDelay(500 / portTICK_PERIOD_MS);
    digitalWrite(2, LOW);
    vTaskDelay(500 / portTICK_PERIOD_MS);
  }
}
- Connect the Board
Use a micro-USB cable to connect the board. Find its COM port under Device Manager (look for USB-SERIAL CH340).
- Install CH340 Driver (if needed)
If the port doesn't show, install the driver from: CH340 Driver
- Select COM Port
In Arduino IDE, go to Tools → Port and select the correct COM port.
- Upload the Code
Click Upload. When it says "Connecting...", press and hold the reset button for 4 seconds and release.
- Monitor Output
Open the Serial Monitor to see "Hello World!" printed every second. The onboard LED will blink every 500ms.
Successful Upload Example
Chip is ESP32D0WDQ6...
Hash of data verified.
Leaving...
Hard resetting via RTS pin...
Once the upload completes successfully, the board will reset and begin running your program.
Features
- Standard Arduino UNO size and headers
- ESP-WROOM-32 module (ESP32S) with Xtensa® 32-bit LX6 dual-core CPU
- CPU Performance: Up to 600 DMIPS
- Memory:
- 4 MByte SPI Flash
- 448 KByte ROM
- 520 KByte SRAM
- 16 KByte SRAM in RTC
- Compact size: 68mm x 53mm x 3.1mm (±0.2mm)
- Supply Voltage: 5V to 12V DC
Wi-Fi Capabilities
- Standards: 802.11 b/g/n/e/i (2.4GHz)
- Max Speed: Up to 150 Mbps
- Wi-Fi Direct (P2P), SoftAP, Station Mode
- Security: WPA/WPA2/WPA2-Enterprise/WPS
- Advanced Features: QoS (WMM-PS), UAPSD, TSN, MPDU/A-MSDU, Beacon scanning
- UMA compliant and certified
Bluetooth Capabilities
- Bluetooth v4.2: BR/EDR & BLE
- Transmit Power: +10 dBm
- Receiver Sensitivity: -98 dBm (NZIF)
- High-speed UART HCI: up to 4 Mbps
- Profiles: SDP, GAP, SMP, HID, GATT, ATT, SPP, BLE Beacon, A2DP, AVRCP, HSP, HFP, RFCOMM
- Supports Bluetooth Piconet and Scatternet
Getting Started with the ESP32 CH340 Wemos D1 R32 Mini
- Install Arduino IDE
Download and install Arduino IDE from https://www.arduino.cc/en/Guide/HomePage
- Add ESP32 Board Support
Open Arduino IDE and go to File → Preferences. In the "Additional Board Manager URLs" field, add:
https://dl.espressif.com/dl/package_esp32_index.json
- Install ESP32 Board Package
Navigate to Tools → Board → Boards Manager, search for "ESP32", and click Install.
- Select Board
Go to Tools → Board and select ESP32 Dev Module.
- Example Code
Upload the following test sketch:
void setup() {
  Serial.begin(112500);
  pinMode(2, OUTPUT);
  vTaskDelay(1000 / portTICK_PERIOD_MS);
  xTaskCreate(task1, "task1", 2048, NULL, 1, NULL);
  xTaskCreate(task2, "task2", 2048, NULL, 1, NULL);
}

void loop() {
  vTaskDelay(1000 / portTICK_PERIOD_MS);
}

void task1(void * parameter) {
  while(1) {
    Serial.println("Hello World!");
    vTaskDelay(1000 / portTICK_PERIOD_MS);
  }
}

void task2(void * parameter) {
  while(1) {
    digitalWrite(2, HIGH);
    vTaskDelay(500 / portTICK_PERIOD_MS);
    digitalWrite(2, LOW);
    vTaskDelay(500 / portTICK_PERIOD_MS);
  }
}
- Connect the Board
Use a micro-USB cable to connect the board. Find its COM port under Device Manager (look for USB-SERIAL CH340).
- Install CH340 Driver (if needed)
If the port doesn't show, install the driver from: CH340 Driver
- Select COM Port
In Arduino IDE, go to Tools → Port and select the correct COM port.
- Upload the Code
Click Upload. When it says "Connecting...", press and hold the reset button for 4 seconds and release.
- Monitor Output
Open the Serial Monitor to see "Hello World!" printed every second. The onboard LED will blink every 500ms.
Successful Upload Example
Chip is ESP32D0WDQ6...
Hash of data verified.
Leaving...
Hard resetting via RTS pin...
Once the upload completes successfully, the board will reset and begin running your program.