Features:
- High Speed Performance: Operates between 9200 RPM and 15000 RPM
- Wide Voltage Range: Compatible with 3V to 6V DC power supplies
- Compact Size: Small form factor for tight spaces and portable devices
- Standard Shaft: 2mm diameter shaft fits common accessories
- Lightweight Design: Ideal for battery-powered applications
- Versatile Usage: Suitable for robotics, DIY, and educational projects
Principle of Work:
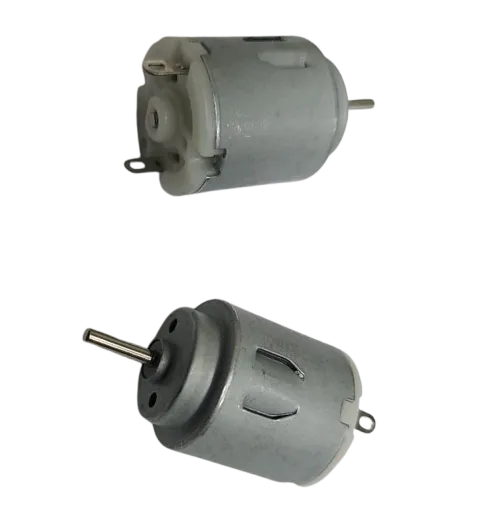
This DC motor operates based on electromagnetic principles. When a DC voltage is applied, current flows through the internal coils, generating a magnetic field that interacts with permanent magnets inside the motor. This interaction produces rotational motion of the shaft. The speed of the motor is directly related to the applied voltage, meaning higher voltage results in higher rotational speed within the specified operating range. Direction of rotation can be reversed by swapping the polarity of the power supply.
Pinout of the Module:
The motor has two terminals:
- Positive Terminal: Connect to the positive voltage supply
- Negative Terminal: Connect to ground (GND)
Applications:
- Robotics: Driving wheels and moving mechanisms
- DIY Projects: Fans, small tools, and mechanical systems
- Educational Kits: Learning motor control and electronics
- RC Toys: Small vehicles and moving parts
- Prototyping: Testing motion-based designs
Circuit:
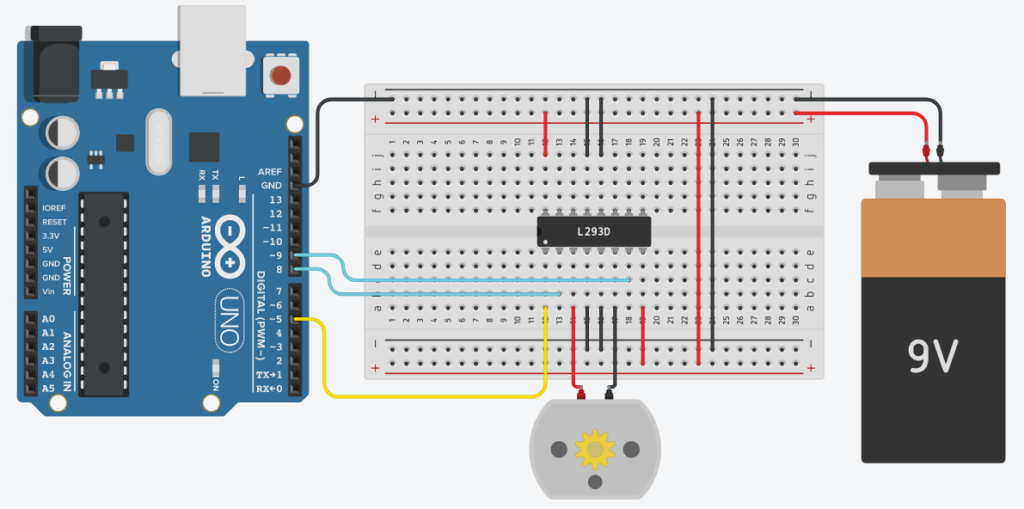
- IN1 to Pin 8
- IN2 to Pin 9
- Enable1 to Pin 5 (PWM)
Pin 4,5,12,13 of the IC is connected to the GND of Arduino and battery. If you don’t do this, the motor will not work. Connect Pin 8 and 16 of the IC to the +ve terminal of the 9v battery. This will power our motor and the IC itself. That’s all we need to do. now we can write code to control the motor.
Code:
#define ENA1 5
#define IN1 8
#define IN2 9
void setup()
{
   pinMode(ENA1, OUTPUT);
   pinMode(IN1, OUTPUT);
   pinMode(IN2, OUTPUT);
}

void loop()
{
   analogWrite(ENA1, 255); //Sets speed of motor using PWM

   digitalWrite(IN1, HIGH); //Input 1 is turned on

   digitalWrite(IN2, LOW); //Input 2 is turned off

   delay(3*1000); //Runs for 3 seconds


   analogWrite(ENA1, 255);

   digitalWrite(IN1, LOW); //Both inputs are turned off

   digitalWrite(IN2, LOW);

   delay(2*1000); // Waits for 2 seconds


   analogWrite(ENA1, 255);

   digitalWrite(IN1, LOW); // Input 1 is off

   digitalWrite(IN2, HIGH); // Input 2 is on

   delay(3*1000); //Runs for 3 seconds


   analogWrite(ENA1, 255);

   digitalWrite(IN1, LOW);

   digitalWrite(IN2, LOW);

   delay(2*1000);
}
Here notice the function analogWrite(ENA1, 255) we are using the PWM feature of pin 5. The PWM value can be anything between 0-255, where 0 will turn off the motor and 255 will spin the motor at full speed. Varying the value between 1-254 will give different speeds.
The next two functions are digitalWrite, which sets a pin either HIGH or LOW. As in the above example, the IN1 is HIGH and IN2 is LOW, this will make the motor turn in one direction. Right or Left depending on the way you connected the terminals.
Swapping the HIGH and LOW will change the direction of rotation, and making both LOW/HIGH Will make the motor stop.
Now that you have an idea of the code, it’s time to upload the code. So connect your Arduino to your PC and upload the code.
Technical Details:
- Motor Length: 25mm (excluding shaft)
- Motor Diameter: 21mm
- Shaft Length: 9mm
- Shaft Diameter: 2mm
- Operating Voltage: DC 3V – 6V
- Speed: 9200 RPM – 15000 RPM
Features:
- High Speed Performance: Operates between 9200 RPM and 15000 RPM
- Wide Voltage Range: Compatible with 3V to 6V DC power supplies
- Compact Size: Small form factor for tight spaces and portable devices
- Standard Shaft: 2mm diameter shaft fits common accessories
- Lightweight Design: Ideal for battery-powered applications
- Versatile Usage: Suitable for robotics, DIY, and educational projects
Principle of Work:
This DC motor operates based on electromagnetic principles. When a DC voltage is applied, current flows through the internal coils, generating a magnetic field that interacts with permanent magnets inside the motor. This interaction produces rotational motion of the shaft. The speed of the motor is directly related to the applied voltage, meaning higher voltage results in higher rotational speed within the specified operating range. Direction of rotation can be reversed by swapping the polarity of the power supply.
Pinout of the Module:
The motor has two terminals:
- Positive Terminal: Connect to the positive voltage supply
- Negative Terminal: Connect to ground (GND)
Applications:
- Robotics: Driving wheels and moving mechanisms
- DIY Projects: Fans, small tools, and mechanical systems
- Educational Kits: Learning motor control and electronics
- RC Toys: Small vehicles and moving parts
- Prototyping: Testing motion-based designs
Circuit:
- IN1 to Pin 8
- IN2 to Pin 9
- Enable1 to Pin 5 (PWM)
Pin 4,5,12,13 of the IC is connected to the GND of Arduino and battery. If you don’t do this, the motor will not work. Connect Pin 8 and 16 of the IC to the +ve terminal of the 9v battery. This will power our motor and the IC itself. That’s all we need to do. now we can write code to control the motor.
Code:
#define ENA1 5
#define IN1 8
#define IN2 9
void setup()
{
   pinMode(ENA1, OUTPUT);
   pinMode(IN1, OUTPUT);
   pinMode(IN2, OUTPUT);
}

void loop()
{
   analogWrite(ENA1, 255); //Sets speed of motor using PWM

   digitalWrite(IN1, HIGH); //Input 1 is turned on

   digitalWrite(IN2, LOW); //Input 2 is turned off

   delay(3*1000); //Runs for 3 seconds


   analogWrite(ENA1, 255);

   digitalWrite(IN1, LOW); //Both inputs are turned off

   digitalWrite(IN2, LOW);

   delay(2*1000); // Waits for 2 seconds


   analogWrite(ENA1, 255);

   digitalWrite(IN1, LOW); // Input 1 is off

   digitalWrite(IN2, HIGH); // Input 2 is on

   delay(3*1000); //Runs for 3 seconds


   analogWrite(ENA1, 255);

   digitalWrite(IN1, LOW);

   digitalWrite(IN2, LOW);

   delay(2*1000);
}
Here notice the function analogWrite(ENA1, 255) we are using the PWM feature of pin 5. The PWM value can be anything between 0-255, where 0 will turn off the motor and 255 will spin the motor at full speed. Varying the value between 1-254 will give different speeds.
The next two functions are digitalWrite, which sets a pin either HIGH or LOW. As in the above example, the IN1 is HIGH and IN2 is LOW, this will make the motor turn in one direction. Right or Left depending on the way you connected the terminals.
Swapping the HIGH and LOW will change the direction of rotation, and making both LOW/HIGH Will make the motor stop.
Now that you have an idea of the code, it’s time to upload the code. So connect your Arduino to your PC and upload the code.
Technical Details:
- Motor Length: 25mm (excluding shaft)
- Motor Diameter: 21mm
- Shaft Length: 9mm
- Shaft Diameter: 2mm
- Operating Voltage: DC 3V – 6V
- Speed: 9200 RPM – 15000 RPM