Features
- Compact Size: Ideal for projects with limited space or portable applications.
- MCU Core: ATmega32U4 with built-in USB communication, eliminating the need for an external USB-to-serial chip.
- USB Interface: Connects directly to a PC and configurable as a keyboard or mouse.
- Power Options: Supports micro USB and RAW GND (DC 7-9V).
- Operating Voltage: 3.3V for stable and reliable operation.
- User-Friendly Integration: Easily embed into interactive objects.
- Customizable Layout: Pin headers not pre-soldered for flexibility in design.
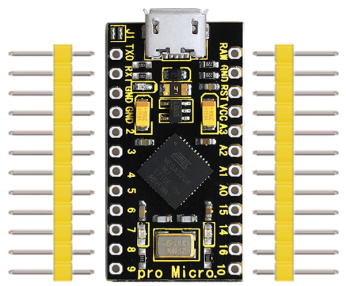
Pinout

- Digital I/O Pins: 18 pins, HIGH = 3.3V, LOW = 0V
- Analog Pins: 9 channels, 10-bit ADC
- PWM Pins: 5 channels for analog-like output
- UART Pins: RX/TX for serial communication
- SPI Pins: MOSI, MISO for peripheral communication
- I2C Pins: SDA and SCL for two-wire communication
- Power Pins: RAW (unregulated input), VCC (3.3V output), RST (reset), GND
Applications
- IoT devices and smart systems
- Embedded system development
- Configurable USB keyboard or mouse
- PC lock/unlock security key
- Custom USB joystick or trackpad
- Water level monitoring
- Electric bike control
- Wireless keyboards or automatic pill dispensers
Circuit Example

Example: Connect an LED to pin 5 through a 220Ω resistor. The other leg goes to GND.
Getting Started with Arduino IDE
- Download and install the Arduino IDE.
- Connect the PRO MICRO to your computer via USB (data cable required).
- Select the board in the IDE: Tools → Board → Arduino Micro / Leonardo.
- Select the correct serial port under Tools → Port.
- Upload sketches directly using the built-in USB functionality.
Sample Code: Blink LED on Pin 5
const int ledPin = 5;
bool ledStatus = false;

void setup() {
  pinMode(ledPin, OUTPUT);
  Serial.begin(9600);
}

void loop() {
  ledStatus = !ledStatus;
  digitalWrite(ledPin, ledStatus);
  if (ledStatus) Serial.println("LED is ON");
  else Serial.println("LED is OFF");
  delay(1000);
}
Technical Details
- CPU: 8-bit ATmega32U4
- Operating Voltage: 3.3V
- Input Voltage: 7-9V (RAW), Micro USB supported
- Analog Input Pins: 9 (10-bit ADC)
- Digital I/O Pins: 18
- PWM Pins: 5 (8-bit)
- Flash Memory: 32KB
- SRAM: 2.5KB
- Clock Speed: 16 MHz
- Dimensions: 35mm x 18mm x 2mm
- Weight: 2.6g
- Pin Pitch: 2.54mm
Resources
Comparison with Arduino UNO
- Size & Form Factor: Smaller and more compact than UNO.
- MCU Core: ATmega32U4 with built-in USB vs. ATmega328P + ATmega16U2 on UNO.
- USB Interface: Direct USB connection without extra converter.
- Pin Configuration: Slightly different; PRO MICRO lacks some UNO pins.
- Analog Pins: PRO MICRO has 9 channels; UNO has 6.
- Power Options: PRO MICRO supports micro USB or RAW 7-9V; UNO supports USB or external barrel jack.
- Cost-effective for compact and USB-based applications.
Features
- Compact Size: Ideal for projects with limited space or portable applications.
- MCU Core: ATmega32U4 with built-in USB communication, eliminating the need for an external USB-to-serial chip.
- USB Interface: Connects directly to a PC and configurable as a keyboard or mouse.
- Power Options: Supports micro USB and RAW GND (DC 7-9V).
- Operating Voltage: 3.3V for stable and reliable operation.
- User-Friendly Integration: Easily embed into interactive objects.
- Customizable Layout: Pin headers not pre-soldered for flexibility in design.
Pinout
- Digital I/O Pins: 18 pins, HIGH = 3.3V, LOW = 0V
- Analog Pins: 9 channels, 10-bit ADC
- PWM Pins: 5 channels for analog-like output
- UART Pins: RX/TX for serial communication
- SPI Pins: MOSI, MISO for peripheral communication
- I2C Pins: SDA and SCL for two-wire communication
- Power Pins: RAW (unregulated input), VCC (3.3V output), RST (reset), GND
Applications
- IoT devices and smart systems
- Embedded system development
- Configurable USB keyboard or mouse
- PC lock/unlock security key
- Custom USB joystick or trackpad
- Water level monitoring
- Electric bike control
- Wireless keyboards or automatic pill dispensers
Circuit Example
Example: Connect an LED to pin 5 through a 220Ω resistor. The other leg goes to GND.
Getting Started with Arduino IDE
- Download and install the Arduino IDE.
- Connect the PRO MICRO to your computer via USB (data cable required).
- Select the board in the IDE: Tools → Board → Arduino Micro / Leonardo.
- Select the correct serial port under Tools → Port.
- Upload sketches directly using the built-in USB functionality.
Sample Code: Blink LED on Pin 5
const int ledPin = 5;
bool ledStatus = false;

void setup() {
  pinMode(ledPin, OUTPUT);
  Serial.begin(9600);
}

void loop() {
  ledStatus = !ledStatus;
  digitalWrite(ledPin, ledStatus);
  if (ledStatus) Serial.println("LED is ON");
  else Serial.println("LED is OFF");
  delay(1000);
}
Technical Details
- CPU: 8-bit ATmega32U4
- Operating Voltage: 3.3V
- Input Voltage: 7-9V (RAW), Micro USB supported
- Analog Input Pins: 9 (10-bit ADC)
- Digital I/O Pins: 18
- PWM Pins: 5 (8-bit)
- Flash Memory: 32KB
- SRAM: 2.5KB
- Clock Speed: 16 MHz
- Dimensions: 35mm x 18mm x 2mm
- Weight: 2.6g
- Pin Pitch: 2.54mm
Resources
Comparison with Arduino UNO
- Size & Form Factor: Smaller and more compact than UNO.
- MCU Core: ATmega32U4 with built-in USB vs. ATmega328P + ATmega16U2 on UNO.
- USB Interface: Direct USB connection without extra converter.
- Pin Configuration: Slightly different; PRO MICRO lacks some UNO pins.
- Analog Pins: PRO MICRO has 9 channels; UNO has 6.
- Power Options: PRO MICRO supports micro USB or RAW 7-9V; UNO supports USB or external barrel jack.
- Cost-effective for compact and USB-based applications.