Features
- 12.3MP Resolution: Captures detailed images at 4056 × 3040 pixels.
- Sony IMX477R Sensor: A 7.9mm diagonal back-illuminated CMOS sensor with 1.55µm × 1.55µm pixels.
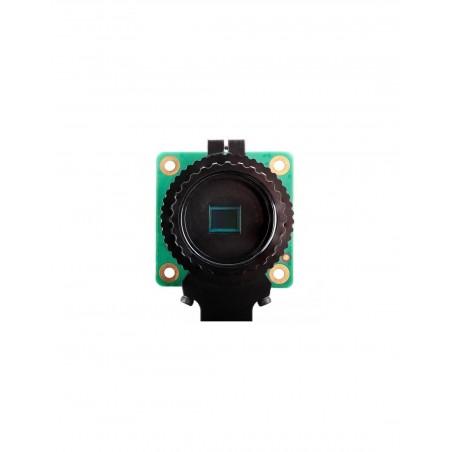
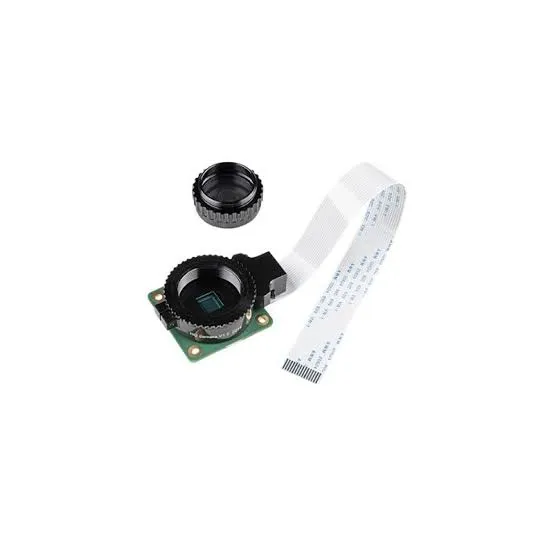
- Interchangeable Lenses: The C/CS-mount version supports compatible C-mount and CS-mount lenses. An M12-mount version is also available separately.
- Adjustable Back Focus: Allows focus adjustment to suit the installed lens and imaging requirements.
- Integrated IR-Cut Filter: Helps maintain natural color reproduction under visible-light conditions. The filter can be removed for infrared-sensitive applications, but this modification is irreversible and voids the warranty.
- RAW Image Output: Supports RAW12, RAW10, and RAW8 output formats, with COMP8 also listed in the supplied specifications.
- Tripod Mount: Includes a standard 1/4"-20 mounting point.
- Camera Ribbon Connection: Connects to a compatible Raspberry Pi camera interface using the supplied ribbon cable.
Principle of Work
- Image Capture: Light passes through the lens and reaches the Sony IMX477R CMOS sensor.
- Photovoltaic Conversion: The sensor's pixels convert incoming light into electrical signals.
- Image Processing: The Raspberry Pi camera pipeline processes the sensor data and produces image output according to the selected capture mode and software settings.
- Lens and Focus Adjustment: The interchangeable lens determines the field of view and optical characteristics. Back focus can be adjusted where supported by the camera mount and lens configuration.
- Infrared Filtering: The integrated IR-cut filter reduces unwanted infrared light in normal visible-light photography.
- Data Transfer: Image data is transferred to the Raspberry Pi through the camera's ribbon connection and CSI interface.
- Software Control: Compatible software controls image capture and settings such as exposure, white balance, and image output.
Pinout of the Module
The camera connects to a compatible Raspberry Pi through its camera ribbon connector. The ribbon carries the camera interface signals; it is not a general-purpose GPIO connection.

Applications
- Photography and Videography: Capturing detailed images and video with a suitable lens.
- Machine Vision: Image acquisition for inspection, measurement, and automated systems.
- Scientific Research: Imaging for experiments, microscopy setups with suitable optics, and documentation.
- Robotics: Providing visual input for navigation and object detection.
- AI and Computer Vision: Capturing images for object detection, classification, and image analysis.
- Environmental Monitoring: Recording wildlife, plants, and outdoor conditions.
- Agriculture: Supporting crop observation and plant analysis.
- Education: Teaching photography, image processing, and embedded vision.
- Security and Monitoring: Building custom monitoring systems with compatible lenses and software.
Circuit

Connecting the Camera to a Raspberry Pi
- Switch off the Raspberry Pi and disconnect its power supply.
- Locate the camera connector on the Raspberry Pi board. Make sure you use a compatible camera interface and ribbon cable.
- Carefully release the connector's locking tab, following the connector design.
- Insert the ribbon cable fully and straight. Align the exposed contacts according to the markings and connector orientation for your specific Raspberry Pi model and camera board.
- Secure the locking tab without forcing it.
- Check that the cable is straight and firmly seated at both ends before reconnecting power.
Important: Raspberry Pi Zero models require a compatible camera cable for their smaller connector. Cable orientation varies between connectors, so do not assume the contacts must always face the same direction.
Code
1. Check Camera Detection
On a supported Raspberry Pi OS installation, open a terminal and run:
rpicam-hello --list-camerasIf the camera is detected, test the preview with:
rpicam-hello2. Capture an Image
Capture a still image using the built-in camera application:
rpicam-still --output image.jpg3. Python Example Using Picamera2
On Raspberry Pi OS, install Picamera2 if it is not already installed:
sudo apt update
sudo apt install python3-picamera2Create a file named camera_demo.py and add the following code:
from picamera2 import Picamera2
from time import sleep

picam2 = Picamera2()

config = picam2.create_still_configuration()
picam2.configure(config)

picam2.start()
sleep(2)

picam2.capture_file("image.jpg")

picam2.stop()
print("Image saved as image.jpg")Run the script:
python3 camera_demo.pyThe script initializes the camera, allows a short settling period, captures an image, and saves it as image.jpg in the current directory. The legacy picamera library is intended for the older camera software stack and should not be used as the default for current Raspberry Pi OS installations.
Technical Details
- Image Sensor: Sony IMX477R stacked, back-illuminated CMOS
- Resolution: 12.3 megapixels
- Maximum Still Image Resolution: 4056 × 3040 pixels
- Sensor Diagonal: 7.9mm
- Pixel Size: 1.55µm × 1.55µm
- Output Formats: RAW12, RAW10, RAW8; COMP8 is also listed in the supplied source
- Back Focus: 12.5–22.4mm for the C/CS-mount version; the M12-mount version has a different range
- Lens Mount: C/CS or M12, depending on the version
- IR-Cut Filter: Integrated
- Tripod Mount: 1/4"-20
- Ribbon Cable Length: 200mm, according to Raspberry Pi's product specifications
Resources
- Raspberry Pi High Quality Camera – Official Product Page
- Raspberry Pi Camera Documentation
- Raspberry Pi Camera Software Documentation
- High Quality Camera Product Brief
- Waveshare Camera User Manual
- Waveshare Camera Guide
- Raspberry Pi High Quality Camera Getting Started
- HQ Camera Technical Drawing
- C-Mount Lens Guide
- CS-Mount Lens Guide
Features
- 12.3MP Resolution: Captures detailed images at 4056 × 3040 pixels.
- Sony IMX477R Sensor: A 7.9mm diagonal back-illuminated CMOS sensor with 1.55µm × 1.55µm pixels.
- Interchangeable Lenses: The C/CS-mount version supports compatible C-mount and CS-mount lenses. An M12-mount version is also available separately.
- Adjustable Back Focus: Allows focus adjustment to suit the installed lens and imaging requirements.
- Integrated IR-Cut Filter: Helps maintain natural color reproduction under visible-light conditions. The filter can be removed for infrared-sensitive applications, but this modification is irreversible and voids the warranty.
- RAW Image Output: Supports RAW12, RAW10, and RAW8 output formats, with COMP8 also listed in the supplied specifications.
- Tripod Mount: Includes a standard 1/4"-20 mounting point.
- Camera Ribbon Connection: Connects to a compatible Raspberry Pi camera interface using the supplied ribbon cable.
Principle of Work
- Image Capture: Light passes through the lens and reaches the Sony IMX477R CMOS sensor.
- Photovoltaic Conversion: The sensor's pixels convert incoming light into electrical signals.
- Image Processing: The Raspberry Pi camera pipeline processes the sensor data and produces image output according to the selected capture mode and software settings.
- Lens and Focus Adjustment: The interchangeable lens determines the field of view and optical characteristics. Back focus can be adjusted where supported by the camera mount and lens configuration.
- Infrared Filtering: The integrated IR-cut filter reduces unwanted infrared light in normal visible-light photography.
- Data Transfer: Image data is transferred to the Raspberry Pi through the camera's ribbon connection and CSI interface.
- Software Control: Compatible software controls image capture and settings such as exposure, white balance, and image output.
Pinout of the Module
The camera connects to a compatible Raspberry Pi through its camera ribbon connector. The ribbon carries the camera interface signals; it is not a general-purpose GPIO connection.
Applications
- Photography and Videography: Capturing detailed images and video with a suitable lens.
- Machine Vision: Image acquisition for inspection, measurement, and automated systems.
- Scientific Research: Imaging for experiments, microscopy setups with suitable optics, and documentation.
- Robotics: Providing visual input for navigation and object detection.
- AI and Computer Vision: Capturing images for object detection, classification, and image analysis.
- Environmental Monitoring: Recording wildlife, plants, and outdoor conditions.
- Agriculture: Supporting crop observation and plant analysis.
- Education: Teaching photography, image processing, and embedded vision.
- Security and Monitoring: Building custom monitoring systems with compatible lenses and software.
Circuit
Connecting the Camera to a Raspberry Pi
- Switch off the Raspberry Pi and disconnect its power supply.
- Locate the camera connector on the Raspberry Pi board. Make sure you use a compatible camera interface and ribbon cable.
- Carefully release the connector's locking tab, following the connector design.
- Insert the ribbon cable fully and straight. Align the exposed contacts according to the markings and connector orientation for your specific Raspberry Pi model and camera board.
- Secure the locking tab without forcing it.
- Check that the cable is straight and firmly seated at both ends before reconnecting power.
Important: Raspberry Pi Zero models require a compatible camera cable for their smaller connector. Cable orientation varies between connectors, so do not assume the contacts must always face the same direction.
Code
1. Check Camera Detection
On a supported Raspberry Pi OS installation, open a terminal and run:
rpicam-hello --list-camerasIf the camera is detected, test the preview with:
rpicam-hello2. Capture an Image
Capture a still image using the built-in camera application:
rpicam-still --output image.jpg3. Python Example Using Picamera2
On Raspberry Pi OS, install Picamera2 if it is not already installed:
sudo apt update
sudo apt install python3-picamera2
Create a file named camera_demo.py and add the following code:
from picamera2 import Picamera2
from time import sleep

picam2 = Picamera2()

config = picam2.create_still_configuration()
picam2.configure(config)

picam2.start()
sleep(2)

picam2.capture_file("image.jpg")

picam2.stop()
print("Image saved as image.jpg")
Run the script:
python3 camera_demo.pyThe script initializes the camera, allows a short settling period, captures an image, and saves it as image.jpg in the current directory. The legacy picamera library is intended for the older camera software stack and should not be used as the default for current Raspberry Pi OS installations.
Technical Details
- Image Sensor: Sony IMX477R stacked, back-illuminated CMOS
- Resolution: 12.3 megapixels
- Maximum Still Image Resolution: 4056 × 3040 pixels
- Sensor Diagonal: 7.9mm
- Pixel Size: 1.55µm × 1.55µm
- Output Formats: RAW12, RAW10, RAW8; COMP8 is also listed in the supplied source
- Back Focus: 12.5–22.4mm for the C/CS-mount version; the M12-mount version has a different range
- Lens Mount: C/CS or M12, depending on the version
- IR-Cut Filter: Integrated
- Tripod Mount: 1/4"-20
- Ribbon Cable Length: 200mm, according to Raspberry Pi's product specifications
Resources
- Raspberry Pi High Quality Camera – Official Product Page
- Raspberry Pi Camera Documentation
- Raspberry Pi Camera Software Documentation
- High Quality Camera Product Brief
- Waveshare Camera User Manual
- Waveshare Camera Guide
- Raspberry Pi High Quality Camera Getting Started
- HQ Camera Technical Drawing
- C-Mount Lens Guide
- CS-Mount Lens Guide