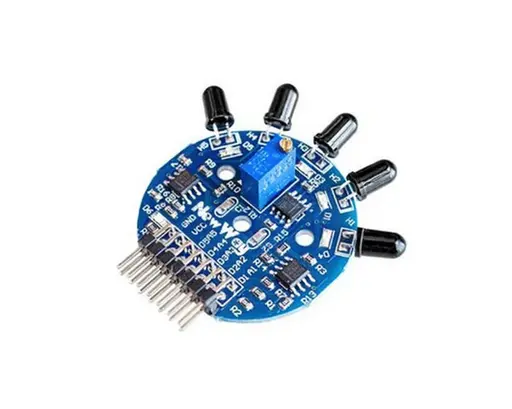
IR Flame Sensor 5 Channels Module
The IR Flame Sensor 5 Channels Module is a device used to detect flames in its detection range of over 120 degrees. The detection range decreases as the distance from the source increases. The sensor can produce both digital (high and low) and analog (voltage signal) outputs, and has five outputs in total.
The digital output detection distance can be adjusted, and the sensitivity of the analog output can be changed. The module is designed to operate on a power supply between 3.3V and 9V, and is compatible with most SCM (Single-Chip Microcontroller) systems. The device is easy to install with its 3 M3 mounting holes.
Package Includes:
- 1 x IR Flame Sensor 5 Channels Module
Features:
- 5-channel infrared flame sensor
- On-board potentiometer for adjusting the sensitivity
- Indicator LEDs: Five (one on each channel) and one power indicator
Specification:
- Voltage: 3.3 - 9 V
- Outputs: 5 Analog and 5 Digital
- Detection range: > 120°
- Frequency: 760nm to 1100nm
Applications:
- Robotics: Used to detect fires and help robots avoid or navigate around them. In firefighting robots, it can locate fire for extinguishing.
- Fire alarm: Can trigger alarms by detecting flames with adjustable sensitivity to fit different environments.
Pin Connections:
| Pin | Description |
|---|---|
| A1-A5 | Analog output pins |
| D1-D5 | Digital output pins |
| Vcc | Power supply (3.3V to 9V) |
| GND | Ground |

Sample Project:
Circuit:
- Connect GND pin of the sensor to the GND pin of Arduino
- Connect the Vcc pin of sensor to +5V pin of Arduino
- Connect A1 pin of the sensor (or any analog pin) to the A0 pin of Arduino
Library:
No external library is required for this module to work.
Code:
const int sensorMin = 0; // sensor minimum
const int sensorMax = 1024; // sensor maximum

void setup() {
  Serial.begin(9600);
}

void loop() {
  // read the sensor on analog A0:
  int sensorReading = analogRead(A0);
  int range = map(sensorReading, sensorMin, sensorMax, 0, 3);

  // range value:
  switch (range) {
    case 0: // No fire detected
      Serial.println("** No Fire **");
      break;
    case 1: // A fire between 1-3 feet away.
      Serial.println("** Fire **");
      break;
  }
  delay(1000);
}
Now open the Arduino IDE. If the sensor board detects fire, you will see the word "Fire" printed in the serial monitor.
References:
Features:
- 5-channel infrared flame sensor
- On-board potentiometer for adjusting the sensitivity
- Indicator LEDs: Five (one on each channel) and one power indicator
Specification:
- Voltage: 3.3 - 9 V
- Outputs: 5 Analog and 5 Digital
- Detection range: > 120°
- Frequency: 760nm to 1100nm
Applications:
- Robotics: Used to detect fires and help robots avoid or navigate around them. In firefighting robots, it can locate fire for extinguishing.
- Fire alarm: Can trigger alarms by detecting flames with adjustable sensitivity to fit different environments.
Pin Connections:
| Pin | Description |
|---|---|
| A1-A5 | Analog output pins |
| D1-D5 | Digital output pins |
| Vcc | Power supply (3.3V to 9V) |
| GND | Ground |
Sample Project:
Circuit:
- Connect GND pin of the sensor to the GND pin of Arduino
- Connect the Vcc pin of sensor to +5V pin of Arduino
- Connect A1 pin of the sensor (or any analog pin) to the A0 pin of Arduino
Library:
No external library is required for this module to work.
Code:
const int sensorMin = 0; // sensor minimum
const int sensorMax = 1024; // sensor maximum

void setup() {
  Serial.begin(9600);
}

void loop() {
  // read the sensor on analog A0:
  int sensorReading = analogRead(A0);
  int range = map(sensorReading, sensorMin, sensorMax, 0, 3);

  // range value:
  switch (range) {
    case 0: // No fire detected
      Serial.println("** No Fire **");
      break;
    case 1: // A fire between 1-3 feet away.
      Serial.println("** Fire **");
      break;
  }
  delay(1000);
}
Now open the Arduino IDE. If the sensor board detects fire, you will see the word "Fire" printed in the serial monitor.