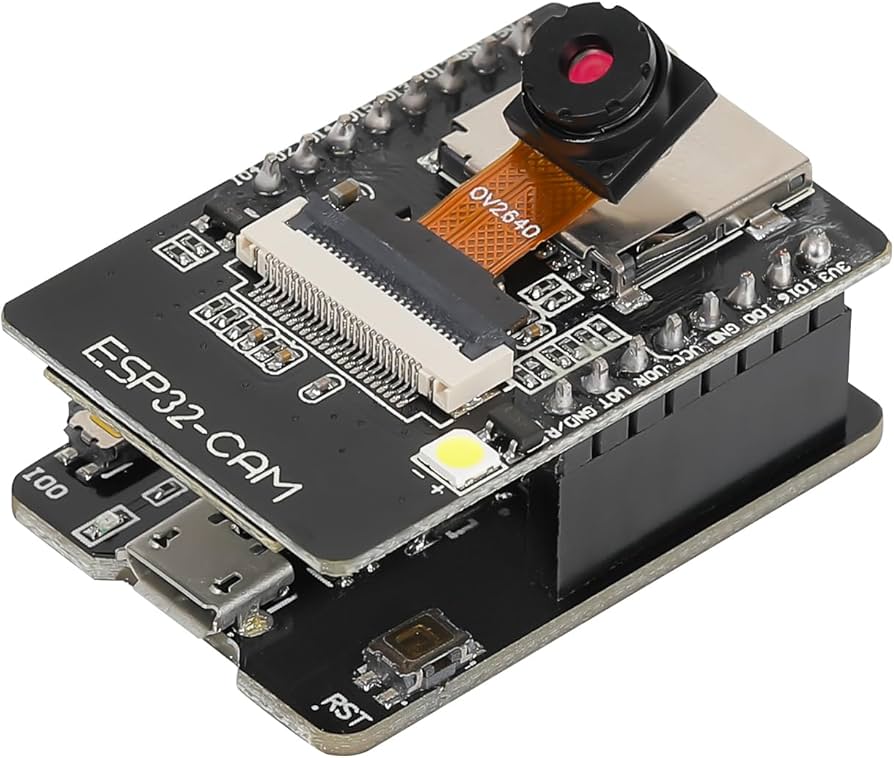
Features:
- Built-in Wi-Fi and Bluetooth connectivity.
- Supports WiFi image upload and remote streaming.
- Compact board size suitable for embedded applications.
- Supports multiple sleep modes for low power consumption.
- Integrated LwIP and FreeRTOS support.
- Compatible with OV2640 and OV7670 camera modules.
- Supports STA/AP/STA+AP Wi-Fi modes.
- Supports Smart Config and AirKiss network setup.
- High-performance dual-core processor up to 160MHz.
- Supports local and remote firmware updates (FOTA).
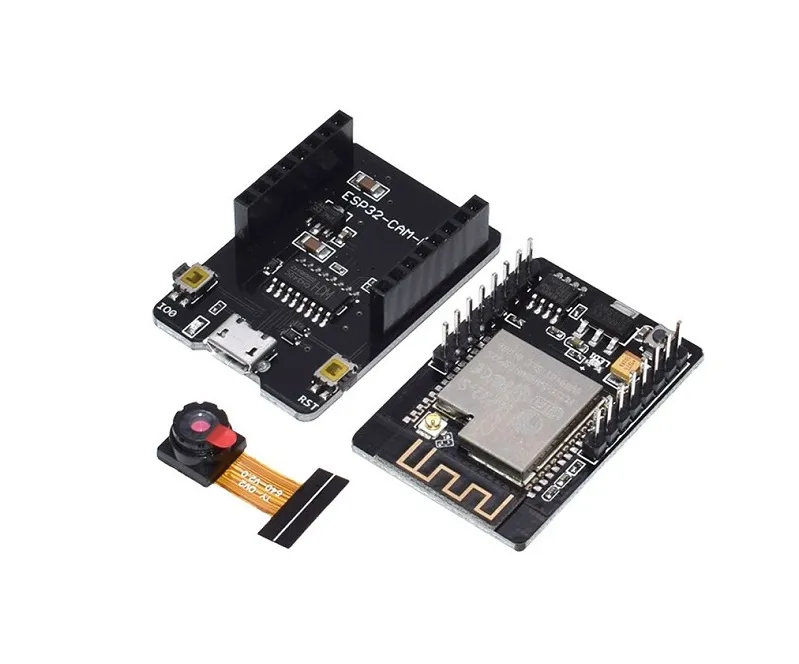
- ESP32-CAM-MB programmer includes CH340C USB-to-Serial chip.
- Dedicated RESET and BOOT buttons for easy programming.
Principle of Work:
The ESP32-CAM works by combining wireless networking, image processing, and embedded control into a single module.
- Image Capture: The OV2640 camera captures images and video data.
- Processing: The ESP32 processor handles image encoding and networking tasks.
- Wireless Communication: Wi-Fi and Bluetooth allow remote transmission and control.
- Storage: Images can be stored locally on a microSD card.
- Firmware Control: Programs can be uploaded through the USB programmer board.
Pinout of the Module:

| Pin | Function |
|---|---|
| 5V | Power Supply Input |
| GND | Ground |
| 3.3V | 3.3V Output |
| U0R | UART RX |
| U0T | UART TX |
| GPIO0 | Boot Mode Selection |
| GPIO2 | General Purpose I/O |
| GPIO4 | Flash LED Control |
| GPIO12-15 | General Purpose I/O |
| GPIO13 | MicroSD Interface |
| GPIO14 | MicroSD Clock |
First Time Starting:
- Connect the ESP32-CAM module to the ESP32-CAM-MB programmer board.
- Install the CH340C USB driver on your computer.
- Open Arduino IDE.
- Add the ESP32 Board Manager URL in Preferences:
https://raw.githubusercontent.com/espressif/arduino-esp32/gh-pages/package_esp32_index.json
- Go to Tools > Board > Boards Manager.
- Search for ESP32 by Espressif Systems and install it.
- Select AI Thinker ESP32-CAM from the board list.
- Select the correct COM port.
- Open an ESP32-CAM example sketch such as CameraWebServer.
- Enter your Wi-Fi SSID and password.
- Upload the code.
- Open Serial Monitor to view the assigned IP address.
- Open the IP address in a web browser to access the camera stream.
Code:
Basic ESP32-CAM Camera Web Server Example:
#include "esp_camera.h"
#include <WiFi.h>

const char* ssid = "YOUR_WIFI_NAME";
const char* password = "YOUR_WIFI_PASSWORD";

void startCameraServer();

void setup() {
  Serial.begin(115200);

  camera_config_t config;
  config.ledc_channel = LEDC_CHANNEL_0;
  config.ledc_timer = LEDC_TIMER_0;

  esp_camera_init(&config);

  WiFi.begin(ssid, password);

  while (WiFi.status() != WL_CONNECTED) {
    delay(500);
    Serial.print(".");
  }

  Serial.println("");
  Serial.println("WiFi connected");

  startCameraServer();

  Serial.print("Camera Ready! Use 'http://");
  Serial.print(WiFi.localIP());
  Serial.println("' to connect");
}

void loop() {
  delay(1);
}
Applications:
- Wireless surveillance systems.
- Smart doorbell and security projects.
- IoT monitoring systems.
- Remote image capture applications.
- Face recognition and AI projects.
- Video streaming systems.
Technical Details:
- IO Ports: 9
- Operating Voltage: 5V
- Recommended Power Supply: 5V 2A
- Flash Memory: 32Mbit
- SRAM: 520KB
- PSRAM: 4MB
- Wi-Fi Standard: 802.11b/g/n/e/i
- Bluetooth: BLE 4.2 BR/EDR
- Frequency Range: 2412~2484MHz
- Maximum TF Card Support: 4GB
- Interfaces: UART, SPI, I2C, PWM
- Default Baud Rate: 115200bps
- Antenna Gain: 2dBi
- Image Formats: JPEG, BMP, Grayscale
- Dimensions: 27mm x 40mm
Features:
- Built-in Wi-Fi and Bluetooth connectivity.
- Supports WiFi image upload and remote streaming.
- Compact board size suitable for embedded applications.
- Supports multiple sleep modes for low power consumption.
- Integrated LwIP and FreeRTOS support.
- Compatible with OV2640 and OV7670 camera modules.
- Supports STA/AP/STA+AP Wi-Fi modes.
- Supports Smart Config and AirKiss network setup.
- High-performance dual-core processor up to 160MHz.
- Supports local and remote firmware updates (FOTA).
- ESP32-CAM-MB programmer includes CH340C USB-to-Serial chip.
- Dedicated RESET and BOOT buttons for easy programming.
Principle of Work:
The ESP32-CAM works by combining wireless networking, image processing, and embedded control into a single module.
- Image Capture: The OV2640 camera captures images and video data.
- Processing: The ESP32 processor handles image encoding and networking tasks.
- Wireless Communication: Wi-Fi and Bluetooth allow remote transmission and control.
- Storage: Images can be stored locally on a microSD card.
- Firmware Control: Programs can be uploaded through the USB programmer board.
Pinout of the Module:
| Pin | Function |
|---|---|
| 5V | Power Supply Input |
| GND | Ground |
| 3.3V | 3.3V Output |
| U0R | UART RX |
| U0T | UART TX |
| GPIO0 | Boot Mode Selection |
| GPIO2 | General Purpose I/O |
| GPIO4 | Flash LED Control |
| GPIO12-15 | General Purpose I/O |
| GPIO13 | MicroSD Interface |
| GPIO14 | MicroSD Clock |
First Time Starting:
- Connect the ESP32-CAM module to the ESP32-CAM-MB programmer board.
- Install the CH340C USB driver on your computer.
- Open Arduino IDE.
- Add the ESP32 Board Manager URL in Preferences:
https://raw.githubusercontent.com/espressif/arduino-esp32/gh-pages/package_esp32_index.json
- Go to Tools > Board > Boards Manager.
- Search for ESP32 by Espressif Systems and install it.
- Select AI Thinker ESP32-CAM from the board list.
- Select the correct COM port.
- Open an ESP32-CAM example sketch such as CameraWebServer.
- Enter your Wi-Fi SSID and password.
- Upload the code.
- Open Serial Monitor to view the assigned IP address.
- Open the IP address in a web browser to access the camera stream.
Code:
Basic ESP32-CAM Camera Web Server Example:
#include "esp_camera.h"
#include <WiFi.h>

const char* ssid = "YOUR_WIFI_NAME";
const char* password = "YOUR_WIFI_PASSWORD";

void startCameraServer();

void setup() {
  Serial.begin(115200);

  camera_config_t config;
  config.ledc_channel = LEDC_CHANNEL_0;
  config.ledc_timer = LEDC_TIMER_0;

  esp_camera_init(&config);

  WiFi.begin(ssid, password);

  while (WiFi.status() != WL_CONNECTED) {
    delay(500);
    Serial.print(".");
  }

  Serial.println("");
  Serial.println("WiFi connected");

  startCameraServer();

  Serial.print("Camera Ready! Use 'http://");
  Serial.print(WiFi.localIP());
  Serial.println("' to connect");
}

void loop() {
  delay(1);
}
Applications:
- Wireless surveillance systems.
- Smart doorbell and security projects.
- IoT monitoring systems.
- Remote image capture applications.
- Face recognition and AI projects.
- Video streaming systems.
Technical Details:
- IO Ports: 9
- Operating Voltage: 5V
- Recommended Power Supply: 5V 2A
- Flash Memory: 32Mbit
- SRAM: 520KB
- PSRAM: 4MB
- Wi-Fi Standard: 802.11b/g/n/e/i
- Bluetooth: BLE 4.2 BR/EDR
- Frequency Range: 2412~2484MHz
- Maximum TF Card Support: 4GB
- Interfaces: UART, SPI, I2C, PWM
- Default Baud Rate: 115200bps
- Antenna Gain: 2dBi
- Image Formats: JPEG, BMP, Grayscale
- Dimensions: 27mm x 40mm