?unique=98f21f6)
Raspberry Pi 5 (2 GB RAM)
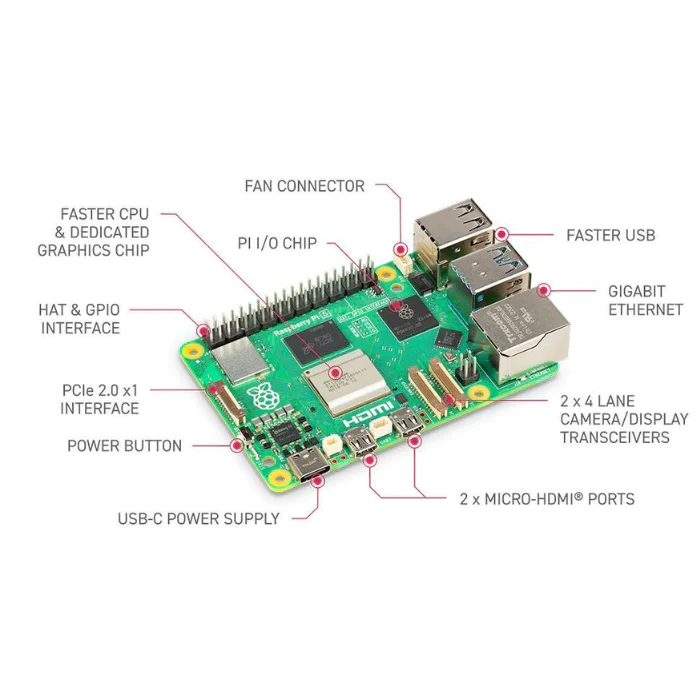
The Raspberry Pi 5 is the flagship model in the Raspberry Pi series, offering major upgrades over its predecessor, the Raspberry Pi 4. This version, equipped with 2GB RAM, delivers 2-3x increased CPU performance, improved multimedia support, and enhanced connectivity. With integration of the RP1 I/O controller, and support for interfaces like USB 3.0 and PCIe, it's ideal for power users, makers, and embedded systems.
Package Includes:
- 1 × Raspberry Pi 5 (2GB RAM)
Features:
- High-Performance Quad-Core Processor: ARM Cortex-A76 for faster multitasking, media processing, and computation-heavy tasks.
- 2GB LPDDR4 RAM: Improved memory management for smoother application performance.
- Advanced Networking: Gigabit Ethernet, dual-band Wi-Fi (2.4GHz/5GHz), Bluetooth 5.0 with BLE.
- USB 3.0 Support: Two high-speed USB 3.0 ports and two USB 2.0 ports for versatile connectivity.
- Dual 4K Display Output: Two Micro HDMI ports support 4Kp60 dual displays.
- MicroSD Storage: Expandable storage via MicroSD card slot.
- 40-pin GPIO Header: Standard header for custom electronics projects.
- Camera & Display Interfaces: Two 4-lane MIPI CSI/DSI interfaces for camera and screen connection.
- PoE Support: Compatible with PoE HATs for single-cable power and networking.
- USB Type-C Power: 5V/5A power input with improved stability.
- Real-Time Clock (RTC): RTC support with external battery backup for timekeeping while powered off.
- PCIe 2.0 Interface: x1 PCIe interface for high-speed expansion.
Specifications:
| Category | Specification |
|---|---|
| Processor | Broadcom BCM2712, Quad-core ARM Cortex-A76 @ 2.4GHz, 512KB L2 + 2MB L3 cache |
| Memory (RAM) | 2GB LPDDR4 |
| Networking | Gigabit Ethernet, Dual-band Wi-Fi 802.11ac, Bluetooth 5.0 (BLE) |
| USB Ports | 2 × USB 3.0, 2 × USB 2.0 |
| Display | 2 × Micro HDMI (up to 4Kp60) |
| Storage | MicroSD card slot |
| Interfaces | 40-pin GPIO, 2 × 4-lane MIPI DSI/CSI, PCIe 2.0 x1, UART header |
| Power & Control | USB Type-C (5V/5A), Power button, RTC via external battery |

How to Use:
- Preparation: Get an SD card and card reader.
- Download OS: Download Raspberry Pi OS from the official site.
- Format SD Card: Use SDFormatter to clean the card.
- Burn OS Image: Use Win32DiskImager to write the OS to the SD card.
- Boot Device: Insert the SD card into the Pi, plug in 5V/5A Type-C power, and boot.
- Connect Peripherals: Attach keyboard, mouse, and display.
UART Login:
The Raspberry Pi 5 includes a dedicated UART connector with support up to 921,600bps. It's useful for early boot diagnostics and post-boot Linux console access. Configure via EEPROM to enable UART debugging.

RTC (Real-Time Clock):
The board supports external RTC functionality with battery backup. Connect via the J5 (BAT) header.
Useful Commands:
sudo hwclock -w– Sync system clock to RTCsudo hwclock -s– Sync RTC to system clocksudo hwclock --set --date="9/8/2023 16:45:05"– Set RTC manuallysudo hwclock -r– Read RTC timesudo hwclock --verbose– Detailed RTC info
Auto Wakeup Configuration:
sudo -E rpi-eeprom-config --edit
# Add:
POWER_OFF_ON_HALT=1
WAKE_ON_GPIO=0
To test wake-up timer (10 mins):
echo +600 | sudo tee /sys/class/rtc/rtc0/wakealarm
sudo halt
RTC Battery Charging Setup:
Enable trickle charging (if supported) by editing config:
sudo nano /boot/firmware/config.txt
# Add:
dtparam=rtc_bbat_vchg=3000000
Dimensions:

Features:
- High-Performance Quad-Core Processor: ARM Cortex-A76 for faster multitasking, media processing, and computation-heavy tasks.
- 2GB LPDDR4 RAM: Improved memory management for smoother application performance.
- Advanced Networking: Gigabit Ethernet, dual-band Wi-Fi (2.4GHz/5GHz), Bluetooth 5.0 with BLE.
- USB 3.0 Support: Two high-speed USB 3.0 ports and two USB 2.0 ports for versatile connectivity.
- Dual 4K Display Output: Two Micro HDMI ports support 4Kp60 dual displays.
- MicroSD Storage: Expandable storage via MicroSD card slot.
- 40-pin GPIO Header: Standard header for custom electronics projects.
- Camera & Display Interfaces: Two 4-lane MIPI CSI/DSI interfaces for camera and screen connection.
- PoE Support: Compatible with PoE HATs for single-cable power and networking.
- USB Type-C Power: 5V/5A power input with improved stability.
- Real-Time Clock (RTC): RTC support with external battery backup for timekeeping while powered off.
- PCIe 2.0 Interface: x1 PCIe interface for high-speed expansion.
Specifications:
| Category | Specification |
|---|---|
| Processor | Broadcom BCM2712, Quad-core ARM Cortex-A76 @ 2.4GHz, 512KB L2 + 2MB L3 cache |
| Memory (RAM) | 2GB LPDDR4 |
| Networking | Gigabit Ethernet, Dual-band Wi-Fi 802.11ac, Bluetooth 5.0 (BLE) |
| USB Ports | 2 × USB 3.0, 2 × USB 2.0 |
| Display | 2 × Micro HDMI (up to 4Kp60) |
| Storage | MicroSD card slot |
| Interfaces | 40-pin GPIO, 2 × 4-lane MIPI DSI/CSI, PCIe 2.0 x1, UART header |
| Power & Control | USB Type-C (5V/5A), Power button, RTC via external battery |
How to Use:
- Preparation: Get an SD card and card reader.
- Download OS: Download Raspberry Pi OS from the official site.
- Format SD Card: Use SDFormatter to clean the card.
- Burn OS Image: Use Win32DiskImager to write the OS to the SD card.
- Boot Device: Insert the SD card into the Pi, plug in 5V/5A Type-C power, and boot.
- Connect Peripherals: Attach keyboard, mouse, and display.
UART Login:
The Raspberry Pi 5 includes a dedicated UART connector with support up to 921,600bps. It's useful for early boot diagnostics and post-boot Linux console access. Configure via EEPROM to enable UART debugging.
RTC (Real-Time Clock):
The board supports external RTC functionality with battery backup. Connect via the J5 (BAT) header.
Useful Commands:
sudo hwclock -w– Sync system clock to RTCsudo hwclock -s– Sync RTC to system clocksudo hwclock --set --date="9/8/2023 16:45:05"– Set RTC manuallysudo hwclock -r– Read RTC timesudo hwclock --verbose– Detailed RTC info
Auto Wakeup Configuration:
sudo -E rpi-eeprom-config --edit
# Add:
POWER_OFF_ON_HALT=1
WAKE_ON_GPIO=0
To test wake-up timer (10 mins):
echo +600 | sudo tee /sys/class/rtc/rtc0/wakealarm
sudo halt
RTC Battery Charging Setup:
Enable trickle charging (if supported) by editing config:
sudo nano /boot/firmware/config.txt
# Add:
dtparam=rtc_bbat_vchg=3000000
Dimensions: