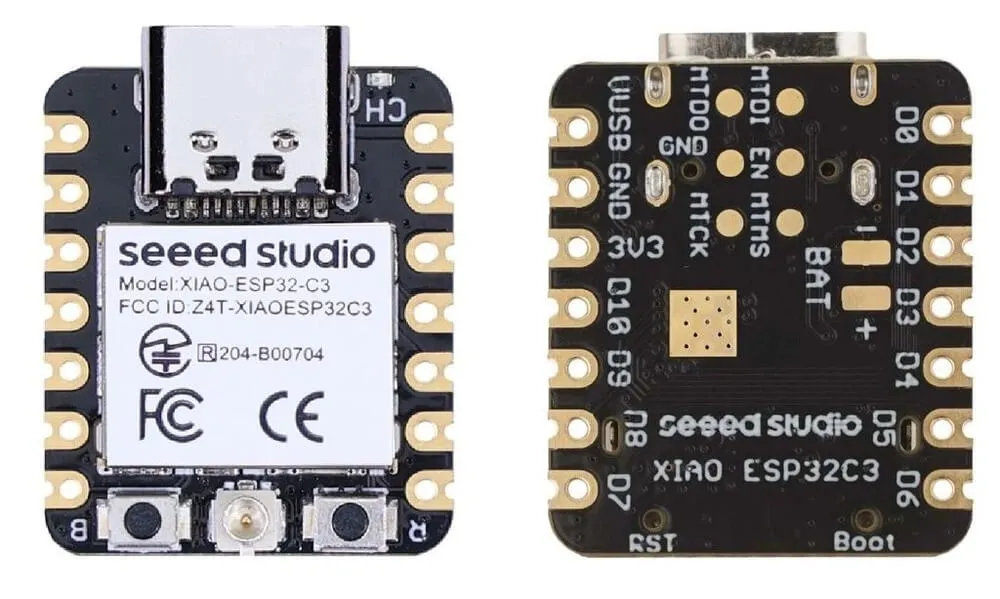
Features:
- Powerful Processor: ESP32-C3 32-bit RISC-V single-core CPU running up to 160MHz
- Wireless Connectivity: Supports 2.4GHz WiFi (802.11 b/g/n) and Bluetooth 5.0 BLE
- Compact Size: Ultra-small 21 x 17.8mm form factor suitable for embedded and wearable devices
- External Antenna: Improved RF performance and signal stability
- Low Power Consumption: Deep sleep current as low as ~44µA
- Rich Interfaces: UART, I2C, SPI communication supported
- GPIO Capability: 11 digital I/O pins with PWM support
- Analog Inputs: 4 ADC channels for sensor interfacing
- Onboard Buttons: Reset button and Boot mode button included
- Battery Support: Built-in lithium battery charge management
- Security Features: Supports AES, RSA, SHA, HMAC, and secure boot
- Memory: 400KB SRAM and 4MB onboard Flash
- Surface-Mount Design: Single-sided components for easy integration
Principle of Work:
The XIAO ESP32C3 operates using the ESP32-C3 SoC, which integrates a RISC-V CPU, wireless connectivity modules, and peripheral interfaces into a single chip. The processor executes user programs stored in its 4MB Flash memory, while 400KB SRAM is used for runtime operations and data handling. The board features a fully integrated WiFi and Bluetooth subsystem, enabling seamless communication with networks, cloud platforms, and other devices. Its GPIO pins allow interaction with sensors and actuators, while interfaces such as UART, I2C, and SPI enable communication with external modules. Power management is a key strength of this board. It supports multiple sleep modes including deep sleep, significantly reducing power consumption for battery-powered applications. The onboard battery charging circuit allows direct connection of a lithium battery, making it ideal for portable and IoT devices.
Pinout of the Module:
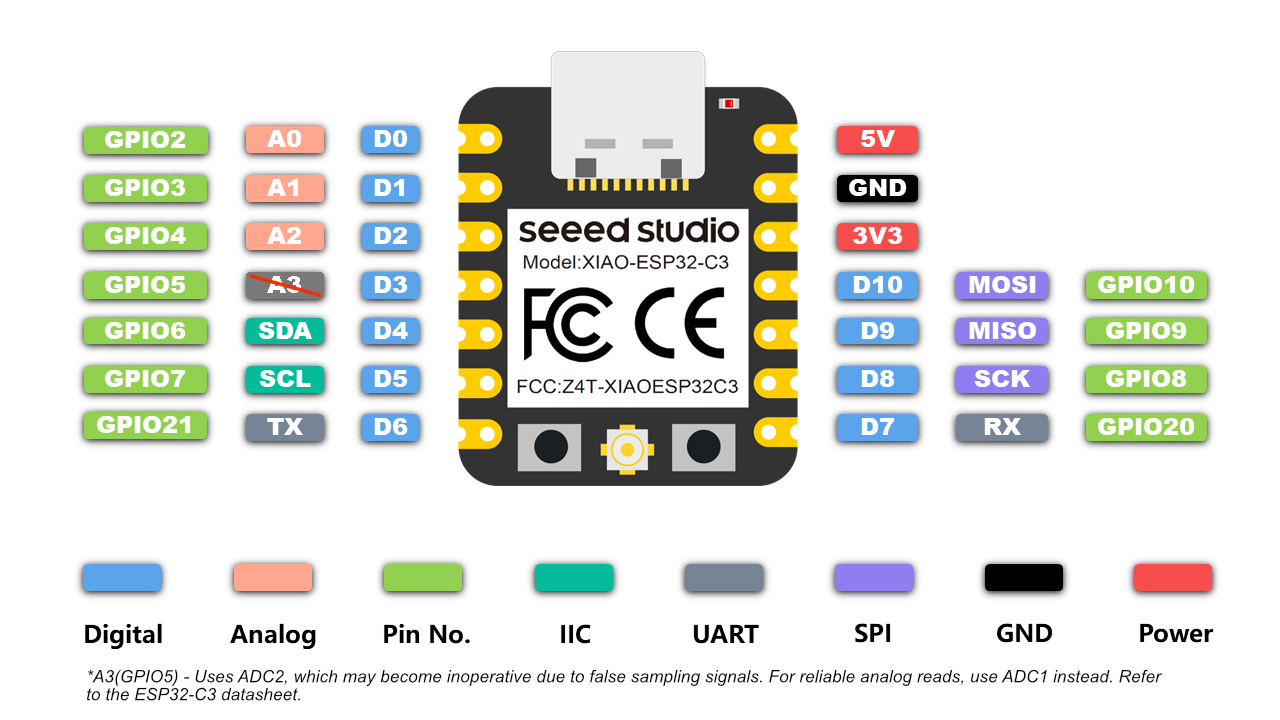
- Power Pins: Includes 5V input/output, 3.3V regulated output, and GND
- Digital I/O Pins: 11 GPIO pins configurable for input/output and PWM
- Analog Pins: 4 ADC channels for analog signal measurement
- I2C Interface: SDA (D4) and SCL (D5) for communication with sensors
- UART Interface: TX (D6) and RX (D7) for serial communication
- SPI Interface: SCK (D8), MISO (D9), MOSI (D10)
- Control Buttons: Reset and Boot buttons for programming and debugging
- Antenna Connector: External antenna for improved wireless performance
Applications:
- IoT Devices: Smart sensors, cloud-connected systems, and wireless monitoring
- Wearable Electronics: Compact size ideal for fitness trackers and smart wearables
- Home Automation: Control of smart home appliances and systems
- Wireless Communication Projects: BLE and WiFi-based applications
- Battery-Powered Systems: Low-power operation suitable for portable devices
- Embedded Systems: Integration into compact electronic designs
- Sensor Networks: Data acquisition and environmental monitoring
- Robotics: Wireless control and sensor interfacing
Circuit:
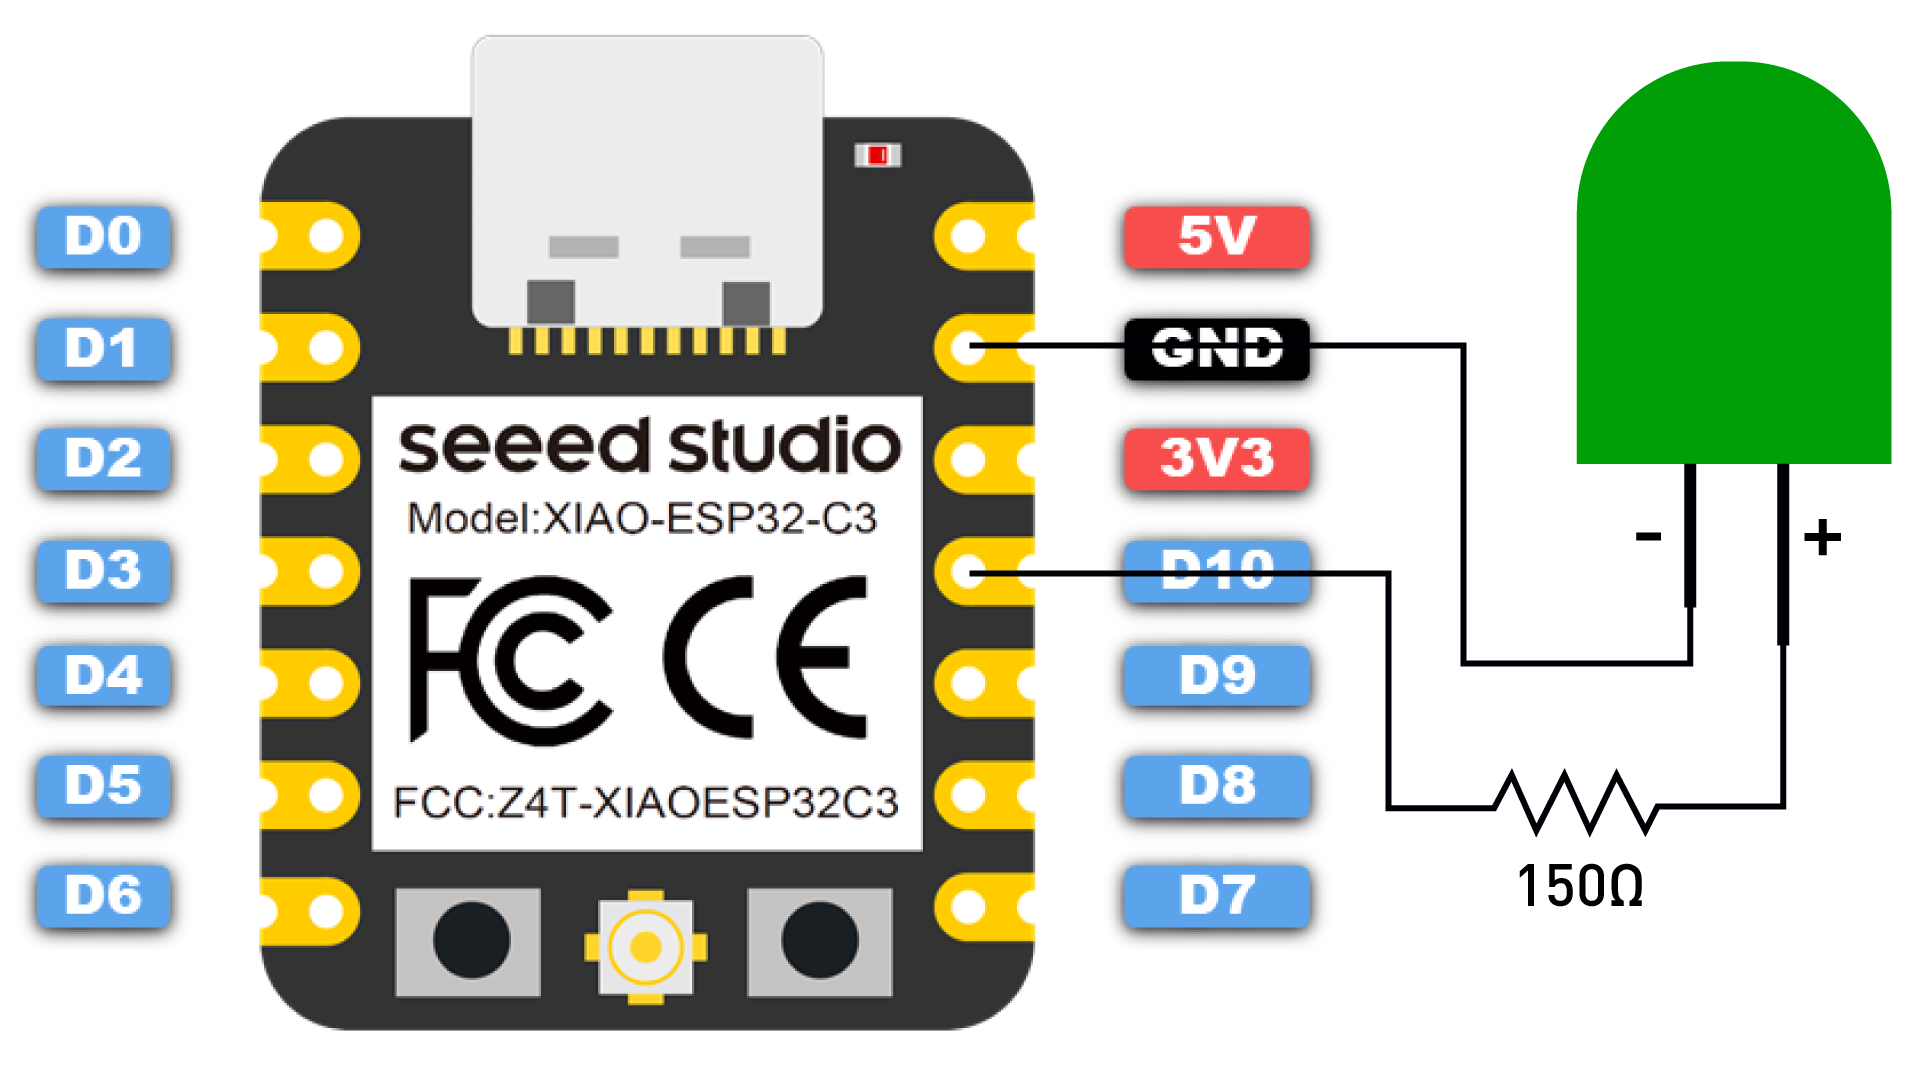
For a basic test, connect an LED to one of the GPIO pins (e.g., D10) with a current-limiting resistor. This allows you to verify operation by running a simple blink program.
Connecting with Arduino First Time
- Install Arduino IDE: Download from Arduino Official Website
- Install ESP32 Board Package: Add ESP32 board support via Boards Manager
https://espressif.github.io/arduino-esp32/package_esp32_index.json - Connect the Board: Use a USB Type-C data cable to connect the board
- Select Board: Tools > Board > ESP32 Arduino > XIAO_ESP32C3
- Select Port: Choose the correct COM port under Tools > Port
- Upload Code: Write or paste code and upload to the board
Code:
// Define LED pin
const int led = D10;

void setup() {
  pinMode(led, OUTPUT);
}

void loop() {
  digitalWrite(led, HIGH);
  delay(1000);
  digitalWrite(led, LOW);
  delay(1000);
}
Technical Details:
- Processor: ESP32-C3 RISC-V 32-bit, up to 160MHz
- Wireless: WiFi 2.4GHz (802.11 b/g/n), Bluetooth 5.0 BLE
- Memory: 400KB SRAM, 4MB Flash
- GPIO: 11 digital I/O (PWM supported)
- ADC: 4 channels
- Interfaces: UART, I2C, SPI
- Operating Voltage: 3.3V
- Input Voltage: 5V (USB), 3.7V (Battery)
- Charging Current: 380mA (fast), 40mA (trickle)
- Deep Sleep Current: ~44µA
- Active Current (WiFi): ~75mA
- Dimensions: 21 x 17.8 mm
- Working Temperature: -40°C to 85°C
MicroPython GitHub Repository
Resources
Hardware Design
- 📄[Datasheet] Espressif ESP32-C3 Datasheet
- 📄[Schematic] XIAO ESP32-C3 Schematic
- 🗃️[PCB Design Files]
- 🗃️[PCB Design Libraries]
- 📄[Pinout Diagram] XIAO ESP32-C3 Pinout Sheet
Mechanical
- 📄[2D Dimensions] XIAO ESP32-C3 Dimension in DXF
- 🗃️[2D Dimensions] XIAO ESP32-C3 Bottom Pad Data
- 📄[3D Model] XIAO ESP32-C3 3D Model
Software & Tools
- 🗃️[Factory Firmware] XIAO ESP32-C3 Factory Firmware
- 🔗[MicroPython Library] XIAO ESP32-C3 MicroPython Library
- 🔗[Platform IO] PlatformIO for Seeed Studio XIAO ESP32-C3
Others
- 🔗[Wiki] First Look at the Seeed Studio XIAO ESP32-C3
- A great intro to the XIAO ESP32C3, covering key features and basic usage.
- 📄[Document] Report of XIAO ESP32-C3 Low Power Consumption
Features:
- Powerful Processor: ESP32-C3 32-bit RISC-V single-core CPU running up to 160MHz
- Wireless Connectivity: Supports 2.4GHz WiFi (802.11 b/g/n) and Bluetooth 5.0 BLE
- Compact Size: Ultra-small 21 x 17.8mm form factor suitable for embedded and wearable devices
- External Antenna: Improved RF performance and signal stability
- Low Power Consumption: Deep sleep current as low as ~44µA
- Rich Interfaces: UART, I2C, SPI communication supported
- GPIO Capability: 11 digital I/O pins with PWM support
- Analog Inputs: 4 ADC channels for sensor interfacing
- Onboard Buttons: Reset button and Boot mode button included
- Battery Support: Built-in lithium battery charge management
- Security Features: Supports AES, RSA, SHA, HMAC, and secure boot
- Memory: 400KB SRAM and 4MB onboard Flash
- Surface-Mount Design: Single-sided components for easy integration
Principle of Work:
The XIAO ESP32C3 operates using the ESP32-C3 SoC, which integrates a RISC-V CPU, wireless connectivity modules, and peripheral interfaces into a single chip. The processor executes user programs stored in its 4MB Flash memory, while 400KB SRAM is used for runtime operations and data handling. The board features a fully integrated WiFi and Bluetooth subsystem, enabling seamless communication with networks, cloud platforms, and other devices. Its GPIO pins allow interaction with sensors and actuators, while interfaces such as UART, I2C, and SPI enable communication with external modules. Power management is a key strength of this board. It supports multiple sleep modes including deep sleep, significantly reducing power consumption for battery-powered applications. The onboard battery charging circuit allows direct connection of a lithium battery, making it ideal for portable and IoT devices.
Pinout of the Module:
- Power Pins: Includes 5V input/output, 3.3V regulated output, and GND
- Digital I/O Pins: 11 GPIO pins configurable for input/output and PWM
- Analog Pins: 4 ADC channels for analog signal measurement
- I2C Interface: SDA (D4) and SCL (D5) for communication with sensors
- UART Interface: TX (D6) and RX (D7) for serial communication
- SPI Interface: SCK (D8), MISO (D9), MOSI (D10)
- Control Buttons: Reset and Boot buttons for programming and debugging
- Antenna Connector: External antenna for improved wireless performance
Applications:
- IoT Devices: Smart sensors, cloud-connected systems, and wireless monitoring
- Wearable Electronics: Compact size ideal for fitness trackers and smart wearables
- Home Automation: Control of smart home appliances and systems
- Wireless Communication Projects: BLE and WiFi-based applications
- Battery-Powered Systems: Low-power operation suitable for portable devices
- Embedded Systems: Integration into compact electronic designs
- Sensor Networks: Data acquisition and environmental monitoring
- Robotics: Wireless control and sensor interfacing
Circuit:
For a basic test, connect an LED to one of the GPIO pins (e.g., D10) with a current-limiting resistor. This allows you to verify operation by running a simple blink program.
Connecting with Arduino First Time
- Install Arduino IDE: Download from Arduino Official Website
- Install ESP32 Board Package: Add ESP32 board support via Boards Manager
https://espressif.github.io/arduino-esp32/package_esp32_index.json - Connect the Board: Use a USB Type-C data cable to connect the board
- Select Board: Tools > Board > ESP32 Arduino > XIAO_ESP32C3
- Select Port: Choose the correct COM port under Tools > Port
- Upload Code: Write or paste code and upload to the board
Code:
// Define LED pin
const int led = D10;

void setup() {
  pinMode(led, OUTPUT);
}

void loop() {
  digitalWrite(led, HIGH);
  delay(1000);
  digitalWrite(led, LOW);
  delay(1000);
}
Technical Details:
- Processor: ESP32-C3 RISC-V 32-bit, up to 160MHz
- Wireless: WiFi 2.4GHz (802.11 b/g/n), Bluetooth 5.0 BLE
- Memory: 400KB SRAM, 4MB Flash
- GPIO: 11 digital I/O (PWM supported)
- ADC: 4 channels
- Interfaces: UART, I2C, SPI
- Operating Voltage: 3.3V
- Input Voltage: 5V (USB), 3.7V (Battery)
- Charging Current: 380mA (fast), 40mA (trickle)
- Deep Sleep Current: ~44µA
- Active Current (WiFi): ~75mA
- Dimensions: 21 x 17.8 mm
- Working Temperature: -40°C to 85°C
MicroPython GitHub Repository
Resources
Hardware Design
- 📄[Datasheet] Espressif ESP32-C3 Datasheet
- 📄[Schematic] XIAO ESP32-C3 Schematic
- 🗃️[PCB Design Files]
- 🗃️[PCB Design Libraries]
- 📄[Pinout Diagram] XIAO ESP32-C3 Pinout Sheet
Mechanical
- 📄[2D Dimensions] XIAO ESP32-C3 Dimension in DXF
- 🗃️[2D Dimensions] XIAO ESP32-C3 Bottom Pad Data
- 📄[3D Model] XIAO ESP32-C3 3D Model
Software & Tools
- 🗃️[Factory Firmware] XIAO ESP32-C3 Factory Firmware
- 🔗[MicroPython Library] XIAO ESP32-C3 MicroPython Library
- 🔗[Platform IO] PlatformIO for Seeed Studio XIAO ESP32-C3
Others
- 🔗[Wiki] First Look at the Seeed Studio XIAO ESP32-C3
- A great intro to the XIAO ESP32C3, covering key features and basic usage.
- 📄[Document] Report of XIAO ESP32-C3 Low Power Consumption