
Features:
- Fully compatible with Arduino UNO R3 and similar boards
- Expands all digital and analog pins into convenient 3-pin headers (GND, VCC, Signal)
- Integrated reset button for quick board reset
- Built-in power indicator and D13 signal indicator LED
- Supports UART serial communication interface
- Supports I2C communication interface
- Supports SPI communication interface
- Provides URF interface for wireless modules
- Includes APC220 communication module interface
- Terminal blocks allow external voltage supply for sensors
- Stackable design for direct installation on UNO R3 boards
Principle of Work:
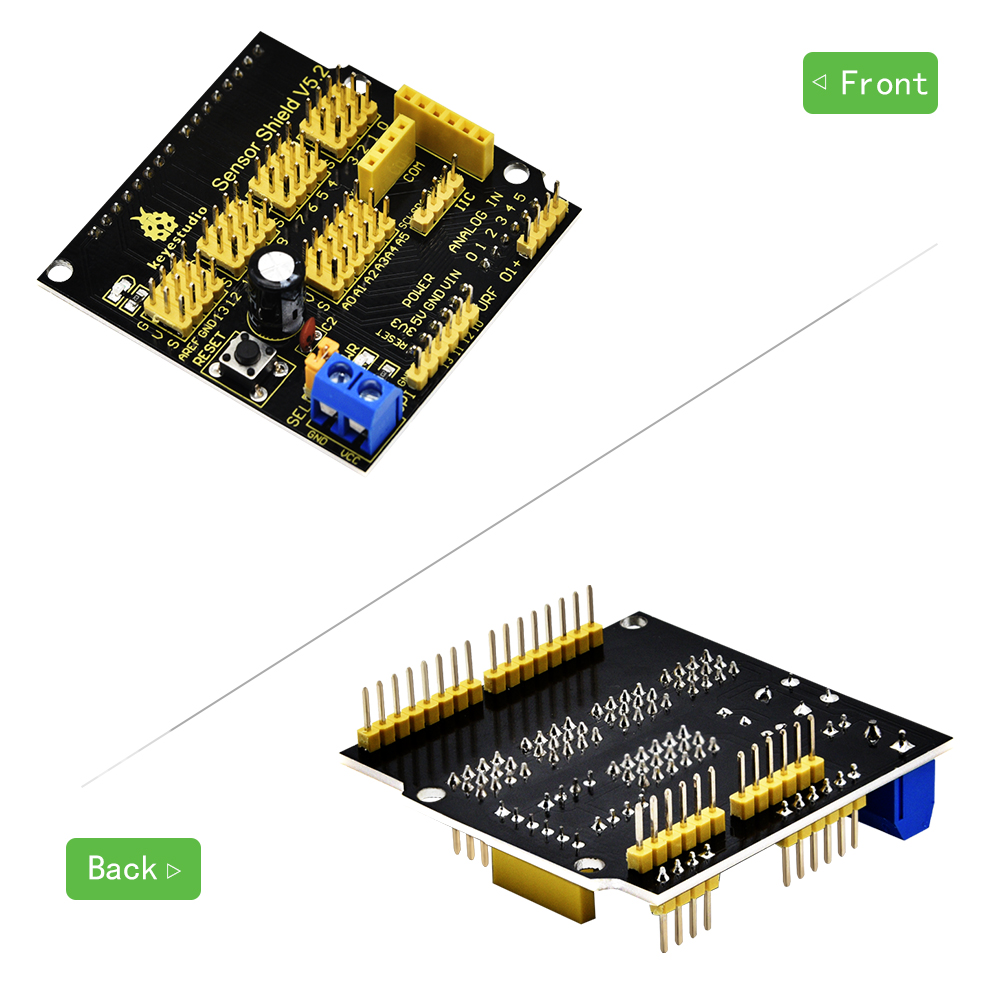
The Keyestudio Sensor Shield works as an interface expansion board for Arduino-compatible controllers. When the shield is stacked onto an Arduino UNO R3 board, it extends the original I/O pins into a more accessible format. Each digital and analog pin is converted into a 3-pin connector consisting of ground (G), voltage (V), and signal (S). This design allows sensor modules with standard 3-pin connectors to be plugged in directly without additional wiring.
The shield also routes communication interfaces such as SPI, I2C, and UART to clearly labeled headers, making it easier to connect devices such as LCD displays, communication modules, and other peripherals. A built-in terminal block allows users to supply external power to connected sensors if they require a voltage different from the board’s default 5V supply.
The voltage distribution can be configured using the onboard jumper. Depending on whether external power is supplied and whether the jumper is connected, the shield can distribute either the Arduino’s 5V supply or an external voltage to the connected sensor modules.
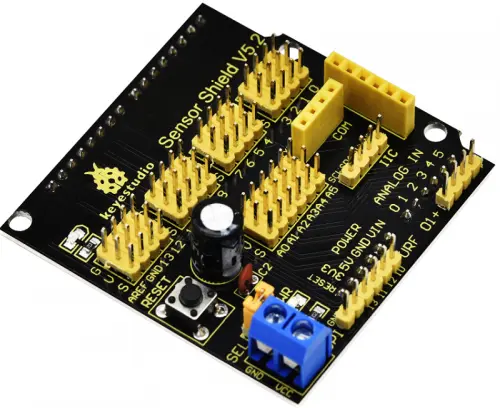
Pinout of the Module:
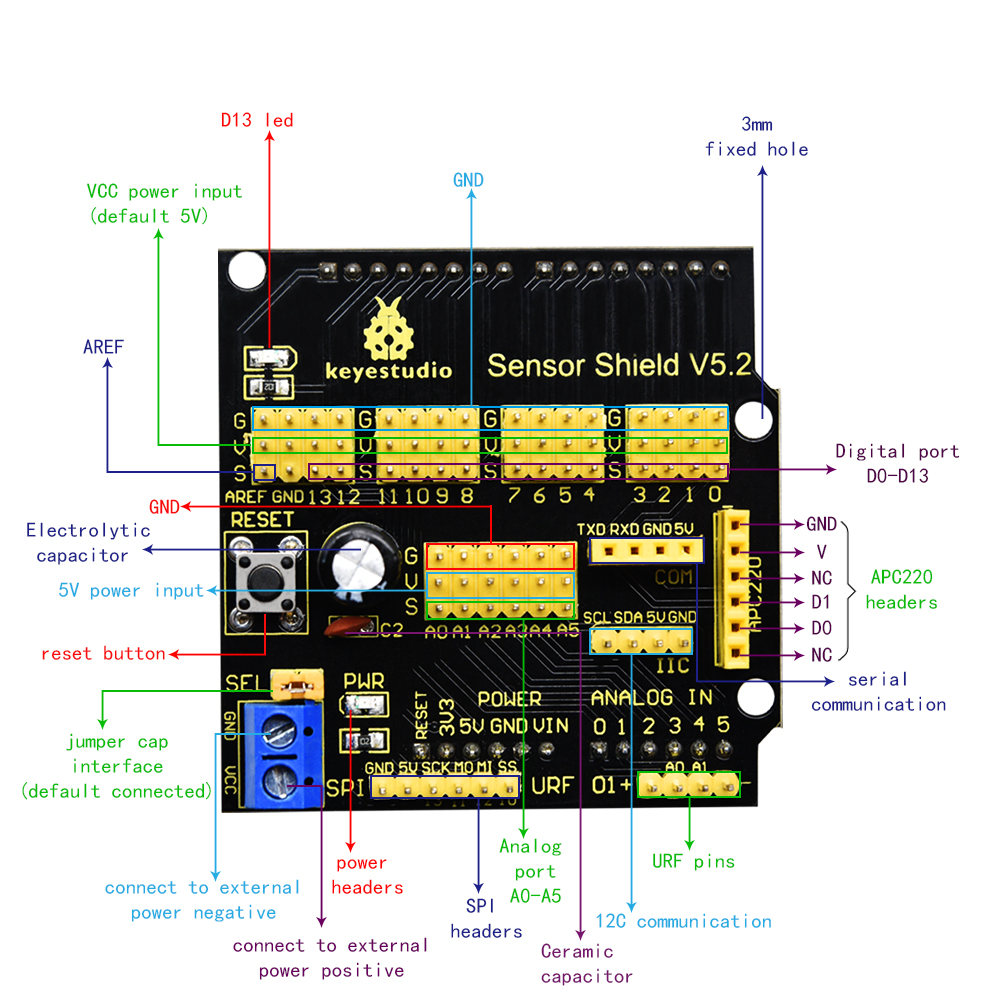
- 3-Pin Sensor Headers: Each Arduino digital and analog pin is expanded into a 3-pin interface consisting of Ground (G), Voltage (V), and Signal (S), allowing direct connection of sensor modules.
- UART Serial Interface: Provides RX and TX pins for serial communication with modules such as Bluetooth or serial sensors.
- I2C Interface: Dedicated SDA and SCL pins allow easy connection to I2C devices like displays, sensors, and EEPROM modules.
- SPI Interface: Provides access to MOSI, MISO, SCK, and SS pins for high-speed communication with SPI devices.
- Reset Button: Allows quick resetting of the Arduino board without disconnecting power.
- Power Terminal Block: Enables external voltage input to power sensor modules requiring a specific voltage.
- Status Indicators: Includes power and D13 indicator LEDs to show board activity and status.
Applications:
- Sensor Experiment Platforms: Easily connect multiple sensors to Arduino without complicated wiring.
- Educational Projects: Ideal for teaching electronics and programming with Arduino.
- Robotics Development: Simplifies sensor connections for robots and automation systems.
- IoT Projects: Allows easy integration of communication modules and sensors.
- Rapid Prototyping: Reduces wiring complexity for quick hardware testing.
- Automation Systems: Suitable for connecting multiple input sensors and output devices.
Circuit:
No additional circuit is required to use the shield. Simply stack the Keyestudio Sensor Shield on top of the Arduino UNO R3 board and connect compatible sensor modules directly to the 3-pin headers.
Connecting with Arduino First Time
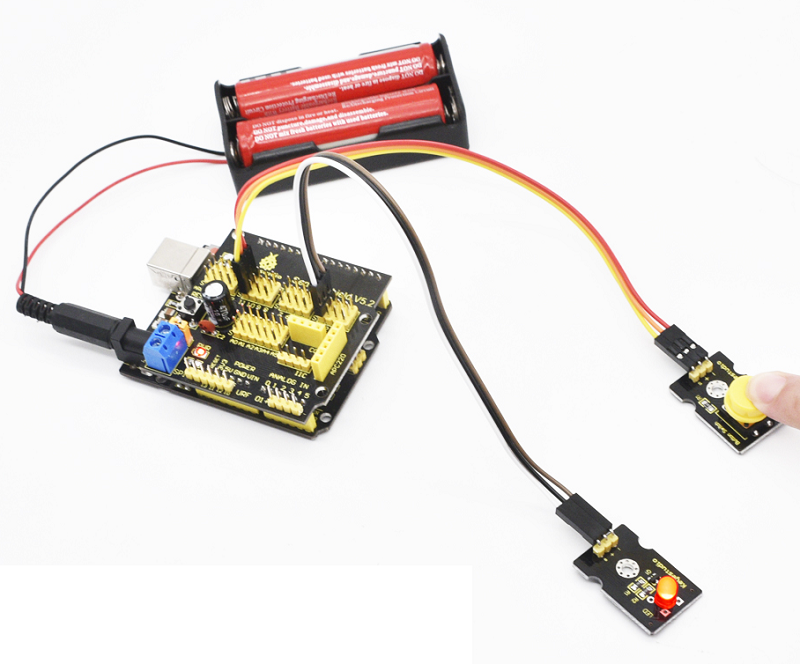
- Stack the Shield: Carefully place the Keyestudio Sensor Shield onto the Arduino UNO R3 board.
- Connect Sensor Modules: Plug sensor modules directly into the 3-pin headers according to their signal pins.
- Power the Board: Power the Arduino through USB or external power supply.
- Upload Code: Open Arduino IDE, select the correct board and port, and upload your sensor program.
- Monitor Data: Use the Serial Monitor to view sensor readings or debug your project.
Code:
The following example reads a digital sensor connected to pin 2 through the sensor shield and displays its state in the Serial Monitor.
const int sensorPin = 2;

void setup() {
  pinMode(sensorPin, INPUT);
  Serial.begin(9600);
}

void loop() {
  int sensorValue = digitalRead(sensorPin);

  if(sensorValue == HIGH) {
    Serial.println("Sensor Triggered");
  } else {
    Serial.println("Sensor Idle");
  }

  delay(500);
}
Technical Details:
- Compatible Boards: Arduino UNO R3 / Leonardo / Easy Plug Control Board
- Interface Type: 3-Pin Sensor Connectors (G, V, S)
- Communication Interfaces: UART, I2C, SPI
- External Power Input: Terminal Block
- Indicator LEDs: Power LED and D13 LED
- Dimensions: 57mm × 57mm × 20mm
- Weight: 20.5g
Resources:
Comparisons:
The Keyestudio Sensor Shield and a traditional breadboard wiring setup both allow multiple sensors to connect to an Arduino board. However, the sensor shield offers several advantages:
- Ease of Connection: The shield provides direct 3-pin connectors for sensors, eliminating the need for jumper wires and breadboards.
- Better Organization: Sensors can be connected neatly, reducing wiring errors and simplifying troubleshooting.
- Integrated Communication Ports: Built-in UART, I2C, and SPI headers make connecting communication modules easier.
- External Power Support: The shield allows external voltage supply for sensors that require different voltage levels.
- Stackable Design: It can be directly mounted on the Arduino UNO R3, creating a compact and professional setup.
Features:
- Fully compatible with Arduino UNO R3 and similar boards
- Expands all digital and analog pins into convenient 3-pin headers (GND, VCC, Signal)
- Integrated reset button for quick board reset
- Built-in power indicator and D13 signal indicator LED
- Supports UART serial communication interface
- Supports I2C communication interface
- Supports SPI communication interface
- Provides URF interface for wireless modules
- Includes APC220 communication module interface
- Terminal blocks allow external voltage supply for sensors
- Stackable design for direct installation on UNO R3 boards
Principle of Work:
The Keyestudio Sensor Shield works as an interface expansion board for Arduino-compatible controllers. When the shield is stacked onto an Arduino UNO R3 board, it extends the original I/O pins into a more accessible format. Each digital and analog pin is converted into a 3-pin connector consisting of ground (G), voltage (V), and signal (S). This design allows sensor modules with standard 3-pin connectors to be plugged in directly without additional wiring.
The shield also routes communication interfaces such as SPI, I2C, and UART to clearly labeled headers, making it easier to connect devices such as LCD displays, communication modules, and other peripherals. A built-in terminal block allows users to supply external power to connected sensors if they require a voltage different from the board’s default 5V supply.
The voltage distribution can be configured using the onboard jumper. Depending on whether external power is supplied and whether the jumper is connected, the shield can distribute either the Arduino’s 5V supply or an external voltage to the connected sensor modules.
Pinout of the Module:
- 3-Pin Sensor Headers: Each Arduino digital and analog pin is expanded into a 3-pin interface consisting of Ground (G), Voltage (V), and Signal (S), allowing direct connection of sensor modules.
- UART Serial Interface: Provides RX and TX pins for serial communication with modules such as Bluetooth or serial sensors.
- I2C Interface: Dedicated SDA and SCL pins allow easy connection to I2C devices like displays, sensors, and EEPROM modules.
- SPI Interface: Provides access to MOSI, MISO, SCK, and SS pins for high-speed communication with SPI devices.
- Reset Button: Allows quick resetting of the Arduino board without disconnecting power.
- Power Terminal Block: Enables external voltage input to power sensor modules requiring a specific voltage.
- Status Indicators: Includes power and D13 indicator LEDs to show board activity and status.
Applications:
- Sensor Experiment Platforms: Easily connect multiple sensors to Arduino without complicated wiring.
- Educational Projects: Ideal for teaching electronics and programming with Arduino.
- Robotics Development: Simplifies sensor connections for robots and automation systems.
- IoT Projects: Allows easy integration of communication modules and sensors.
- Rapid Prototyping: Reduces wiring complexity for quick hardware testing.
- Automation Systems: Suitable for connecting multiple input sensors and output devices.
Circuit:
No additional circuit is required to use the shield. Simply stack the Keyestudio Sensor Shield on top of the Arduino UNO R3 board and connect compatible sensor modules directly to the 3-pin headers.
Connecting with Arduino First Time
- Stack the Shield: Carefully place the Keyestudio Sensor Shield onto the Arduino UNO R3 board.
- Connect Sensor Modules: Plug sensor modules directly into the 3-pin headers according to their signal pins.
- Power the Board: Power the Arduino through USB or external power supply.
- Upload Code: Open Arduino IDE, select the correct board and port, and upload your sensor program.
- Monitor Data: Use the Serial Monitor to view sensor readings or debug your project.
Code:
The following example reads a digital sensor connected to pin 2 through the sensor shield and displays its state in the Serial Monitor.
const int sensorPin = 2;

void setup() {
  pinMode(sensorPin, INPUT);
  Serial.begin(9600);
}

void loop() {
  int sensorValue = digitalRead(sensorPin);

  if(sensorValue == HIGH) {
    Serial.println("Sensor Triggered");
  } else {
    Serial.println("Sensor Idle");
  }

  delay(500);
}
Technical Details:
- Compatible Boards: Arduino UNO R3 / Leonardo / Easy Plug Control Board
- Interface Type: 3-Pin Sensor Connectors (G, V, S)
- Communication Interfaces: UART, I2C, SPI
- External Power Input: Terminal Block
- Indicator LEDs: Power LED and D13 LED
- Dimensions: 57mm × 57mm × 20mm
- Weight: 20.5g
Resources:
Comparisons:
The Keyestudio Sensor Shield and a traditional breadboard wiring setup both allow multiple sensors to connect to an Arduino board. However, the sensor shield offers several advantages:
- Ease of Connection: The shield provides direct 3-pin connectors for sensors, eliminating the need for jumper wires and breadboards.
- Better Organization: Sensors can be connected neatly, reducing wiring errors and simplifying troubleshooting.
- Integrated Communication Ports: Built-in UART, I2C, and SPI headers make connecting communication modules easier.
- External Power Support: The shield allows external voltage supply for sensors that require different voltage levels.
- Stackable Design: It can be directly mounted on the Arduino UNO R3, creating a compact and professional setup.