Features
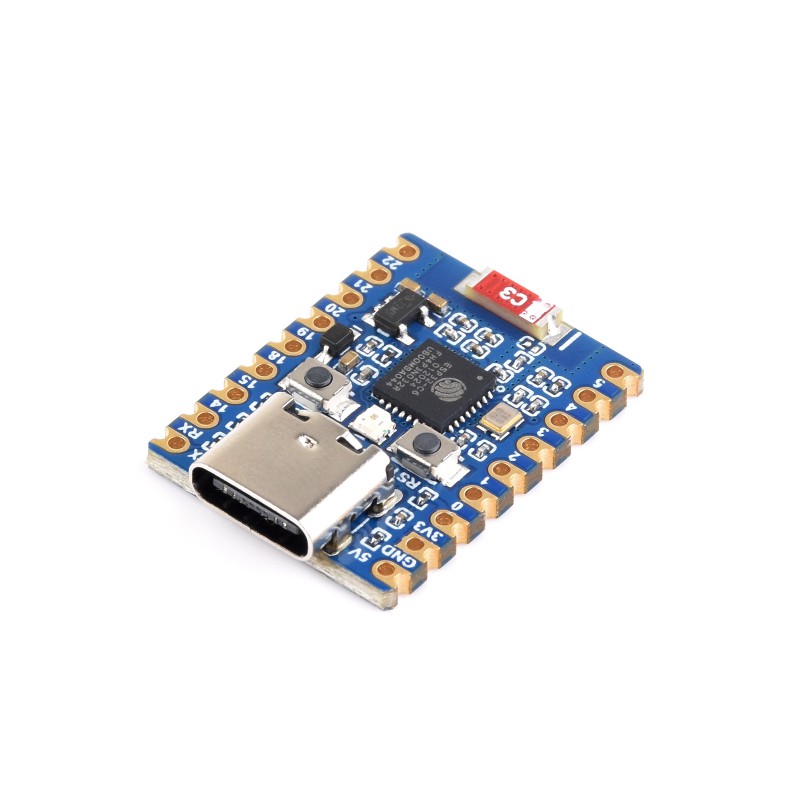
- Based on the ESP32-C6FH4 RISC-V microcontroller.
- 32-bit single-core RISC-V processor running at up to 160 MHz.
- Integrated 2.4 GHz Wi-Fi 6 wireless connectivity.
- Integrated Bluetooth Low Energy (BLE).
- 320 KB ROM, 512 KB HP SRAM, and 16 KB LP SRAM.
- 4 MB onboard Flash memory.
- USB Type-C connector for convenient power and development.
- Compact mini development-board form factor.
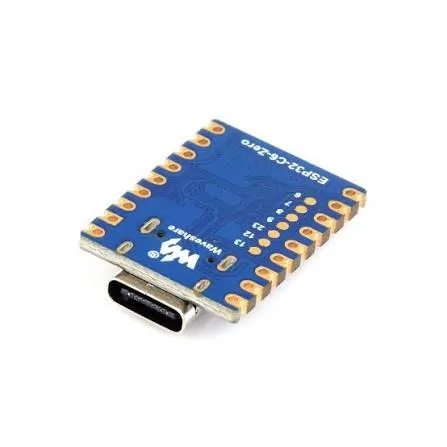
- Castellated edges for direct PCB or carrier-board soldering.
- Rich peripheral interfaces for sensors, displays, communication modules, and other devices.
- Multiple low-power operating modes for energy-efficient applications.
- Compatible with ESP-IDF and Arduino IDE.
- Suitable for IoT, embedded, automation, wearable, and smart-home projects.
- Supplied without pin headers for flexible installation.
Principle of Operation
The ESP32-C6-Zero is built around the ESP32-C6FH4 system-on-chip, which combines a RISC-V processor, memory, wireless connectivity, and multiple peripheral interfaces in a single device. User applications are programmed into the board's Flash memory and executed by the integrated processor.
The integrated 2.4 GHz Wi-Fi 6 interface allows the board to communicate with wireless networks and Internet-connected services, while Bluetooth Low Energy provides short-range wireless communication with compatible devices and peripherals.

The board's GPIO and peripheral interfaces allow external components such as sensors, LEDs, displays, motors, and communication modules to be connected. The USB Type-C connector provides a convenient connection for programming and power, depending on the board's supported USB functionality and software configuration.
For applications requiring reduced power consumption, the ESP32-C6 supports multiple low-power operating modes. This allows developers to balance processing performance, wireless communication, response time, and battery life according to the requirements of the application.
Applications
- IoT and connected-device projects.
- Wi-Fi 6 wireless sensor nodes.
- Bluetooth Low Energy applications.
- Home automation and smart-home devices.
- Embedded control systems.
- Wireless data-logging systems.
- Battery-powered IoT devices.
- Wearable electronics and portable devices.
- Environmental monitoring systems.
- Sensor and actuator projects.
- Rapid embedded-system prototyping.
- Custom PCB and carrier-board development.
Pinout
The ESP32-C6-Zero provides GPIO and peripheral connections through its castellated pads. Since this version is supplied without pin headers, the pads can be soldered directly to a custom PCB or used with separately installed headers if required.

Development Environment
The ESP32-C6-Zero can be programmed using the Arduino IDE or Espressif's ESP-IDF development framework. Arduino IDE provides a simpler environment for rapid prototyping, while ESP-IDF provides more comprehensive access to the ESP32-C6 platform and its advanced features.
How to Use the ESP32-C6-Zero with Arduino IDE
1. Install Arduino IDE
Download and install the latest version of the Arduino IDE on your computer.
2. Add ESP32 Board Support
- Open Arduino IDE.
- Go to File → Preferences.

- Find the Additional boards manager URLs field.
- Add the following URL:
https://espressif.github.io/arduino-esp32/package_esp32_index.json- Click OK to save the settings.

3. Install the ESP32 Board Package
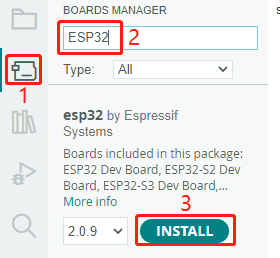
- Go to Tools → Board → Boards Manager.
- Search for ESP32.
- Find esp32 by Espressif Systems.
- Click Install.
- Wait until the installation is complete.
4. Connect the ESP32-C6-Zero
Connect the ESP32-C6-Zero to your computer using a USB Type-C data cable.
Make sure the USB Type-C cable supports data transfer. Some USB cables are designed only for charging and will not allow the board to communicate with the computer.
5. Select the ESP32-C6 Board
In Arduino IDE, go to:
Tools → Board → esp32 → ESP32C6 Dev Module
Select ESP32C6 Dev Module as the board configuration for the ESP32-C6-Zero.
6. Select the COM Port
Go to:
Tools → Port
Select the COM port assigned to the ESP32-C6-Zero. For example:
COM5
COM6
COM7If the port does not appear, disconnect the board, reconnect it, and check Tools → Port again.
7. Upload a Test Program
Use the following simple sketch to verify that the ESP32-C6-Zero is working correctly:
void setup() {
  Serial.begin(115200);
}

void loop() {
  Serial.println("ESP32-C6-Zero is working!");
  delay(1000);
}- Click the Verify button to compile the sketch.
- Click the Upload button to program the ESP32-C6-Zero.
- Wait until Arduino IDE reports that the upload has completed.
8. If the Board Does Not Enter Upload Mode
If Arduino IDE remains at a message such as Connecting........_____....., the board may need to be manually placed into download mode.
- Press and hold the BOOT button on the ESP32-C6-Zero.
- Click Upload in Arduino IDE.
- When Arduino IDE begins connecting to the board, release the BOOT button.
- Wait for the upload to finish.
9. Test the Serial Monitor
- Open Tools → Serial Monitor.
- Set the baud rate to 115200.
You should see a message similar to:
ESP32-C6-Zero is working!
ESP32-C6-Zero is working!
ESP32-C6-Zero is working!10. The ESP32-C6-Zero Is Ready
If the sketch uploads successfully and the message appears repeatedly in the Serial Monitor, the ESP32-C6-Zero has been successfully configured and is ready for development using the Arduino IDE.
You can now install additional Arduino libraries and start developing projects using the ESP32-C6's GPIO, Wi-Fi, Bluetooth LE, ADC, SPI, I2C, UART, and other supported peripherals.
Technical Specifications
| Parameter | Specification |
|---|---|
| Board | ESP32-C6-Zero |
| Main Chip | ESP32-C6FH4 |
| Processor | 32-bit RISC-V single-core |
| Maximum CPU Frequency | Up to 160 MHz |
| ROM | 320 KB |
| High-Performance SRAM | 512 KB |
| Low-Power SRAM | 16 KB |
| Flash Memory | 4 MB |
| Wi-Fi | 2.4 GHz Wi-Fi 6 |
| Bluetooth | Bluetooth Low Energy (BLE) |
| USB Connector | USB Type-C |
| Board Type | Mini development board |
| PCB Connection | Castellated pads |
| Pin Headers | Not included / not pre-installed |
| Development Platforms | Arduino IDE and ESP-IDF |
| Wireless Frequency | 2.4 GHz |
Important Notes
- This version is supplied without pin headers.
- Pin headers can be installed separately if a breadboard-compatible connection is required.
- The ESP32-C6 uses 3.3V logic levels on its GPIO interfaces.
- Wi-Fi 6 and Bluetooth LE provide integrated wireless connectivity without requiring an external wireless module.
- Actual wireless range and performance depend on the antenna, enclosure, environment, interference, and configuration.
- USB Type-C provides a convenient physical connection, but supported USB functionality depends on the ESP32-C6 hardware and software configuration.
- Refer to the board pinout before connecting external peripherals to avoid using pins with special boot or peripheral functions incorrectly.
Resources
Features
- Based on the ESP32-C6FH4 RISC-V microcontroller.
- 32-bit single-core RISC-V processor running at up to 160 MHz.
- Integrated 2.4 GHz Wi-Fi 6 wireless connectivity.
- Integrated Bluetooth Low Energy (BLE).
- 320 KB ROM, 512 KB HP SRAM, and 16 KB LP SRAM.
- 4 MB onboard Flash memory.
- USB Type-C connector for convenient power and development.
- Compact mini development-board form factor.
- Castellated edges for direct PCB or carrier-board soldering.
- Rich peripheral interfaces for sensors, displays, communication modules, and other devices.
- Multiple low-power operating modes for energy-efficient applications.
- Compatible with ESP-IDF and Arduino IDE.
- Suitable for IoT, embedded, automation, wearable, and smart-home projects.
- Supplied without pin headers for flexible installation.
Principle of Operation
The ESP32-C6-Zero is built around the ESP32-C6FH4 system-on-chip, which combines a RISC-V processor, memory, wireless connectivity, and multiple peripheral interfaces in a single device. User applications are programmed into the board's Flash memory and executed by the integrated processor.
The integrated 2.4 GHz Wi-Fi 6 interface allows the board to communicate with wireless networks and Internet-connected services, while Bluetooth Low Energy provides short-range wireless communication with compatible devices and peripherals.
The board's GPIO and peripheral interfaces allow external components such as sensors, LEDs, displays, motors, and communication modules to be connected. The USB Type-C connector provides a convenient connection for programming and power, depending on the board's supported USB functionality and software configuration.
For applications requiring reduced power consumption, the ESP32-C6 supports multiple low-power operating modes. This allows developers to balance processing performance, wireless communication, response time, and battery life according to the requirements of the application.
Applications
- IoT and connected-device projects.
- Wi-Fi 6 wireless sensor nodes.
- Bluetooth Low Energy applications.
- Home automation and smart-home devices.
- Embedded control systems.
- Wireless data-logging systems.
- Battery-powered IoT devices.
- Wearable electronics and portable devices.
- Environmental monitoring systems.
- Sensor and actuator projects.
- Rapid embedded-system prototyping.
- Custom PCB and carrier-board development.
Pinout
The ESP32-C6-Zero provides GPIO and peripheral connections through its castellated pads. Since this version is supplied without pin headers, the pads can be soldered directly to a custom PCB or used with separately installed headers if required.
Development Environment
The ESP32-C6-Zero can be programmed using the Arduino IDE or Espressif's ESP-IDF development framework. Arduino IDE provides a simpler environment for rapid prototyping, while ESP-IDF provides more comprehensive access to the ESP32-C6 platform and its advanced features.
How to Use the ESP32-C6-Zero with Arduino IDE
1. Install Arduino IDE
Download and install the latest version of the Arduino IDE on your computer.
2. Add ESP32 Board Support
- Open Arduino IDE.
- Go to File → Preferences.
- Find the Additional boards manager URLs field.
- Add the following URL:
https://espressif.github.io/arduino-esp32/package_esp32_index.json- Click OK to save the settings.
3. Install the ESP32 Board Package
- Go to Tools → Board → Boards Manager.
- Search for ESP32.
- Find esp32 by Espressif Systems.
- Click Install.
- Wait until the installation is complete.
4. Connect the ESP32-C6-Zero
Connect the ESP32-C6-Zero to your computer using a USB Type-C data cable.
Make sure the USB Type-C cable supports data transfer. Some USB cables are designed only for charging and will not allow the board to communicate with the computer.
5. Select the ESP32-C6 Board
In Arduino IDE, go to:
Tools → Board → esp32 → ESP32C6 Dev Module
Select ESP32C6 Dev Module as the board configuration for the ESP32-C6-Zero.
6. Select the COM Port
Go to:
Tools → Port
Select the COM port assigned to the ESP32-C6-Zero. For example:
COM5
COM6
COM7
If the port does not appear, disconnect the board, reconnect it, and check Tools → Port again.
7. Upload a Test Program
Use the following simple sketch to verify that the ESP32-C6-Zero is working correctly:
void setup() {
  Serial.begin(115200);
}

void loop() {
  Serial.println("ESP32-C6-Zero is working!");
  delay(1000);
}- Click the Verify button to compile the sketch.
- Click the Upload button to program the ESP32-C6-Zero.
- Wait until Arduino IDE reports that the upload has completed.
8. If the Board Does Not Enter Upload Mode
If Arduino IDE remains at a message such as Connecting........_____....., the board may need to be manually placed into download mode.
- Press and hold the BOOT button on the ESP32-C6-Zero.
- Click Upload in Arduino IDE.
- When Arduino IDE begins connecting to the board, release the BOOT button.
- Wait for the upload to finish.
9. Test the Serial Monitor
- Open Tools → Serial Monitor.
- Set the baud rate to 115200.
You should see a message similar to:
ESP32-C6-Zero is working!
ESP32-C6-Zero is working!
ESP32-C6-Zero is working!
10. The ESP32-C6-Zero Is Ready
If the sketch uploads successfully and the message appears repeatedly in the Serial Monitor, the ESP32-C6-Zero has been successfully configured and is ready for development using the Arduino IDE.
You can now install additional Arduino libraries and start developing projects using the ESP32-C6's GPIO, Wi-Fi, Bluetooth LE, ADC, SPI, I2C, UART, and other supported peripherals.
Technical Specifications
| Parameter | Specification |
|---|---|
| Board | ESP32-C6-Zero |
| Main Chip | ESP32-C6FH4 |
| Processor | 32-bit RISC-V single-core |
| Maximum CPU Frequency | Up to 160 MHz |
| ROM | 320 KB |
| High-Performance SRAM | 512 KB |
| Low-Power SRAM | 16 KB |
| Flash Memory | 4 MB |
| Wi-Fi | 2.4 GHz Wi-Fi 6 |
| Bluetooth | Bluetooth Low Energy (BLE) |
| USB Connector | USB Type-C |
| Board Type | Mini development board |
| PCB Connection | Castellated pads |
| Pin Headers | Not included / not pre-installed |
| Development Platforms | Arduino IDE and ESP-IDF |
| Wireless Frequency | 2.4 GHz |
Important Notes
- This version is supplied without pin headers.
- Pin headers can be installed separately if a breadboard-compatible connection is required.
- The ESP32-C6 uses 3.3V logic levels on its GPIO interfaces.
- Wi-Fi 6 and Bluetooth LE provide integrated wireless connectivity without requiring an external wireless module.
- Actual wireless range and performance depend on the antenna, enclosure, environment, interference, and configuration.
- USB Type-C provides a convenient physical connection, but supported USB functionality depends on the ESP32-C6 hardware and software configuration.
- Refer to the board pinout before connecting external peripherals to avoid using pins with special boot or peripheral functions incorrectly.