Features
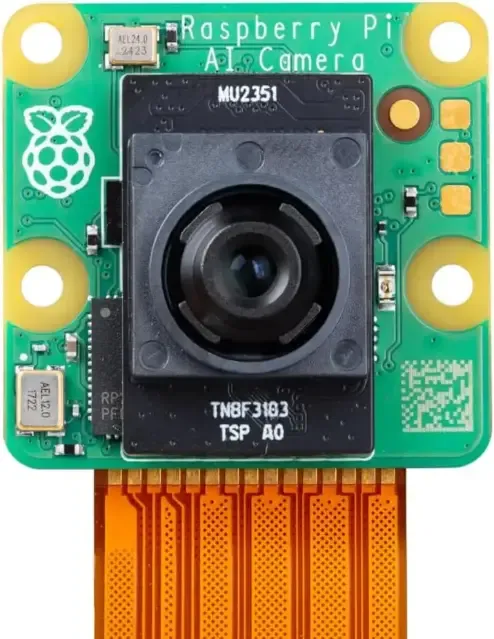
- Official Raspberry Pi AI-enabled camera module.
- Sony IMX500 intelligent vision sensor with integrated AI accelerator.
- 12.3 Megapixel high-resolution image sensor.
- Performs AI inference directly on the camera module.
- Supports object detection, image classification, and computer vision tasks.
- CSI interface for high-speed communication with Raspberry Pi.
- Compatible with Raspberry Pi AI software ecosystem.
- Supports custom AI models.
- Low-latency local image processing without cloud services.
- Compact design suitable for embedded vision systems.
- Ideal for robotics, automation, security, and smart monitoring.
Principle of Operation
Unlike traditional cameras that simply capture images, the Raspberry Pi AI Camera incorporates the Sony IMX500 intelligent vision sensor, which combines image capture with onboard neural network processing. Images are analyzed directly inside the sensor, allowing AI inference to be completed before the processed results are sent to the Raspberry Pi.
This edge AI architecture greatly reduces processor workload, minimizes latency, lowers bandwidth requirements, and improves privacy because image analysis occurs locally without transmitting images to cloud services. Developers can deploy custom neural network models for object detection, classification, tracking, and many other machine vision applications.
Applications
- Object detection
- Image classification
- Smart surveillance systems
- Face and people detection
- Industrial quality inspection
- Robotics and autonomous navigation
- Traffic monitoring
- Smart agriculture
- Home automation
- Educational AI projects
- Machine vision research
- Edge AI development
Pinout
| Connection | Function |
|---|---|
| CSI Ribbon Connector | High-speed Camera Serial Interface to Raspberry Pi |
Wiring
The AI Camera connects directly to the Raspberry Pi using the supplied CSI ribbon cable. No additional wiring is required. Simply connect one end of the ribbon cable to the camera module and the other end to the Raspberry Pi CSI camera connector before enabling the camera interface through Raspberry Pi OS.
Unlock the Port: Gently lift the plastic collar on the Raspberry Pi’s camera port. It should click upward.
Insert the Ribbon Cable:
- For Raspberry Pi 4: The silver contacts on the cable must face away from the Ethernet port (towards the HDMI). The blue tape faces the Ethernet.
- For Raspberry Pi 5: The metal contacts usually face inward toward the board surface, depending on the specific cable type.
Secure the Lock: Push the plastic collar back down until it clicks firmly.
Connect to Camera: Repeat the process on the camera side if the cable is not pre-attached.

| Camera | Raspberry Pi |
|---|---|
| CSI Connector | CSI Camera Port |
Specifications
| Product Type | AI Camera Module |
| Brand | Raspberry Pi |
| Image Sensor | Sony IMX500 |
| Resolution | 12.3 Megapixels |
| AI Processing | Integrated Edge AI Accelerator |
| AI Platform | Sony AITRIOS™ Compatible |
| Interface | CSI (Camera Serial Interface) |
| Connection | Flexible Ribbon Cable |
| Compatibility | Raspberry Pi boards with CSI Camera Connector |
| Focus | Fixed Focus |
| Image Processing | On-device AI Inference |
| Cloud Requirement | Not Required |
| Applications | Computer Vision, Robotics, AI, Automation, Smart Monitoring |
Library Required
Before using the Raspberry Pi AI Camera, ensure your Raspberry Pi is running the latest version of Raspberry Pi OS. Open a Terminal and run the following commands:
sudo apt update
sudo apt full-upgrade -y
sudo apt install -y libcamera-apps python3-picamera2 imx500-all
sudo reboot
The installation includes:
- libcamera – Camera drivers and command-line utilities.
- Picamera2 – Python library for camera applications.
- Raspberry Pi AI Camera Software Stack – Enables AI functionality for the IMX500 AI Camera.
- IMX500 Model Package – Installs pre-trained AI models for object detection and image classification.
After the Raspberry Pi restarts, the AI Camera is ready to use.
Example Python Code
from picamera2 import Picamera2
import time
picam2 = Picamera2()
config = picam2.create_preview_configuration()
picam2.configure(config)
picam2.start()
time.sleep(2)
picam2.capture_file("image.jpg")
print("Image captured!")
Resources
- Raspberry Pi AI Camera Documentation:
https://www.raspberrypi.com/documentation/accessories/ai-camera.html - Getting Started Guide:
https://www.raspberrypi.com/documentation/computers/camera_software.html - Picamera2 Library:
https://github.com/raspberrypi/picamera2 - Sony IMX500 Edge AI Vision Sensor:
https://www.sony-semicon.com/en/products/is/industry/edge-ai-sensing.html - Raspberry Pi Documentation:
https://www.raspberrypi.com/documentation/
Features
- Official Raspberry Pi AI-enabled camera module.
- Sony IMX500 intelligent vision sensor with integrated AI accelerator.
- 12.3 Megapixel high-resolution image sensor.
- Performs AI inference directly on the camera module.
- Supports object detection, image classification, and computer vision tasks.
- CSI interface for high-speed communication with Raspberry Pi.
- Compatible with Raspberry Pi AI software ecosystem.
- Supports custom AI models.
- Low-latency local image processing without cloud services.
- Compact design suitable for embedded vision systems.
- Ideal for robotics, automation, security, and smart monitoring.
Principle of Operation
Unlike traditional cameras that simply capture images, the Raspberry Pi AI Camera incorporates the Sony IMX500 intelligent vision sensor, which combines image capture with onboard neural network processing. Images are analyzed directly inside the sensor, allowing AI inference to be completed before the processed results are sent to the Raspberry Pi.
This edge AI architecture greatly reduces processor workload, minimizes latency, lowers bandwidth requirements, and improves privacy because image analysis occurs locally without transmitting images to cloud services. Developers can deploy custom neural network models for object detection, classification, tracking, and many other machine vision applications.
Applications
- Object detection
- Image classification
- Smart surveillance systems
- Face and people detection
- Industrial quality inspection
- Robotics and autonomous navigation
- Traffic monitoring
- Smart agriculture
- Home automation
- Educational AI projects
- Machine vision research
- Edge AI development
Pinout
| Connection | Function |
|---|---|
| CSI Ribbon Connector | High-speed Camera Serial Interface to Raspberry Pi |
Wiring
The AI Camera connects directly to the Raspberry Pi using the supplied CSI ribbon cable. No additional wiring is required. Simply connect one end of the ribbon cable to the camera module and the other end to the Raspberry Pi CSI camera connector before enabling the camera interface through Raspberry Pi OS.
Unlock the Port: Gently lift the plastic collar on the Raspberry Pi’s camera port. It should click upward.
Insert the Ribbon Cable:
- For Raspberry Pi 4: The silver contacts on the cable must face away from the Ethernet port (towards the HDMI). The blue tape faces the Ethernet.
- For Raspberry Pi 5: The metal contacts usually face inward toward the board surface, depending on the specific cable type.
Secure the Lock: Push the plastic collar back down until it clicks firmly.
Connect to Camera: Repeat the process on the camera side if the cable is not pre-attached.
| Camera | Raspberry Pi |
|---|---|
| CSI Connector | CSI Camera Port |
Specifications
| Product Type | AI Camera Module |
| Brand | Raspberry Pi |
| Image Sensor | Sony IMX500 |
| Resolution | 12.3 Megapixels |
| AI Processing | Integrated Edge AI Accelerator |
| AI Platform | Sony AITRIOS™ Compatible |
| Interface | CSI (Camera Serial Interface) |
| Connection | Flexible Ribbon Cable |
| Compatibility | Raspberry Pi boards with CSI Camera Connector |
| Focus | Fixed Focus |
| Image Processing | On-device AI Inference |
| Cloud Requirement | Not Required |
| Applications | Computer Vision, Robotics, AI, Automation, Smart Monitoring |
Library Required
Before using the Raspberry Pi AI Camera, ensure your Raspberry Pi is running the latest version of Raspberry Pi OS. Open a Terminal and run the following commands:
sudo apt update
sudo apt full-upgrade -y
sudo apt install -y libcamera-apps python3-picamera2 imx500-all
sudo reboot
The installation includes:
- libcamera – Camera drivers and command-line utilities.
- Picamera2 – Python library for camera applications.
- Raspberry Pi AI Camera Software Stack – Enables AI functionality for the IMX500 AI Camera.
- IMX500 Model Package – Installs pre-trained AI models for object detection and image classification.
After the Raspberry Pi restarts, the AI Camera is ready to use.
Example Python Code
from picamera2 import Picamera2
import time
picam2 = Picamera2()
config = picam2.create_preview_configuration()
picam2.configure(config)
picam2.start()
time.sleep(2)
picam2.capture_file("image.jpg")
print("Image captured!")
Resources
- Raspberry Pi AI Camera Documentation:
https://www.raspberrypi.com/documentation/accessories/ai-camera.html - Getting Started Guide:
https://www.raspberrypi.com/documentation/computers/camera_software.html - Picamera2 Library:
https://github.com/raspberrypi/picamera2 - Sony IMX500 Edge AI Vision Sensor:
https://www.sony-semicon.com/en/products/is/industry/edge-ai-sensing.html - Raspberry Pi Documentation:
https://www.raspberrypi.com/documentation/