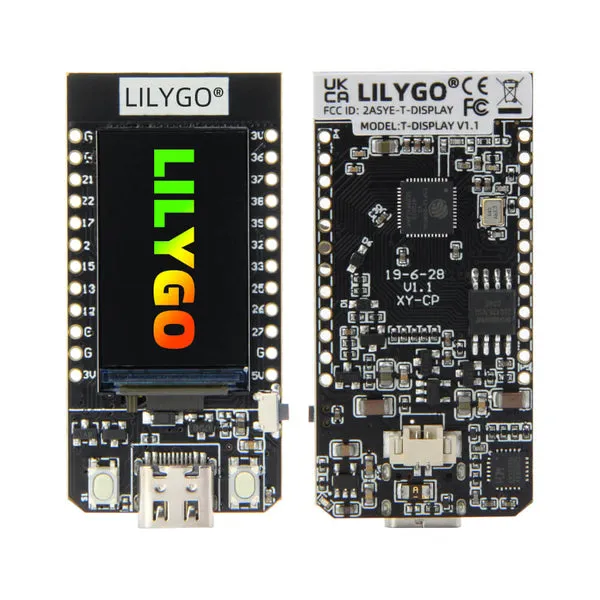
Features
- Powered by Espressif ESP32 dual-core Xtensa LX6 processor.
- Built-in Wi-Fi and Bluetooth connectivity.
- Integrated 1.14-inch IPS TFT color display.
- ST7789V display controller with SPI interface.
- 135 × 240 pixel resolution with 65K RGB colors.
- High-density 260 PPI display for sharp graphics.
- 16MB SPI Flash memory for large applications.
- Integrated CH9102F USB-to-UART bridge for easy programming.
- Onboard TP4054 charging circuit for Li-Po batteries.
- Supports 3.7V Li-Po / Li-Ion battery connection.
- Two onboard programmable user buttons.
- Compact design suitable for portable and embedded applications.
- Compatible with Arduino IDE and ESP32 development tools.
- Supports graphics libraries such as TFT_eSPI.
Principle of Operation
The LilyGO T-Display V1.1 operates using the ESP32 microcontroller as the main processing unit. The ESP32 executes the user firmware, handles wireless communication, processes sensor data, and controls the integrated TFT display.
The IPS display communicates with the ESP32 through a four-wire SPI interface. Display commands and image data are transferred through the SPI bus to the ST7789V display controller, which refreshes the LCD pixels to generate graphics, text, and animations.
The onboard charging circuit manages battery charging through the USB connector, allowing the board to operate as a portable embedded device. The integrated buttons provide direct user input without requiring additional external components.
Applications
- IoT dashboards and smart displays
- Portable monitoring devices
- Wearable electronics
- Smart home controllers
- Wireless sensor displays
- Embedded graphical user interfaces (GUI)
- Robotics control panels
- Industrial monitoring systems
- Battery-powered IoT devices
- Educational ESP32 projects
Pinout
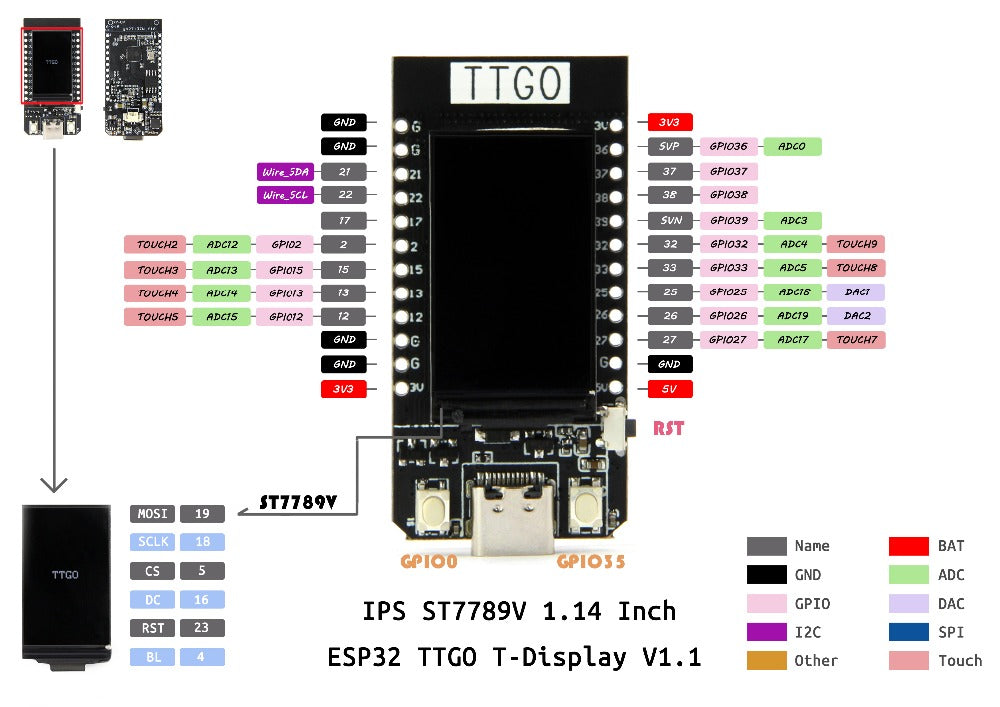
| Function | ESP32 GPIO |
|---|---|
| Display MOSI (SPI Data) | GPIO 19 |
| Display SCLK (SPI Clock) | GPIO 18 |
| Display CS | GPIO 5 |
| Display DC | GPIO 16 |
| Display Reset | GPIO 23 |
| Backlight Control | GPIO 4 (PWM Supported) |
| User Button 1 | GPIO 0 |
| User Button 2 | GPIO 35 |
| Battery Input | 3.7V Li-Po / Li-Ion |
Wiring
The LilyGO T-Display V1.1 includes the TFT display and its internal connections, so no external wiring is required for normal operation. External sensors and modules can be connected through the available GPIO pins.

| Module | Connection |
|---|---|
| TFT Display | Integrated SPI Connection |
| USB Programming | USB Type Connector |
| Battery | 3.7V Li-Po Battery Connector |
| I2C Sensors | Available ESP32 GPIO Pins |
| SPI Devices | Available SPI GPIO Pins |
Library Required
Arduino IDE Setup
Before programming the ESP32 T-Display V1.1 16MB (LilyGO) using the Arduino IDE, install the official ESP32 board support package from Espressif Systems and the required display library.
Step 1: Add ESP32 Board Manager URL
-
Open Arduino IDE.
- Go to File → Preferences.
- In the Additional Boards Manager URLs field, add:
https://raw.githubusercontent.com/espressif/arduino-esp32/gh-pages/package_esp32_index.json
If other Board Manager URLs already exist, separate them using commas.
Step 2: Install ESP32 Board Package
- Open Tools → Board → Boards Manager.
- Search for ESP32.
- Install: ESP32 by Espressif Systems
Step 3: Select ESP32 T-Display V1.1 Board
- Connect the LilyGO ESP32 T-Display V1.1 16MB board using a USB-C cable.
- Go to Tools → Board.
- Select:
- ESP32 Dev Module
Step 4: Install Required Display Library
Install the following library using Arduino IDE Library Manager:
- TFT_eSPI Graphics Library:
https://github.com/Bodmer/TFT_eSPI - Adafruit GFX Library:
https://github.com/adafruit/Adafruit-GFX-Library
Step 5: Recommended Board Settings
| Setting | Recommended Value |
|---|---|
| Board | ESP32 Dev Module |
| Flash Size | 16MB (128Mb) |
| CPU Frequency | 240 MHz (WiFi) |
| Flash Mode | QIO |
| Upload Speed | 921600 baud |
| Partition Scheme | Default |
TFT_eSPI Display Configuration
Configure the TFT_eSPI library for the LilyGO T-Display board:
- Open: TFT_eSPI → User_Setup_Select.h
- Enable:
#include <User_Setups/Setup25_TTGO_T_Display.h>
This enables the correct ST7789 display driver and pin configuration for the T-Display board. :contentReference[oaicite:2]{index=2}
Built-in ESP32 Libraries
The ESP32 Arduino Core includes built-in libraries that can be used without additional installation:
| Library | Function |
|---|---|
| WiFi | Wi-Fi connection and network communication |
| Bluetooth | Bluetooth and BLE communication support |
| SPI | Communication with TFT display and SPI peripherals |
| Wire | I2C communication with sensors and modules |
| Preferences | Save configuration data permanently in flash memory |
Example Library Include
#include <WiFi.h>
#include <SPI.h>
#include <Wire.h>
#include <Preferences.h>
#include <TFT_eSPI.h>
Notes
- Use a USB data cable. Charging-only cables cannot upload programs.
- If the board is not detected, install the required USB-to-Serial driver.
- The ESP32 T-Display V1.1 includes an integrated ST7789 TFT display, programmable buttons, Wi-Fi, Bluetooth, and ESP32 dual-core processing.
- For 16MB Flash versions, ensure the Arduino IDE Flash Size is set correctly to avoid upload issues.
Arduino IDE Setup
- Install ESP32 by Espressif Systems from Boards Manager.
- Select board: ESP32 Dev Module or compatible TTGO ESP32 board.
- Set Flash Size to 16MB (128Mb).
- Disable PSRAM if not required.
- Use TFT_eSPI library version compatible with the project (recommended version 2.0.14 or lower).
- Configure TFT_eSPI User_Setup file for the ST7789V display controller.
Example Code
#include <TFT_eSPI.h>

TFT_eSPI tft = TFT_eSPI();

void setup()
{
  tft.init();
  tft.setRotation(1);

  tft.fillScreen(TFT_BLACK);

  tft.setTextColor(TFT_WHITE);
  tft.setTextSize(2);

  tft.drawString("LilyGO T-Display", 10, 20);
  tft.drawString("ESP32 Ready", 10, 50);
}

void loop()
{

}
Specifications
| Product Type | ESP32 TFT Display Development Board |
| Processor | ESP32-D0WD-Q6 Dual-Core Xtensa LX6 |
| Clock Speed | Up to 240MHz |
| SRAM | 520KB Internal SRAM |
| Flash Memory | 16MB SPI Flash |
| Display Type | IPS TFT LCD |
| Display Controller | ST7789V |
| Display Size | 1.14 Inch |
| Resolution | 135 × 240 Pixels |
| Color Depth | 65K RGB Colors |
| Communication Interface | 4-Wire SPI |
| USB Interface | CH9102F USB-to-UART |
| Battery Charging | TP4054 Integrated Charger |
| Battery Type | 3.7V Li-Po / Li-Ion |
| Dimensions | 51.4mm × 25.2mm |
Resources
- ESP32 Arduino Core:
https://github.com/espressif/arduino-esp32 - TFT_eSPI Library:
https://github.com/Bodmer/TFT_eSPI - LilyGO Official GitHub:
https://github.com/Xinyuan-LilyGO - Arduino IDE:
https://www.arduino.cc/en/software
Features
- Powered by Espressif ESP32 dual-core Xtensa LX6 processor.
- Built-in Wi-Fi and Bluetooth connectivity.
- Integrated 1.14-inch IPS TFT color display.
- ST7789V display controller with SPI interface.
- 135 × 240 pixel resolution with 65K RGB colors.
- High-density 260 PPI display for sharp graphics.
- 16MB SPI Flash memory for large applications.
- Integrated CH9102F USB-to-UART bridge for easy programming.
- Onboard TP4054 charging circuit for Li-Po batteries.
- Supports 3.7V Li-Po / Li-Ion battery connection.
- Two onboard programmable user buttons.
- Compact design suitable for portable and embedded applications.
- Compatible with Arduino IDE and ESP32 development tools.
- Supports graphics libraries such as TFT_eSPI.
Principle of Operation
The LilyGO T-Display V1.1 operates using the ESP32 microcontroller as the main processing unit. The ESP32 executes the user firmware, handles wireless communication, processes sensor data, and controls the integrated TFT display.
The IPS display communicates with the ESP32 through a four-wire SPI interface. Display commands and image data are transferred through the SPI bus to the ST7789V display controller, which refreshes the LCD pixels to generate graphics, text, and animations.
The onboard charging circuit manages battery charging through the USB connector, allowing the board to operate as a portable embedded device. The integrated buttons provide direct user input without requiring additional external components.
Applications
- IoT dashboards and smart displays
- Portable monitoring devices
- Wearable electronics
- Smart home controllers
- Wireless sensor displays
- Embedded graphical user interfaces (GUI)
- Robotics control panels
- Industrial monitoring systems
- Battery-powered IoT devices
- Educational ESP32 projects
Pinout
| Function | ESP32 GPIO |
|---|---|
| Display MOSI (SPI Data) | GPIO 19 |
| Display SCLK (SPI Clock) | GPIO 18 |
| Display CS | GPIO 5 |
| Display DC | GPIO 16 |
| Display Reset | GPIO 23 |
| Backlight Control | GPIO 4 (PWM Supported) |
| User Button 1 | GPIO 0 |
| User Button 2 | GPIO 35 |
| Battery Input | 3.7V Li-Po / Li-Ion |
Wiring
The LilyGO T-Display V1.1 includes the TFT display and its internal connections, so no external wiring is required for normal operation. External sensors and modules can be connected through the available GPIO pins.
| Module | Connection |
|---|---|
| TFT Display | Integrated SPI Connection |
| USB Programming | USB Type Connector |
| Battery | 3.7V Li-Po Battery Connector |
| I2C Sensors | Available ESP32 GPIO Pins |
| SPI Devices | Available SPI GPIO Pins |
Library Required
Arduino IDE Setup
Before programming the ESP32 T-Display V1.1 16MB (LilyGO) using the Arduino IDE, install the official ESP32 board support package from Espressif Systems and the required display library.
Step 1: Add ESP32 Board Manager URL
-
Open Arduino IDE.
- Go to File → Preferences.
- In the Additional Boards Manager URLs field, add:
https://raw.githubusercontent.com/espressif/arduino-esp32/gh-pages/package_esp32_index.json
If other Board Manager URLs already exist, separate them using commas.
Step 2: Install ESP32 Board Package
- Open Tools → Board → Boards Manager.
- Search for ESP32.
- Install: ESP32 by Espressif Systems
Step 3: Select ESP32 T-Display V1.1 Board
- Connect the LilyGO ESP32 T-Display V1.1 16MB board using a USB-C cable.
- Go to Tools → Board.
- Select:
- ESP32 Dev Module
Step 4: Install Required Display Library
Install the following library using Arduino IDE Library Manager:
- TFT_eSPI Graphics Library:
https://github.com/Bodmer/TFT_eSPI - Adafruit GFX Library:
https://github.com/adafruit/Adafruit-GFX-Library
Step 5: Recommended Board Settings
| Setting | Recommended Value |
|---|---|
| Board | ESP32 Dev Module |
| Flash Size | 16MB (128Mb) |
| CPU Frequency | 240 MHz (WiFi) |
| Flash Mode | QIO |
| Upload Speed | 921600 baud |
| Partition Scheme | Default |
TFT_eSPI Display Configuration
Configure the TFT_eSPI library for the LilyGO T-Display board:
- Open: TFT_eSPI → User_Setup_Select.h
- Enable:
#include <User_Setups/Setup25_TTGO_T_Display.h>
This enables the correct ST7789 display driver and pin configuration for the T-Display board. :contentReference[oaicite:2]{index=2}
Built-in ESP32 Libraries
The ESP32 Arduino Core includes built-in libraries that can be used without additional installation:
| Library | Function |
|---|---|
| WiFi | Wi-Fi connection and network communication |
| Bluetooth | Bluetooth and BLE communication support |
| SPI | Communication with TFT display and SPI peripherals |
| Wire | I2C communication with sensors and modules |
| Preferences | Save configuration data permanently in flash memory |
Example Library Include
#include <WiFi.h>
#include <SPI.h>
#include <Wire.h>
#include <Preferences.h>
#include <TFT_eSPI.h>
Notes
- Use a USB data cable. Charging-only cables cannot upload programs.
- If the board is not detected, install the required USB-to-Serial driver.
- The ESP32 T-Display V1.1 includes an integrated ST7789 TFT display, programmable buttons, Wi-Fi, Bluetooth, and ESP32 dual-core processing.
- For 16MB Flash versions, ensure the Arduino IDE Flash Size is set correctly to avoid upload issues.
Arduino IDE Setup
- Install ESP32 by Espressif Systems from Boards Manager.
- Select board: ESP32 Dev Module or compatible TTGO ESP32 board.
- Set Flash Size to 16MB (128Mb).
- Disable PSRAM if not required.
- Use TFT_eSPI library version compatible with the project (recommended version 2.0.14 or lower).
- Configure TFT_eSPI User_Setup file for the ST7789V display controller.
Example Code
#include <TFT_eSPI.h>

TFT_eSPI tft = TFT_eSPI();

void setup()
{
  tft.init();
  tft.setRotation(1);

  tft.fillScreen(TFT_BLACK);

  tft.setTextColor(TFT_WHITE);
  tft.setTextSize(2);

  tft.drawString("LilyGO T-Display", 10, 20);
  tft.drawString("ESP32 Ready", 10, 50);
}

void loop()
{

}
Specifications
| Product Type | ESP32 TFT Display Development Board |
| Processor | ESP32-D0WD-Q6 Dual-Core Xtensa LX6 |
| Clock Speed | Up to 240MHz |
| SRAM | 520KB Internal SRAM |
| Flash Memory | 16MB SPI Flash |
| Display Type | IPS TFT LCD |
| Display Controller | ST7789V |
| Display Size | 1.14 Inch |
| Resolution | 135 × 240 Pixels |
| Color Depth | 65K RGB Colors |
| Communication Interface | 4-Wire SPI |
| USB Interface | CH9102F USB-to-UART |
| Battery Charging | TP4054 Integrated Charger |
| Battery Type | 3.7V Li-Po / Li-Ion |
| Dimensions | 51.4mm × 25.2mm |
Resources
- ESP32 Arduino Core:
https://github.com/espressif/arduino-esp32 - TFT_eSPI Library:
https://github.com/Bodmer/TFT_eSPI - LilyGO Official GitHub:
https://github.com/Xinyuan-LilyGO - Arduino IDE:
https://www.arduino.cc/en/software