Features:
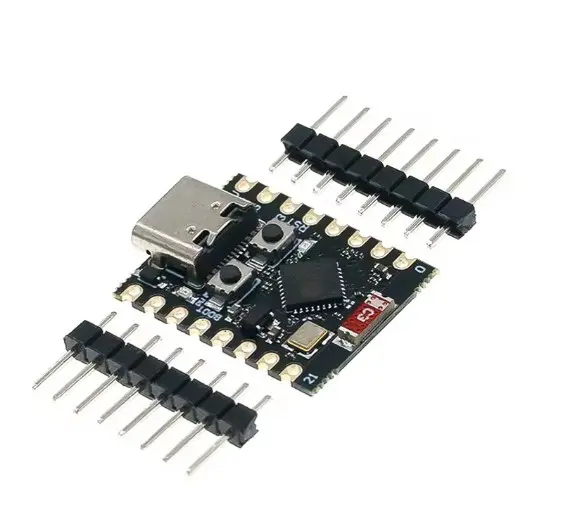
- ESP32-C3 Microcontroller with 32-bit RISC-V architecture.
- Integrated Wi-Fi (2.4GHz) and Bluetooth 5.0 BLE.
- 4MB onboard Flash memory.
- Ultra-compact size (~22.5mm x 18mm).
- Low power consumption with deep sleep support.
- Multiple interfaces: GPIO, ADC, PWM, UART, SPI, I2C.
- Native USB Type-C for programming and power.
- Onboard LED, BOOT and RESET buttons.
- Integrated PCB antenna.
Principle of Work:
The ESP32-C3 executes firmware stored in its internal flash memory. It processes data, controls peripherals, and communicates wirelessly using Wi-Fi and BLE.
- Processing: RISC-V CPU handles computation and logic.
- Connectivity: Built-in Wi-Fi and BLE enable communication.
- Peripheral Control: Interfaces allow sensor and module integration.
- Low Power Modes: Optimized for battery-powered designs.
Pinout of the Module:

| Pin | Function | Description |
|---|---|---|
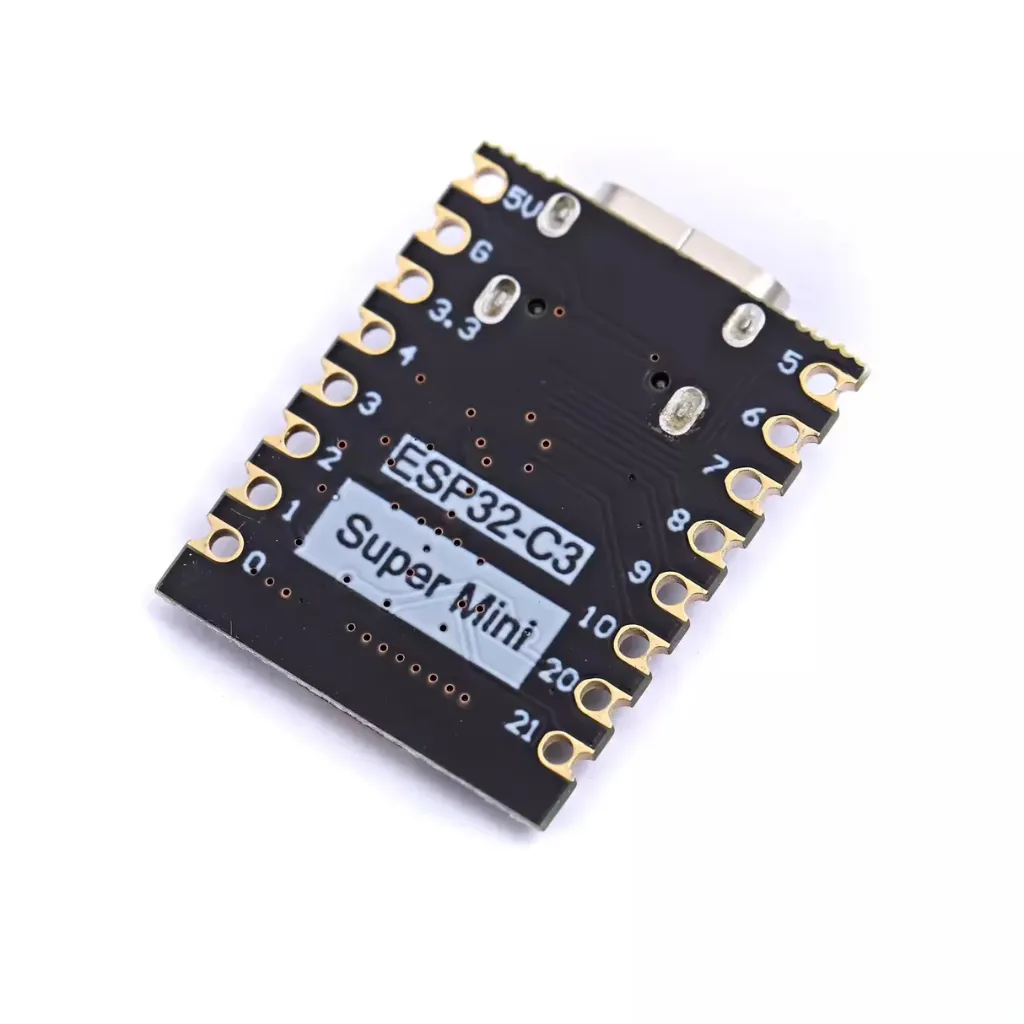
| GPIO0 | Boot / IO | Used for boot mode selection |
| GPIO1 | TX | UART Transmit |
| GPIO3 | RX | UART Receive |
| GPIO2 | IO | General purpose I/O |
| GPIO4 | IO | General purpose I/O |
| GPIO5 | IO | General purpose I/O |
| 3V3 | Power | 3.3V supply |
| GND | Ground | Common ground |
Installing ESP32 Board Package (Arduino IDE):
Follow these steps to install the ESP32 board package in Arduino IDE and start programming your ESP32-C3 Super Mini:
- Open Arduino IDE
- Make sure you are using Arduino IDE version 1.8.x or newer (recommended: Arduino IDE 2.x).
- Add ESP32 Board Manager URL
- Go to File → Preferences.
- Find the field "Additional Board Manager URLs".
- Add the following URL:
https://raw.githubusercontent.com/espressif/arduino-esp32/gh-pages/package_esp32_index.json
- Click OK.
- Open Boards Manager
- Go to Tools → Board → Boards Manager.
- Search for ESP32
- In the search bar, type ESP32.
- Install ESP32 Package
- Find "ESP32 by Espressif Systems".
- Click Install and wait for the installation to complete.
- Select Your Board
- Go to Tools → Board → ESP32 Arduino.
- Select ESP32C3 Dev Module.
- Select Port
- Go to Tools → Port.
- Select the COM port corresponding to your connected board.
Troubleshooting:
- Board not appearing: Restart Arduino IDE after installation.
- Port not detected: Install the correct USB driver (CH340 or CP210x).
- Upload issues: Hold the BOOT button while clicking upload.
Code:
Basic LED Blink Example:
void setup() {
  pinMode(2, OUTPUT); // onboard LED (may vary)
}

void loop() {
  digitalWrite(2, HIGH);
  delay(1000);
  digitalWrite(2, LOW);
  delay(1000);
}
Applications:
- IoT devices
- Smart home automation
- Wireless sensors
- Wearables
- Industrial monitoring
Technical Details:
- Microcontroller: ESP32-C3 (RISC-V)
- Clock Speed: Up to 160 MHz
- Flash: 4MB
- Wi-Fi: 802.11 b/g/n
- Bluetooth: BLE 5.0
- Operating Voltage: 3.3V
- Interfaces: UART, SPI, I2C, PWM, ADC
- USB: Native USB Type-C
Resources:
Features:
- ESP32-C3 Microcontroller with 32-bit RISC-V architecture.
- Integrated Wi-Fi (2.4GHz) and Bluetooth 5.0 BLE.
- 4MB onboard Flash memory.
- Ultra-compact size (~22.5mm x 18mm).
- Low power consumption with deep sleep support.
- Multiple interfaces: GPIO, ADC, PWM, UART, SPI, I2C.
- Native USB Type-C for programming and power.
- Onboard LED, BOOT and RESET buttons.
- Integrated PCB antenna.
Principle of Work:
The ESP32-C3 executes firmware stored in its internal flash memory. It processes data, controls peripherals, and communicates wirelessly using Wi-Fi and BLE.
- Processing: RISC-V CPU handles computation and logic.
- Connectivity: Built-in Wi-Fi and BLE enable communication.
- Peripheral Control: Interfaces allow sensor and module integration.
- Low Power Modes: Optimized for battery-powered designs.
Pinout of the Module:
| Pin | Function | Description |
|---|---|---|
| GPIO0 | Boot / IO | Used for boot mode selection |
| GPIO1 | TX | UART Transmit |
| GPIO3 | RX | UART Receive |
| GPIO2 | IO | General purpose I/O |
| GPIO4 | IO | General purpose I/O |
| GPIO5 | IO | General purpose I/O |
| 3V3 | Power | 3.3V supply |
| GND | Ground | Common ground |
Installing ESP32 Board Package (Arduino IDE):
Follow these steps to install the ESP32 board package in Arduino IDE and start programming your ESP32-C3 Super Mini:
- Open Arduino IDE
- Make sure you are using Arduino IDE version 1.8.x or newer (recommended: Arduino IDE 2.x).
- Add ESP32 Board Manager URL
- Go to File → Preferences.
- Find the field "Additional Board Manager URLs".
- Add the following URL:
https://raw.githubusercontent.com/espressif/arduino-esp32/gh-pages/package_esp32_index.json
- Click OK.
- Open Boards Manager
- Go to Tools → Board → Boards Manager.
- Search for ESP32
- In the search bar, type ESP32.
- Install ESP32 Package
- Find "ESP32 by Espressif Systems".
- Click Install and wait for the installation to complete.
- Select Your Board
- Go to Tools → Board → ESP32 Arduino.
- Select ESP32C3 Dev Module.
- Select Port
- Go to Tools → Port.
- Select the COM port corresponding to your connected board.
Troubleshooting:
- Board not appearing: Restart Arduino IDE after installation.
- Port not detected: Install the correct USB driver (CH340 or CP210x).
- Upload issues: Hold the BOOT button while clicking upload.
Code:
Basic LED Blink Example:
void setup() {
  pinMode(2, OUTPUT); // onboard LED (may vary)
}

void loop() {
  digitalWrite(2, HIGH);
  delay(1000);
  digitalWrite(2, LOW);
  delay(1000);
}
Applications:
- IoT devices
- Smart home automation
- Wireless sensors
- Wearables
- Industrial monitoring
Technical Details:
- Microcontroller: ESP32-C3 (RISC-V)
- Clock Speed: Up to 160 MHz
- Flash: 4MB
- Wi-Fi: 802.11 b/g/n
- Bluetooth: BLE 5.0
- Operating Voltage: 3.3V
- Interfaces: UART, SPI, I2C, PWM, ADC
- USB: Native USB Type-C