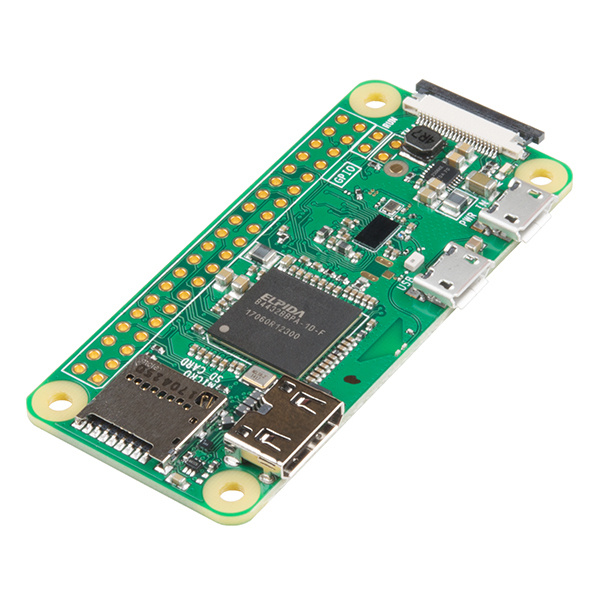

Features:
- Ultra-Compact Design: Small footprint (65mm x 30mm x 5mm) ideal for space-constrained projects.
- Broadcom BCM2835 SoC for reliable performance.
- 1GHz ARM11 CPU for smooth operation.
- 512MB RAM for multitasking and embedded applications.
- Built-in Wi-Fi (2.4GHz 802.11n).
- Bluetooth 4.1 and BLE support.
- Mini HDMI port for video and audio output.
- Micro USB for power and USB OTG functionality.
- 40-pin GPIO header (unpopulated).
- Camera Serial Interface (CSI) support.
- MicroSD card slot for operating system and storage.
Pinout of the Module:
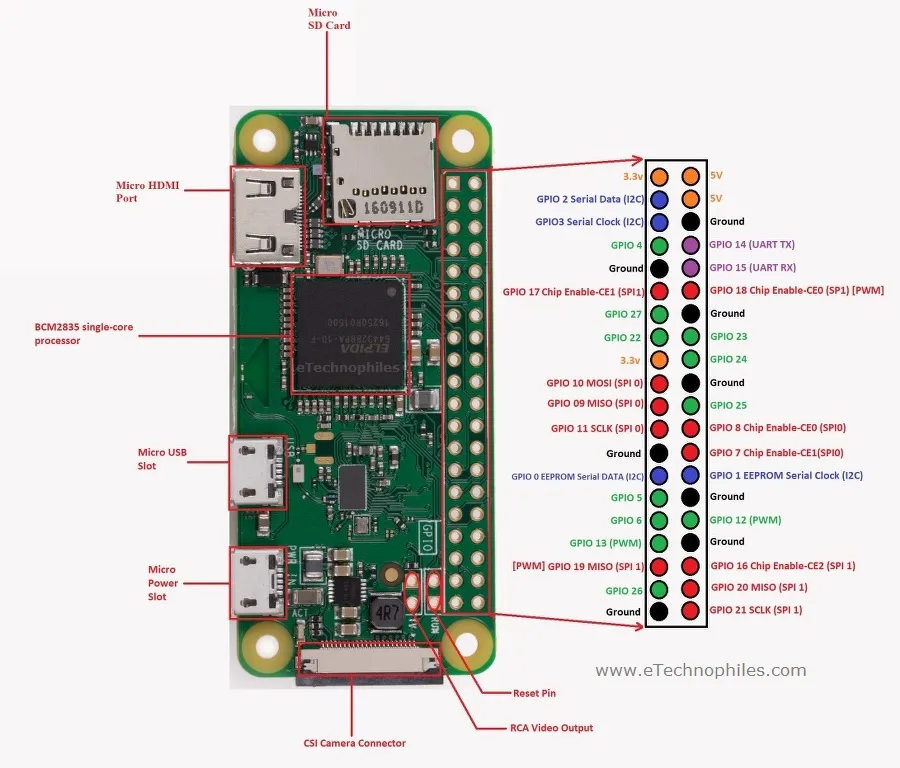
The Raspberry Pi Zero W includes a 40-pin GPIO header (unpopulated) compatible with standard Raspberry Pi pinouts, supporting I2C, SPI, UART, PWM, and general-purpose input/output functions.
Principle of Work:
The Raspberry Pi Zero W operates as a complete single-board computer running a Linux-based operating system from a microSD card.
- Processing: The ARM11 CPU executes programs and operating system tasks.
- Memory Handling: 512MB RAM supports running applications and services.
- Storage: The OS and files are stored on a microSD card.
- Connectivity: Built-in Wi-Fi and Bluetooth enable communication with networks and devices.
- Peripheral Interface: GPIO pins allow interaction with sensors, modules, and external hardware.
Getting Started with Raspberry Pi Zero W:
Follow the steps below to set up your Raspberry Pi Zero W for the first time. This guide will help you install the operating system, connect the required peripherals, and complete the initial configuration.
- Download the Operating System:
Visit the official Raspberry Pi website and download Raspberry Pi OS: https://www.raspberrypi.com/software/
Use the Raspberry Pi Imager tool to flash the OS onto a microSD card (minimum 8GB recommended, Class 10). - Prepare the microSD Card:
Insert the flashed microSD card into the slot on the Raspberry Pi Zero W. - Connect Display:
Use a mini HDMI to HDMI adapter to connect your Raspberry Pi to a monitor or TV. - Connect Input Devices:
Use a USB OTG (On-The-Go) cable to connect a USB hub, then attach your keyboard and mouse. - Power the Device:
Connect a stable 5V / 2A micro USB power supply to the PWR IN port to power the board. - Initial Boot:
The Raspberry Pi will boot automatically. Follow the on-screen setup wizard to:- Select your language and region
- Set your username and password
- Update system software
- Connect to Wi-Fi:
Choose your Wi-Fi network and enter the password to enable internet access. - Optional Headless Setup:
If you prefer to run the Raspberry Pi without a display:- Enable SSH via Raspberry Pi Imager advanced settings
- Pre-configure Wi-Fi credentials
- Start Using Your Raspberry Pi:
Once setup is complete, you can begin installing software, programming, or using it for your projects.
For detailed documentation, visit: https://www.raspberrypi.com/documentation/
Applications:
- IoT and smart home systems.
- Embedded Linux projects.
- Media streaming devices.
- Portable computing systems.
- Educational and prototyping platforms.
Technical Details:
- SoC: Broadcom BCM2835
- CPU: ARM11 @ 1GHz
- RAM: 512MB
- Wireless: 2.4GHz 802.11n Wi-Fi
- Bluetooth: 4.1 + BLE
- Video Output: Mini HDMI (1080p)
- Power Input: 5V via Micro USB
- USB: Micro USB (OTG)
- GPIO: 40-pin (unpopulated)
- Storage: MicroSD card
- Camera Interface: CSI
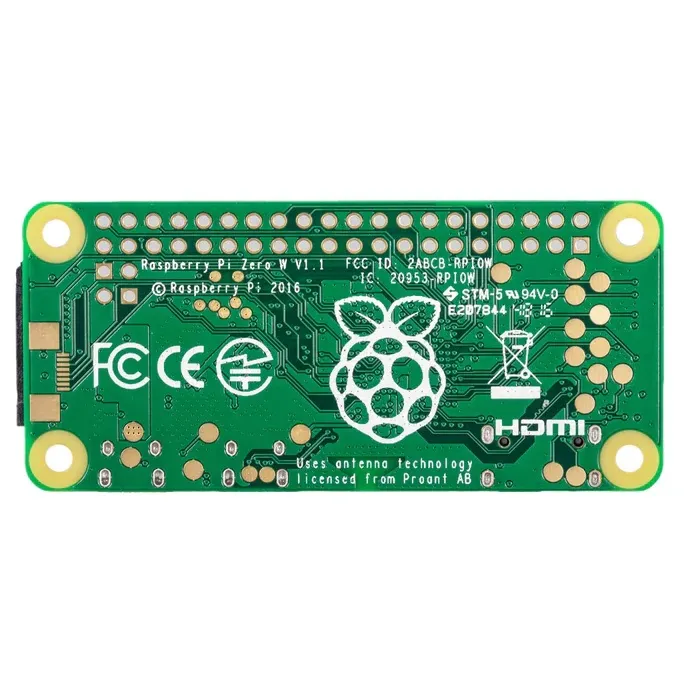
- Dimensions: 65mm x 30mm x 5mm
Features:
- Ultra-Compact Design: Small footprint (65mm x 30mm x 5mm) ideal for space-constrained projects.
- Broadcom BCM2835 SoC for reliable performance.
- 1GHz ARM11 CPU for smooth operation.
- 512MB RAM for multitasking and embedded applications.
- Built-in Wi-Fi (2.4GHz 802.11n).
- Bluetooth 4.1 and BLE support.
- Mini HDMI port for video and audio output.
- Micro USB for power and USB OTG functionality.
- 40-pin GPIO header (unpopulated).
- Camera Serial Interface (CSI) support.
- MicroSD card slot for operating system and storage.
Pinout of the Module:
The Raspberry Pi Zero W includes a 40-pin GPIO header (unpopulated) compatible with standard Raspberry Pi pinouts, supporting I2C, SPI, UART, PWM, and general-purpose input/output functions.
Principle of Work:
The Raspberry Pi Zero W operates as a complete single-board computer running a Linux-based operating system from a microSD card.
- Processing: The ARM11 CPU executes programs and operating system tasks.
- Memory Handling: 512MB RAM supports running applications and services.
- Storage: The OS and files are stored on a microSD card.
- Connectivity: Built-in Wi-Fi and Bluetooth enable communication with networks and devices.
- Peripheral Interface: GPIO pins allow interaction with sensors, modules, and external hardware.
Getting Started with Raspberry Pi Zero W:
Follow the steps below to set up your Raspberry Pi Zero W for the first time. This guide will help you install the operating system, connect the required peripherals, and complete the initial configuration.
- Download the Operating System:
Visit the official Raspberry Pi website and download Raspberry Pi OS: https://www.raspberrypi.com/software/
Use the Raspberry Pi Imager tool to flash the OS onto a microSD card (minimum 8GB recommended, Class 10). - Prepare the microSD Card:
Insert the flashed microSD card into the slot on the Raspberry Pi Zero W. - Connect Display:
Use a mini HDMI to HDMI adapter to connect your Raspberry Pi to a monitor or TV. - Connect Input Devices:
Use a USB OTG (On-The-Go) cable to connect a USB hub, then attach your keyboard and mouse. - Power the Device:
Connect a stable 5V / 2A micro USB power supply to the PWR IN port to power the board. - Initial Boot:
The Raspberry Pi will boot automatically. Follow the on-screen setup wizard to:- Select your language and region
- Set your username and password
- Update system software
- Connect to Wi-Fi:
Choose your Wi-Fi network and enter the password to enable internet access. - Optional Headless Setup:
If you prefer to run the Raspberry Pi without a display:- Enable SSH via Raspberry Pi Imager advanced settings
- Pre-configure Wi-Fi credentials
- Start Using Your Raspberry Pi:
Once setup is complete, you can begin installing software, programming, or using it for your projects.
For detailed documentation, visit: https://www.raspberrypi.com/documentation/
Applications:
- IoT and smart home systems.
- Embedded Linux projects.
- Media streaming devices.
- Portable computing systems.
- Educational and prototyping platforms.
Technical Details:
- SoC: Broadcom BCM2835
- CPU: ARM11 @ 1GHz
- RAM: 512MB
- Wireless: 2.4GHz 802.11n Wi-Fi
- Bluetooth: 4.1 + BLE
- Video Output: Mini HDMI (1080p)
- Power Input: 5V via Micro USB
- USB: Micro USB (OTG)
- GPIO: 40-pin (unpopulated)
- Storage: MicroSD card
- Camera Interface: CSI
- Dimensions: 65mm x 30mm x 5mm