Features
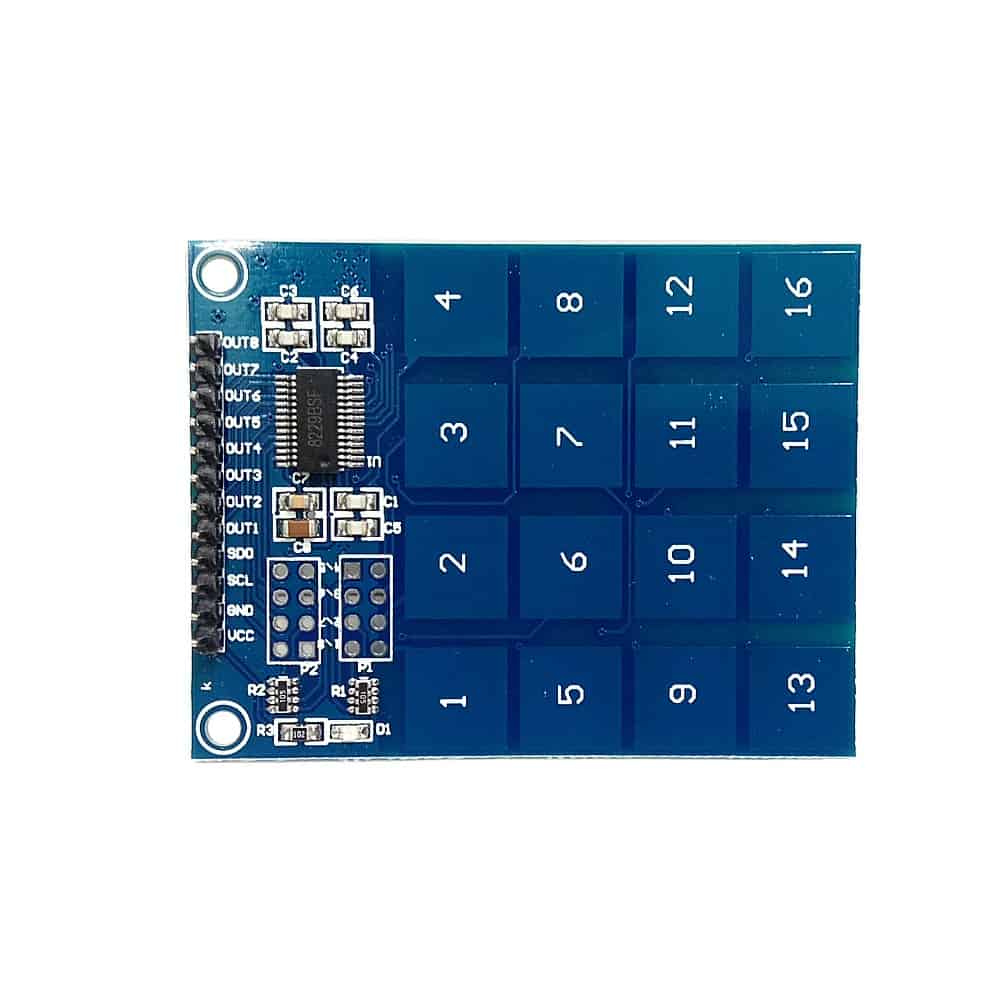
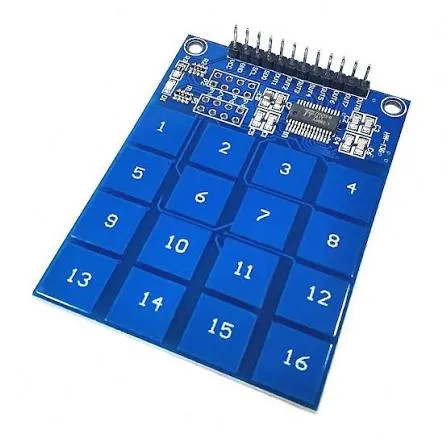
- 16 touch keys: Provides 16 separate capacitive touch electrode areas.
- Capacitive sensing: Detects touch without mechanical switches or moving parts.
- Responsive operation: Provides a convenient touch-based input method for electronic projects.
- Numbered touch pads: Touch electrodes are clearly identified from 1 to 16.
- TTP229 compatible: Designed for use with compatible 16-key capacitive touch controller modules.
- Easy integration: Supplied with 16 jumper wires for connection to a compatible controller.
- Customizable surface: The electrode areas can be marked or labeled for specific applications.
- No mechanical buttons: Provides a flat touch interface without physical button mechanisms.
- Suitable for learning: Useful for experimenting with capacitive touch technology.
- Compact design: Suitable for control panels, prototypes, and interactive projects.
Principle of Operation
Capacitive touch sensing works by detecting changes in electrical capacitance caused when a person touches or approaches a conductive electrode. Each of the 16 pads on the keypad acts as an individual touch electrode.
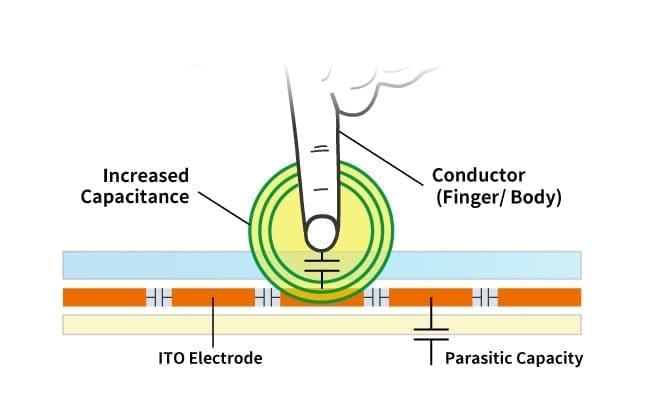
The keypad itself provides the 16 touch electrodes; a compatible capacitive touch controller is required to detect the capacitance changes and convert them into digital key information. A controller such as a TTP229 can scan the electrodes and communicate the detected key states to an Arduino or other microcontroller.
Applications
- Arduino touch-input projects
- Microcontroller user interfaces
- Capacitive touch learning and experimentation
- Touch-based control panels
- Home automation interfaces
- Electronic access-control panels
- Interactive displays and installations
- DIY touch keyboards
- Smart appliance controls
- Educational electronics projects
- Custom human-machine interfaces
Pinout
The keypad provides 16 individual electrode connections, one for each capacitive touch area. These connections are intended to be connected to the corresponding inputs of a compatible capacitive touch controller.

| Key | Electrode | Function |
|---|---|---|
| 1 | Electrode 1 | Capacitive touch input 1 |
| 2–15 | Electrodes 2–15 | Individual capacitive touch inputs |
| 16 | Electrode 16 | Capacitive touch input 16 |
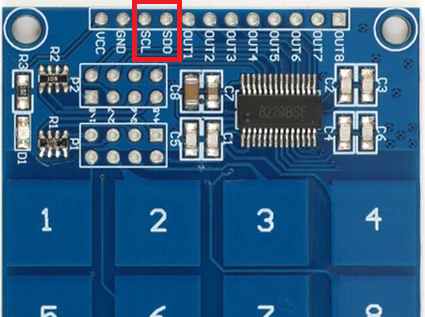
Another way to get the input from this touch keypad is by using its I2C-compatible bus. The I2C-compatible bus on the TTP229 keypad is available for both the 8 and 16-key modes. This two-wire bus is available on the P3 header as shown here:
Note:
- By default, the keypad is in the 8-key mode.
- The SDO pin on the P3 header outputs the 8-bit serial data, indicating the status of the touch buttons 1~8.
- The 16-key mode can be enabled by shorting the TP2 option pin to the VSS, using a jumper cap in the P1 header.
- When the 16-key mode is enabled, the SDO pin on the P3 header outputs the 16-bit serial data, indicating the status of touch buttons 1~16.
- The bits B0~B15 of the serial data indicates the status of the ouch buttons 1~16, respectively.
- By default, the output of the 2-wire bus is the CMOS output active-LOW.
- If the bit is 0, it indicates that the respective touch button was pressed. If the bit is 1, it indicates that the respective touch button was not pressed.
Wiring
Connect each of the 16 keypad electrodes to the corresponding input of a compatible 16-key capacitive touch controller. The controller handles capacitive sensing and provides the communication interface used by the microcontroller.
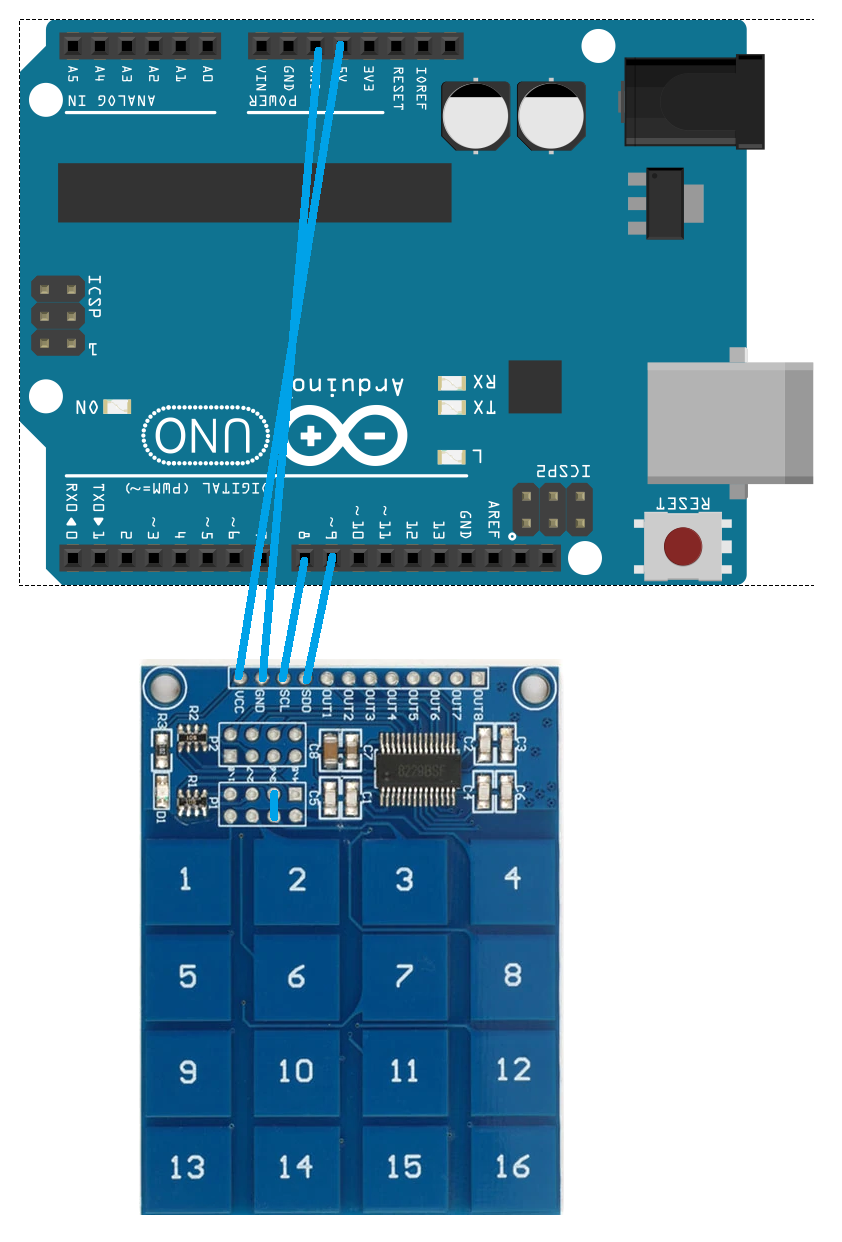
When using a TTP229-based controller, the keypad electrodes are connected to the controller's touch-input channels. The controller is then connected to the Arduino according to the controller module's interface and wiring requirements.
Code:
#define SCL 8
#define SDO 9
byte Key;

byte Read_TTP229_Keypad(void)
{
 byte Num;
 byte Key_State = 0;
 for(Num = 1; Num <= 16; Num++)
 {
   digitalWrite(SCL, LOW);
   if (!digitalRead(SDO))
     Key_State = Num;
     digitalWrite(SCL, HIGH);
 }
 return Key_State;
}

void setup()
{
 Serial.begin(9600);
 pinMode(SCL, OUTPUT);
 pinMode(SDO, INPUT);
}

void loop()
{
 Key = Read_TTP229_Keypad();
 if (Key)
 Serial.println(Key);
 delay(1000);
}
Specifications
| Product Type | 16-Key Capacitive Touch Keypad |
|---|---|
| Number of Keys | 16 |
| Input Type | Capacitive touch |
| Key Layout | Keys numbered 1–16 |
| Electrodes | 16 individual touch electrodes |
| Controller Compatibility | Compatible with 16-key capacitive touch controllers, including TTP229-based modules |
| Microcontroller Interface | Through a compatible capacitive touch controller |
| Jumper Wires | 16 pieces |
| Jumper Wire Length | 150 mm (6 inches) |
Features
- 16 touch keys: Provides 16 separate capacitive touch electrode areas.
- Capacitive sensing: Detects touch without mechanical switches or moving parts.
- Responsive operation: Provides a convenient touch-based input method for electronic projects.
- Numbered touch pads: Touch electrodes are clearly identified from 1 to 16.
- TTP229 compatible: Designed for use with compatible 16-key capacitive touch controller modules.
- Easy integration: Supplied with 16 jumper wires for connection to a compatible controller.
- Customizable surface: The electrode areas can be marked or labeled for specific applications.
- No mechanical buttons: Provides a flat touch interface without physical button mechanisms.
- Suitable for learning: Useful for experimenting with capacitive touch technology.
- Compact design: Suitable for control panels, prototypes, and interactive projects.
Principle of Operation
Capacitive touch sensing works by detecting changes in electrical capacitance caused when a person touches or approaches a conductive electrode. Each of the 16 pads on the keypad acts as an individual touch electrode.
The keypad itself provides the 16 touch electrodes; a compatible capacitive touch controller is required to detect the capacitance changes and convert them into digital key information. A controller such as a TTP229 can scan the electrodes and communicate the detected key states to an Arduino or other microcontroller.
Applications
- Arduino touch-input projects
- Microcontroller user interfaces
- Capacitive touch learning and experimentation
- Touch-based control panels
- Home automation interfaces
- Electronic access-control panels
- Interactive displays and installations
- DIY touch keyboards
- Smart appliance controls
- Educational electronics projects
- Custom human-machine interfaces
Pinout
The keypad provides 16 individual electrode connections, one for each capacitive touch area. These connections are intended to be connected to the corresponding inputs of a compatible capacitive touch controller.
| Key | Electrode | Function |
|---|---|---|
| 1 | Electrode 1 | Capacitive touch input 1 |
| 2–15 | Electrodes 2–15 | Individual capacitive touch inputs |
| 16 | Electrode 16 | Capacitive touch input 16 |
Another way to get the input from this touch keypad is by using its I2C-compatible bus. The I2C-compatible bus on the TTP229 keypad is available for both the 8 and 16-key modes. This two-wire bus is available on the P3 header as shown here:
Note:
- By default, the keypad is in the 8-key mode.
- The SDO pin on the P3 header outputs the 8-bit serial data, indicating the status of the touch buttons 1~8.
- The 16-key mode can be enabled by shorting the TP2 option pin to the VSS, using a jumper cap in the P1 header.
- When the 16-key mode is enabled, the SDO pin on the P3 header outputs the 16-bit serial data, indicating the status of touch buttons 1~16.
- The bits B0~B15 of the serial data indicates the status of the ouch buttons 1~16, respectively.
- By default, the output of the 2-wire bus is the CMOS output active-LOW.
- If the bit is 0, it indicates that the respective touch button was pressed. If the bit is 1, it indicates that the respective touch button was not pressed.
Wiring
Connect each of the 16 keypad electrodes to the corresponding input of a compatible 16-key capacitive touch controller. The controller handles capacitive sensing and provides the communication interface used by the microcontroller.
When using a TTP229-based controller, the keypad electrodes are connected to the controller's touch-input channels. The controller is then connected to the Arduino according to the controller module's interface and wiring requirements.
Code:
#define SCL 8
#define SDO 9
byte Key;

byte Read_TTP229_Keypad(void)
{
 byte Num;
 byte Key_State = 0;
 for(Num = 1; Num <= 16; Num++)
 {
   digitalWrite(SCL, LOW);
   if (!digitalRead(SDO))
     Key_State = Num;
     digitalWrite(SCL, HIGH);
 }
 return Key_State;
}

void setup()
{
 Serial.begin(9600);
 pinMode(SCL, OUTPUT);
 pinMode(SDO, INPUT);
}

void loop()
{
 Key = Read_TTP229_Keypad();
 if (Key)
 Serial.println(Key);
 delay(1000);
}
Specifications
| Product Type | 16-Key Capacitive Touch Keypad |
|---|---|
| Number of Keys | 16 |
| Input Type | Capacitive touch |
| Key Layout | Keys numbered 1–16 |
| Electrodes | 16 individual touch electrodes |
| Controller Compatibility | Compatible with 16-key capacitive touch controllers, including TTP229-based modules |
| Microcontroller Interface | Through a compatible capacitive touch controller |
| Jumper Wires | 16 pieces |
| Jumper Wire Length | 150 mm (6 inches) |