
Features
- Versatile Compatibility: Works seamlessly with Arduino and Raspberry Pi platforms.
- Digital Data Decoding: Receives laser signals and converts them into digital output.
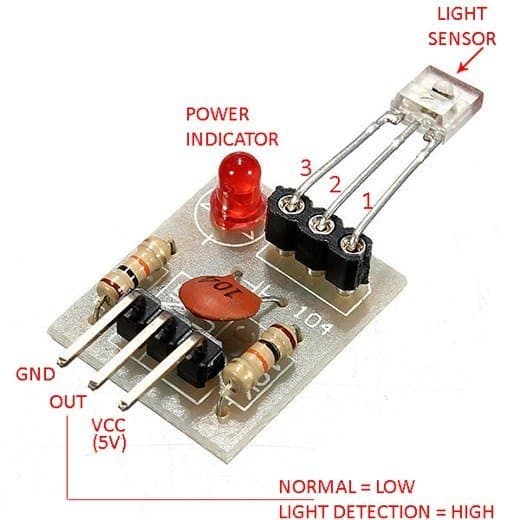
- Output Control: Outputs a HIGH level (5V) when a laser signal is detected and LOW when no signal is present.
- Compact Design: Small size and lightweight, easy to integrate into projects.
- Wide Operating Range: Reliable operation over a broad temperature range.
Specifications
- Working Voltage: 5V DC
- Operating Temperature: -30°C to 85°C
- Dimensions: 24 x 15 x 8 mm (L x W x H)
- Weight: 3 g
- Output Level: HIGH when laser signal is detected, LOW when no laser signal is received
- Application: Laser detection in electronic circuits and embedded systems
Applications
- Laser tripwire and security systems
- Robotics and automation projects
- Optical communication experiments
- Educational electronics projects
- Arduino and Raspberry Pi based prototypes
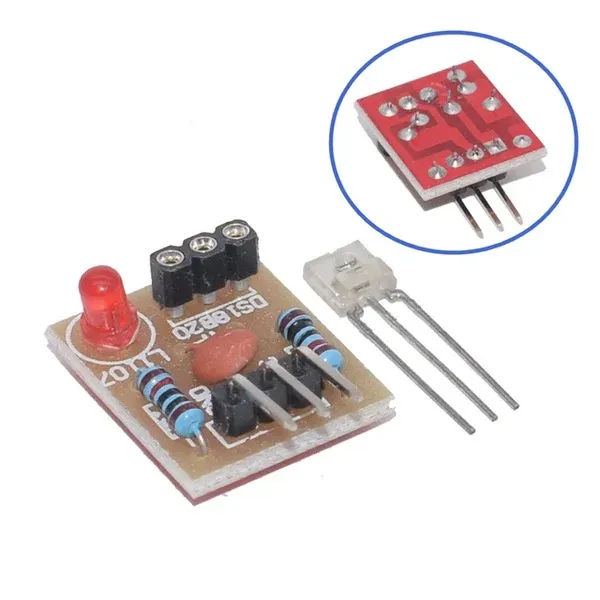
Pinout
Arduino Code

The following Arduino example code demonstrates how to read the digital output from the laser sensor module. When a laser is detected on the sensor input pin, an action such as turning on a buzzer or LED is triggered. Serial output is used to monitor the sensor status.
const int SENSOR_PIN = 2;   // Pin 2 for the sensor
const int ACTION_PIN = 3;   // Pin 3 for the action

void setup() {
  Serial.begin(9600);
  Serial.println("Robojax.com Laser Module Test");

  pinMode(SENSOR_PIN, INPUT);
  pinMode(ACTION_PIN, OUTPUT);
}

void loop() {
  int detected = digitalRead(SENSOR_PIN);

  if (detected == HIGH) {
    digitalWrite(ACTION_PIN, HIGH);
    Serial.println("Detected!");
  } else {
    digitalWrite(ACTION_PIN, LOW);
    Serial.println("No laser");
  }

  delay(200);
}
Features
- Versatile Compatibility: Works seamlessly with Arduino and Raspberry Pi platforms.
- Digital Data Decoding: Receives laser signals and converts them into digital output.
- Output Control: Outputs a HIGH level (5V) when a laser signal is detected and LOW when no signal is present.
- Compact Design: Small size and lightweight, easy to integrate into projects.
- Wide Operating Range: Reliable operation over a broad temperature range.
Specifications
- Working Voltage: 5V DC
- Operating Temperature: -30°C to 85°C
- Dimensions: 24 x 15 x 8 mm (L x W x H)
- Weight: 3 g
- Output Level: HIGH when laser signal is detected, LOW when no laser signal is received
- Application: Laser detection in electronic circuits and embedded systems
Applications
- Laser tripwire and security systems
- Robotics and automation projects
- Optical communication experiments
- Educational electronics projects
- Arduino and Raspberry Pi based prototypes
Pinout
Arduino Code
The following Arduino example code demonstrates how to read the digital output from the laser sensor module. When a laser is detected on the sensor input pin, an action such as turning on a buzzer or LED is triggered. Serial output is used to monitor the sensor status.
const int SENSOR_PIN = 2;   // Pin 2 for the sensor
const int ACTION_PIN = 3;   // Pin 3 for the action

void setup() {
  Serial.begin(9600);
  Serial.println("Robojax.com Laser Module Test");

  pinMode(SENSOR_PIN, INPUT);
  pinMode(ACTION_PIN, OUTPUT);
}

void loop() {
  int detected = digitalRead(SENSOR_PIN);

  if (detected == HIGH) {
    digitalWrite(ACTION_PIN, HIGH);
    Serial.println("Detected!");
  } else {
    digitalWrite(ACTION_PIN, LOW);
    Serial.println("No laser");
  }

  delay(200);
}